
How to grant and revoke privileges in MySQL
When it comes to keeping databases and data secure, it is recommended to use privileges. They can help you control who can access database data and do not allow users without specified permissions to view, modify, or delete database objects or data.
In the article, we'll explore how to grant and revoke privileges on any level using the GRANT and REVOKE commands and dbForge Studio for MySQL, a powerful GUI tool for database development, management, testing, and deployment.
Role of privileges in MySQL database security
To get started, let us identify what a privilege is. In MySQL, privileges are rights or permissions assigned to users, which decide whether they are allowed to perform different operations within the MySQL database. These operations may include accessing databases, executing queries, modifying data, creating or deleting tables, and managing other users' privileges. Therefore, if a user has the privilege to execute a specific command, MySQL executes the statement. Otherwise, an error will occur.
You can assign a privilege to the user account using the GRANT statement.
GRANT privilege
ON privilege_level TO account_name;
where:
- privilege is an operation that the user account will be allowed to perform, such as SELECT, INSERT, DROP, etc. If you want to grant multiple privileges, separate them by commas.
- privilege_level is the level of access, such as global, database, or database object, to which the privileges can be applied.
- account_name is the username to which the privileges will be granted.
MySQL supports the following types of privileges to access and control the database:
Global
They can be used to manage all databases located on the current MySQL server and control administrative tasks, such as creating or deleting databases, managing users, and setting server parameters. To assign the global privilege, use the following syntax:
GRANT privilege
ON *.* TO username;
Database
They give permissions to manage all objects from the specified database and determine what operations users can perform within those databases. To assign the database-level privilege, use the following syntax:
GRANT privilege
ON database_name.* TO username;
Table
They provide users with the right to manage rows from the specified database table and determine what operations users can perform on those tables. To assign the table-level privilege, use the following syntax:
GRANT privilege
ON database_name.table_name TO username;
Column
They allow users to perform the defined operations, for example, SELECT or DELETE, for the specified columns of the database table. Note that the column must be specified for each privilege. To assign the column-level privilege, use the following syntax:
GRANT privilege (column1), privilege (column2)
ON table_name TO username;
Stored routine
They control access to stored procedures and functions within the database, including the ability to execute, alter, or drop them. To assign the stored routine privilege, use the following syntax:
GRANT privilege
ON PROCEDURE procedure_name TO username;
Proxy user
They allow one user to be a proxy for another. The proxy user receives all the privileges of the proxied user. To assign the proxy user privilege, use the following syntax:
GRANT PROXY
ON proxied_user TO proxy_user;
So, managing privileges ensures that data access is restricted to authorized users, helps organizations protect their sensitive information, and maintains compliance with regulatory requirements.
Show user privileges in MySQL
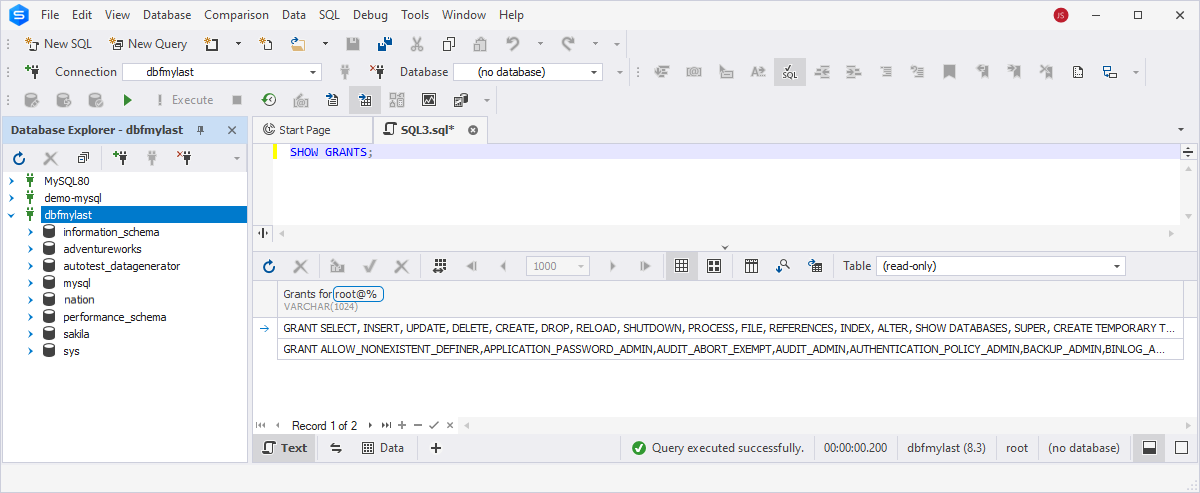
In MySQL, you can view user privileges using the SHOW GRANTS command. The command displays the privileges given to the user currently connected to the database.
SHOW GRANTS;
For example, you can execute the SHOW GRANTS command to list all global privileges for the user - root on the dbfmylast server.
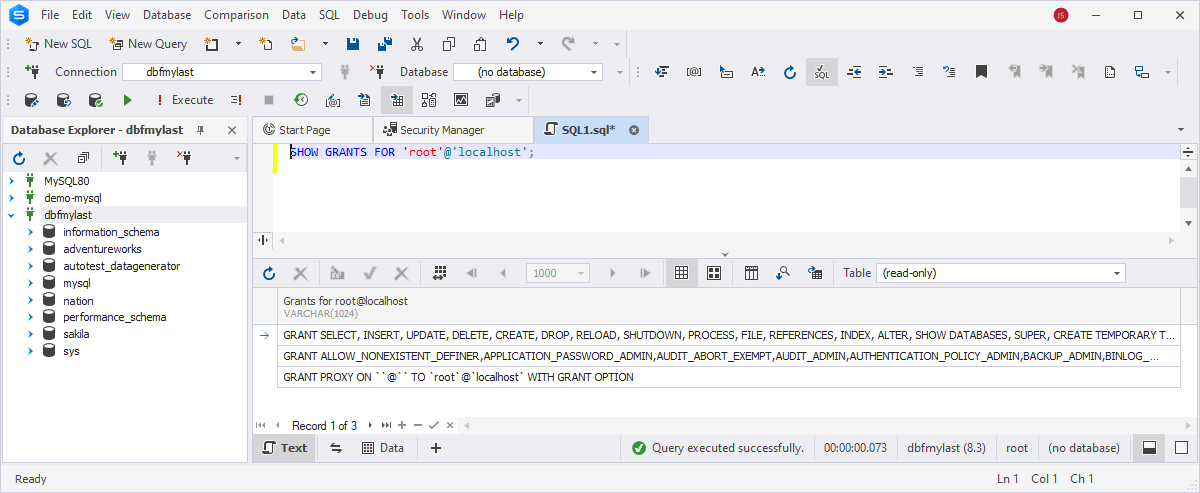
You can also see the privileges granted to the specific user account from which the user can be connected. In such cases, if the current server and the hostname of the user whose permissions you want to check differ, it is recommended to specify the hostname or IP address in the command. To show the privileges, execute the following command:
SHOW GRANTS FOR 'username'@'hostname';
Let us consider the following example. The command SHOW GRANTS FOR 'root'@'localhost'; displays the privileges granted to the user account root when connecting from the hostname 'localhost'. These privileges may include permissions to perform different actions, such as accessing specific databases, executing certain SQL queries (for example, SELECT, INSERT, UPDATE, DELETE, etc.), creating or dropping databases and tables, etc.
In the command, replace the following parameters with your actual data:
- username is the username of the user whose privileges you want to view.
- hostname is the hostname or IP address from which the user is connecting.
Show privileges for all users on a MySQL database
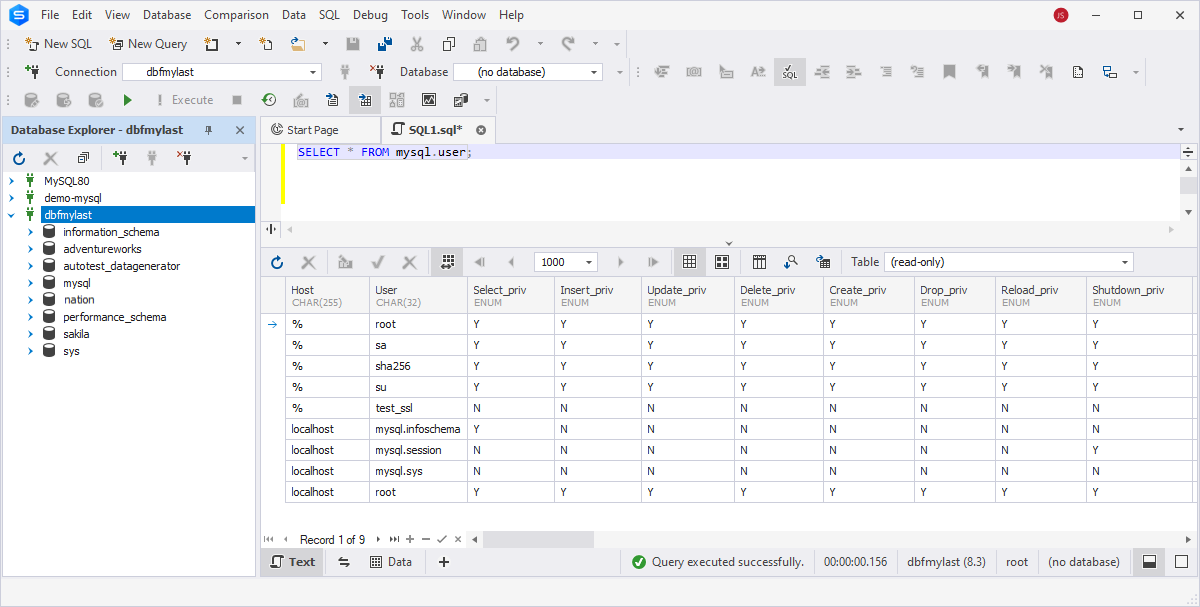
Now, we can view the permissions granted to all users connected to a MySQL database. One of the ways to do this is to query the following SELECT statement:
SELECT * FROM mysql.user;
This query retrieves information about all user accounts stored in the mysql.user system table, including their privileges. The result will include columns, such as Host, User, and various privileges columns like Select_priv, Insert_priv, Update_priv, etc.
However, it should be noted that you need to have administrative privileges or at least the SELECT privilege on the mysql system database.
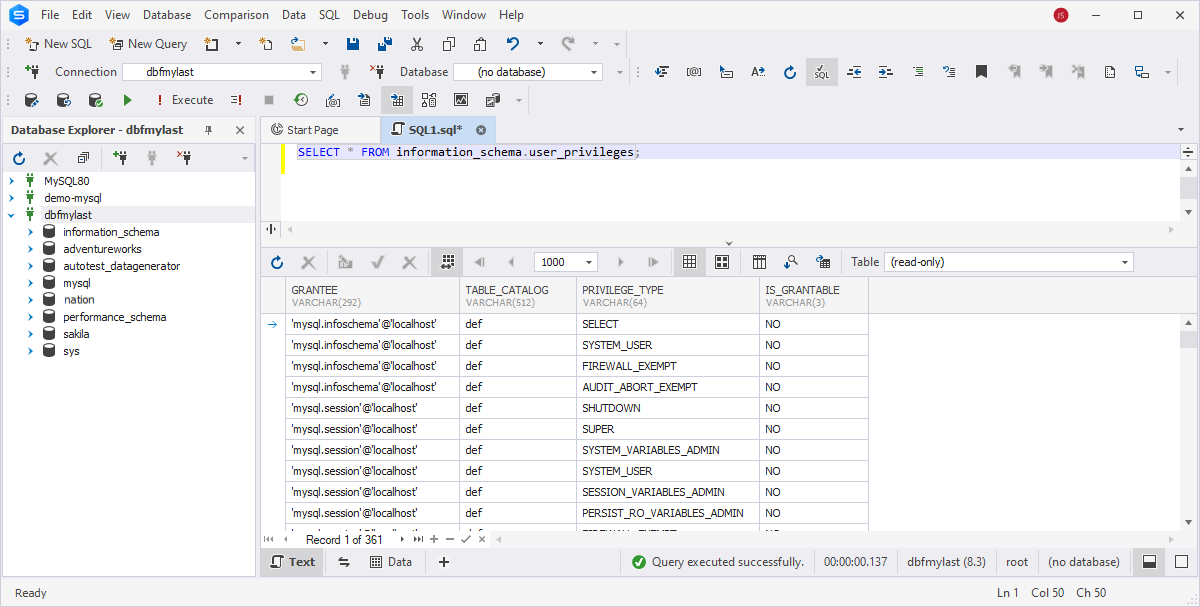
Another way to show privileges granted to all users that exist in a MySQL database is to query user_privileges in information_schema.
SELECT * FROM information_schema.user_privileges;
where information_schema.user_privileges is a system view that provides information about user privileges. It contains details about the privileges granted to users, including the user account and the host from which the user is connecting.
When you execute this command, it will return a result set containing the user account to whom the permissions were granted, a host, a privilege type, and information about whether the user has the privilege to grant the same privilege to other users. In the latter, if the IS_GRANTABLE column has the YES value, the user has the privilege to assign the same privilege to other users. In other words, the user has the right to manage access permissions for other users. If the value is NO, the user does not have permission to assign the same privilege to others.
Grant all privileges in MySQL
Now, we'll go through some examples of how to grant privileges to users in MySQL. For instance, you need to provide a specific user with full access and all permissions over all databases, so only this person can have complete ownership to manage databases, tables, access, functions, etc. You can achieve this using the GRANT ALL PRIVILEGES statement:
GRANT ALL PRIVILEGES ON *.* TO 'username'@'hostname';
Executing this statement will grant all privileges on all databases and tables to the specified user at the destination host. However, it does not automatically grant the WITH GRANT OPTION or PROXY privileges.
- WITH GRANT OPTION allows a user to share or remove permissions from other users. When you give someone permission using the WITH GRANT OPTION clause, they can share those privileges with other users. But if you don't include WITH GRANT OPTION, users can't transfer those permissions further, even if they have been given all permissions.
- PROXY allows a user to connect as another user without providing the password for that user. This privilege is not granted by default with ALL PRIVILEGES. It should be assigned explicitly if required.
So, to assign the WITH GRANT OPTION or PROXY privileges along with ALL PRIVILEGES, you would need to include them explicitly in the GRANT statement as follows:
GRANT ALL PRIVILEGES ON *.* TO 'username'@'hostname' WITH GRANT OPTION;
If you want to give all privileges over the specified database, modify the statement as follows:
GRANT ALL PRIVILEGES ON database_name.* TO 'username'@'hostname';
You can also provide full ownership over one table from the database using the following statement:
GRANT ALL PRIVILEGES ON database_name.table_name TO 'username'@'hostname';
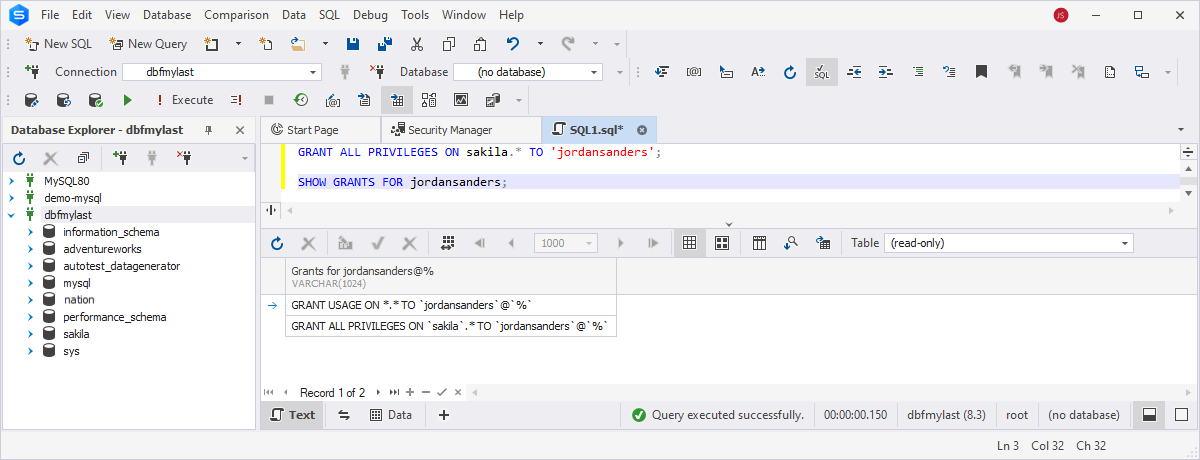
For example, assign all privileges over the sakila database to the user - jordansanders:
GRANT ALL PRIVILEGES ON sakila.* TO 'jordansanders';
Then, verify that the permissions were granted running the SHOW GRANTS FOR statement:
SHOW GRANTS FOR jordansanders;
The results grid displays all the permissions available for the user jordansanders on the sakila database:
How to grant read-only privileges
There might be cases when you want users only to view data from the tables without the ability to modify or delete it. You can do this by giving the SELECT privilege. So, to grant read-only access, execute the following statement:
GRANT SELECT ON database_name.* TO 'username'@'hostname';
Don't forget to replace the following parameters with your actual data:
- database_name is the name of the database to which you want to grant read-only access. If you want to do this for all databases, use *.*.
- username is the username of the account.
- hostname is the hostname or IP address from which the user will connect.
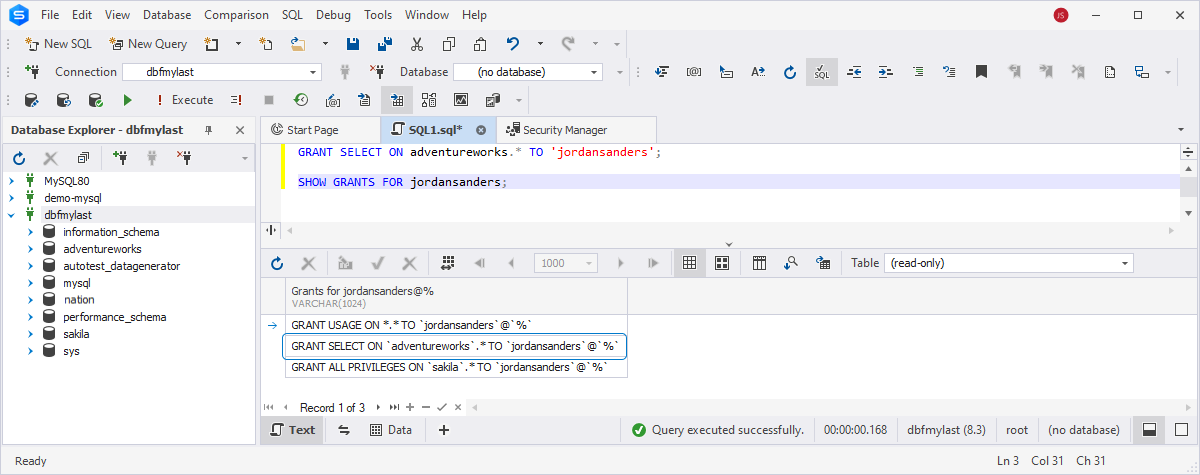
For example, provide the user jordansanders with read-only access to the adventureworks database:
GRANT SELECT ON adventureworks.* TO 'jordansanders';
Then, check whether the privileges have been assigned:
SHOW GRANTS FOR jordansanders;
In the output, you'll see the permissions the user has, including the read-only access privilege.
Grant privileges using a GUI tool
We have demonstrated how you can give permissions using the GRANT statement. Now, we would like to show the easiest method to assign permissions using Security Manager available in dbForge Studio For MySQL.
Security Manager is an advanced administration tool that allows you to create, update, or delete logins, users, and roles, manipulate user accounts, assign or modify roles visually, grant object permissions, and revoke user privileges and access rights.
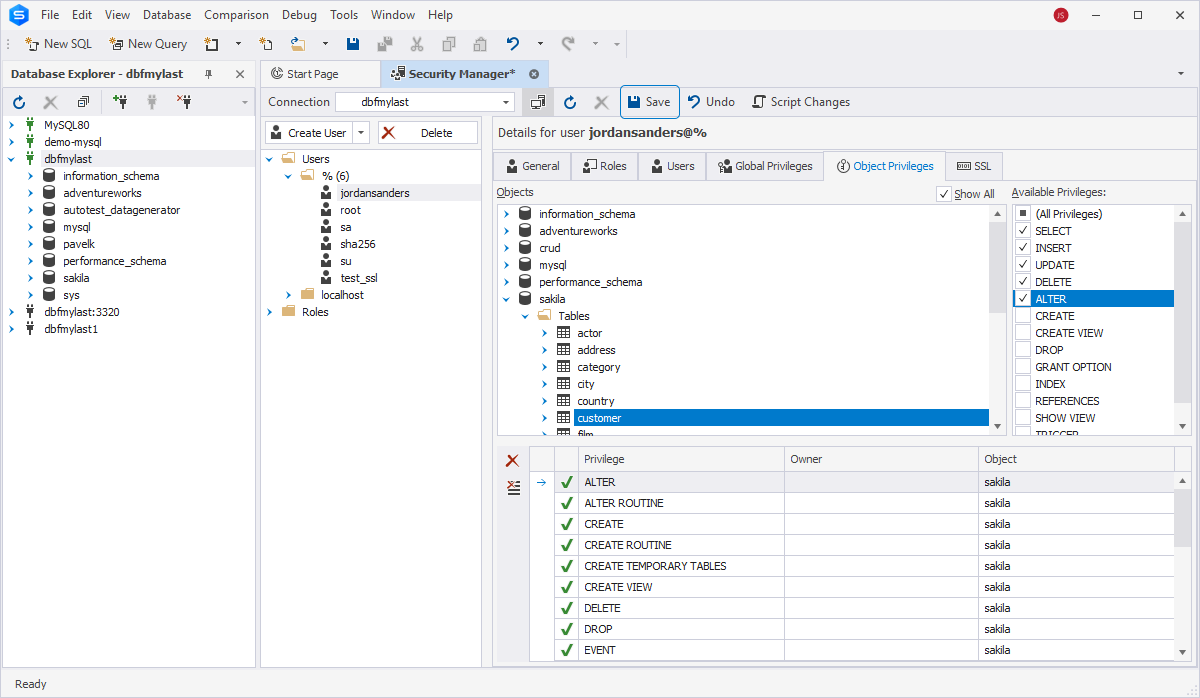
Security Manager allows global and object privileges to be granted. Let us now see how to grant permissions on the database object. Begin by opening the Studio.
- On the ribbon, select Database > Security Manager. This will open the Security Manager.
- Select the user you want to grant permissions to and go to the Object Privileges tab.
- In the Objects tree, select the database object for which you want to set permissions.
- In the Available Privileges pane, a list of privileges you can assign is displayed - select the checkboxes next to the required privileges. Select the checkboxes next to the required privileges.
- On the toolbar, click Save to apply the changes.
Note that the grid under the Objects tree displays the current privileges of the selected user (account).
How to revoke all privileges in MySQL
We have already looked at how to grant privileges to the user, and now it is time to review how to revoke them.
In MySQL, the REVOKE command can be used to remove privileges from a user account. The syntax of the command is as follows:
REVOKE ALL PRIVILEGES ON *.* FROM 'user_name'@'host_name';
where:
- *.* means that the privileges will be removed from any database and any database object.
- user_name is the user account from which you want to remove privileges.
- hostname is the hostname or IP address from which the specified user is connecting.
After executing this command, the user will no longer have any privileges within the MySQL server. However, it is important to note that this command does not remove the user account itself; it only deletes the privileges associated with the user account.
Let us revoke all privileges for the user jordansanders we granted before, namely, the read-only access to the adventureworks database and all privileges to the sakila database. To do this, execute the following query:
REVOKE ALL PRIVILEGES ON *.* FROM 'jordansanders';
Then, run the SHOW GRANTS FOR query to verify that the privileges have been removed:

As you can see, the previously assigned privileges have been revoked. Although the GRANT USAGE ON *.* TO 'jordansanders'@'%' is displayed, it only grants the user account jordansanders the permission to connect to the MySQL server from any host ('%'); it does not give any specific privileges on any databases or tables. In other words, it allows the user to establish a connection to the MySQL server without any additional permissions.
Revoke database-level privileges
MySQL supports revoking privileges at the database level using the REVOKE command. So, to remove privileges from a specific database, specify the database name in the REVOKE command as follows:
REVOKE privileges ON database_name.* FROM 'user_name'@'host_name';
where:
- privileges specifies the privileges you want to revoke from the user. It could be a single privilege or a comma-separated list of multiple privileges - for example, SELECT, INSERT, UPDATE, DELETE, etc.
- database_name specifies the database from which you want to revoke privileges.
- user_name is the user account from which you want to remove privileges.
- hostname is the hostname or IP address from which the specified user is connecting.
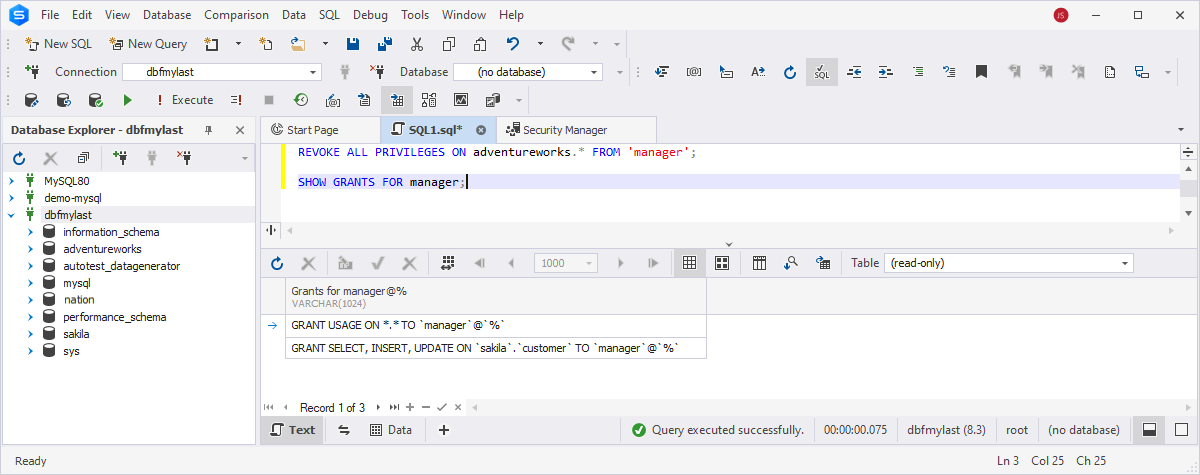
Let us take the user manager as an example and view the privileges it has been assigned.
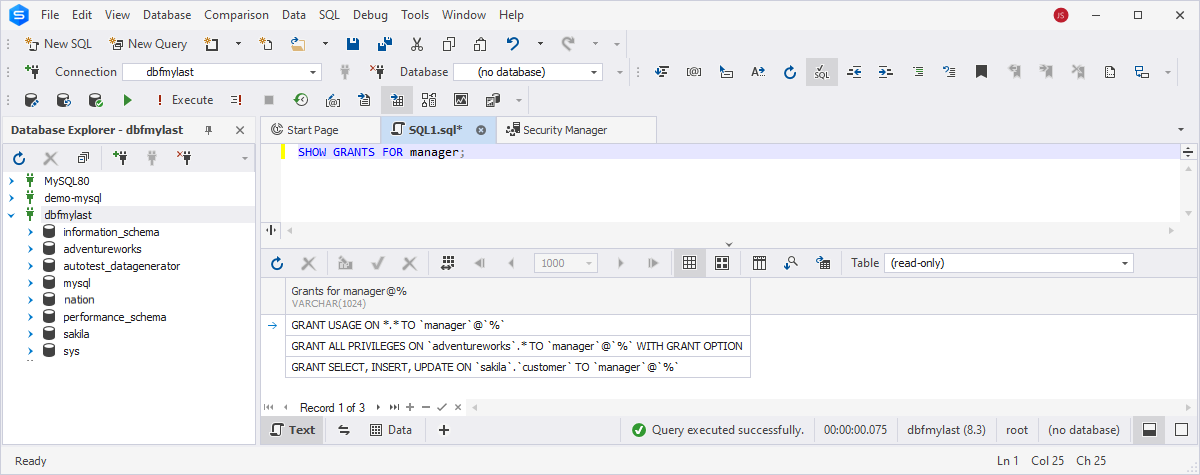
As you can see, the user has been granted all privileges on the adventureworks database and the SELECT, INSERT, and UPDATE privileges on the customer table of the sakila database.
Now, execute the command to remove a privilege from the adventureworks database:
REVOKE ALL PRIVILEGES ON adventureworks.* FROM 'manager';
Then, check the user privileges after revoking to ensure that they do not have access to the specified database:
Revoke object-level privileges
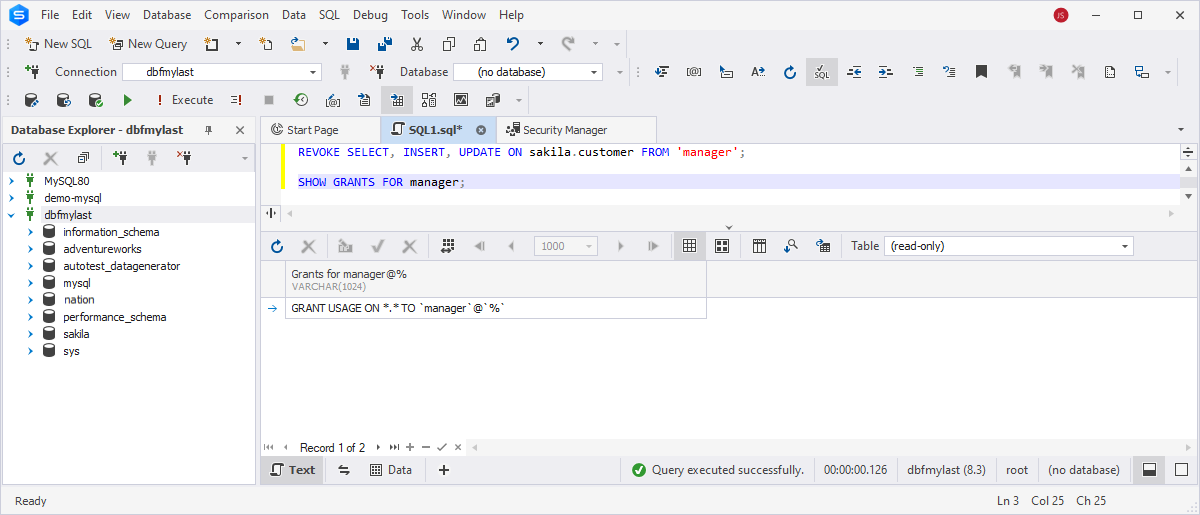
Now, we'll remove the privilege from a database object, such as a table. To do this, specify the database and table names in the REVOKE command:
REVOKE privileges ON database_name.object_name FROM 'user_name'@'host_name';
Finally, remove the SELECT, INSERT, and UPDATE privileges for the customer table in the sakila database for the user manager.
REVOKE SELECT, INSERT, UPDATE ON sakila.customer FROM 'manager';
Upon executing the SHOW GRANTS FOR query, we can verify that the mentioned privileges have been removed.
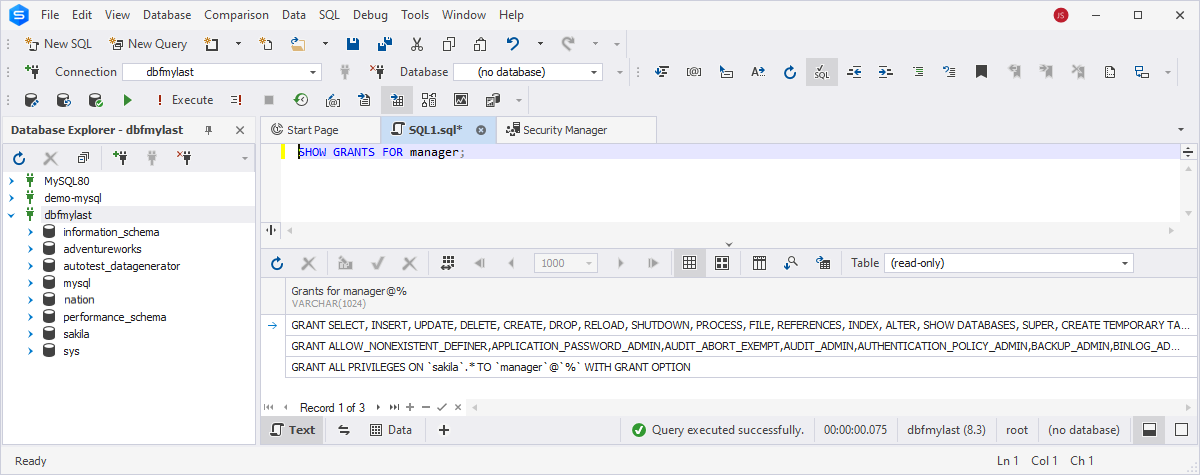
Revoke privileges using a GUI tool
It is worth noting that revoking all privileges in dbForge Studio is much easier than using the commands mentioned above. All you need to do is to open Security Manager, perform several clicks, and save the changes. For example, remove all privileges from the user manager. First, execute the SHOW GRANTS FOR query to see the privileges assigned to the user.
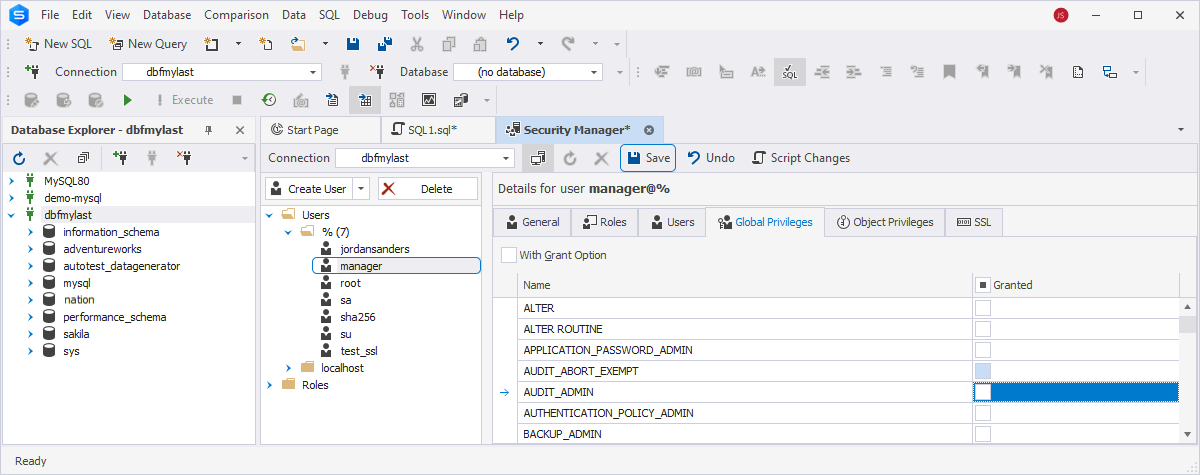
To proceed, navigate to Security Manager and select manager from the user list. Then, switch to the Global Privileges tab and clear the checkboxes next to the previously granted privileges. Click Save to apply the changes.
Advantages of granting and revoking privileges using dbForge Studio for MySQL
We would like to note that the Security Manager tool available in dbForge Studio for MySQL can be more beneficial to use over manually writing the GRANT and REVOKE commands:
- Take advantage of the user-friendly GUI for managing privileges, which can be helpful for those users who are not familiar with SQL syntax or who prefer a visual approach to privilege management.
- Minimize the number of errors when granting and revoking privileges in Security Manager instead of typing SQL commands manually.
- Improve accuracy and efficiency in privilege management tasks by visually selecting specific databases, tables, or columns when granting or revoking privileges.
- Manage privileges using role-based access control, which allows administrators to define roles with specific sets of privileges and assign users to these roles.
- Automate routine MySQL and MariaDB admin tasks.
Conclusion
In this guide, we examined how to regulate the level of access granted to user accounts across databases or database objects. These privileges can be assigned globally, to databases, or to specific database objects. We have also discussed the GRANT command as a way to assign user account privileges, thus enhancing their access levels, and the REVOKE command, which illustrates how to revoke privileges granted to accounts. In addition to using these commands, we demonstrated the easiest way to grant and revoke permissions - dbForge Studio for MySQL, an ultimate IDE for MySQL and MariaDB database administration and management. This GUI tool can offer a more user-friendly, efficient, and integrated approach to privilege management. So, try the Studio and evaluate its cutting-edge features and capabilities within a free 30-day trial period.