Black Friday is here! Get up to 30% off on Devart products!
ends in   {{days}}
Days
{{timeFormat.hours}}
:
{{timeFormat.minutes}}
:
{{timeFormat.seconds}}

How to Export and Import
a MySQL Database Using
the Dump or IDE

Data import and export tasks, being an integral part of database management and operation, are vital for software and database developers, as well as data analysts, and many other IT professionals.

Ensuring data availability, consistency, and security requires both the proper techniques and the possibility of automating these tasks for better efficiency and consistency while reducing manual efforts.

This guide will describe how to perform data import and export and how to automate these tasks via the Command-Line interface using dbForge Studio for MySQL and dedicated MySQL commands.

  • How to export and import MySQL databases with dbForge Studio for MySQL and the CLI
  • Advantages and disadvantages of the IDE for backing up and restoring
    MySQL data
  • Data export and import formats supported by dbForge Studio for MySQL
  • How to import a large MySQL file with dbForge Studio for MySQL
  • How to import or export MS Excel data
  • How to import and export MySQL data to/from CSV
How to export a MySQL database

Whenever database developers need to perform the migration of database data, for example, from one server to another, the following question comes up to their mind: "How can I copy a MySQL database and restore it quickly and smoothly?".

All possible methods to move MySQL database data include the creation of a dump file. This is the file created in the process of a database backup that contains essential data. Further, you can use the file to restore database data in the required location.

You can export a MySQL database using dbForge Studio for MySQL.

Export a MySQL database

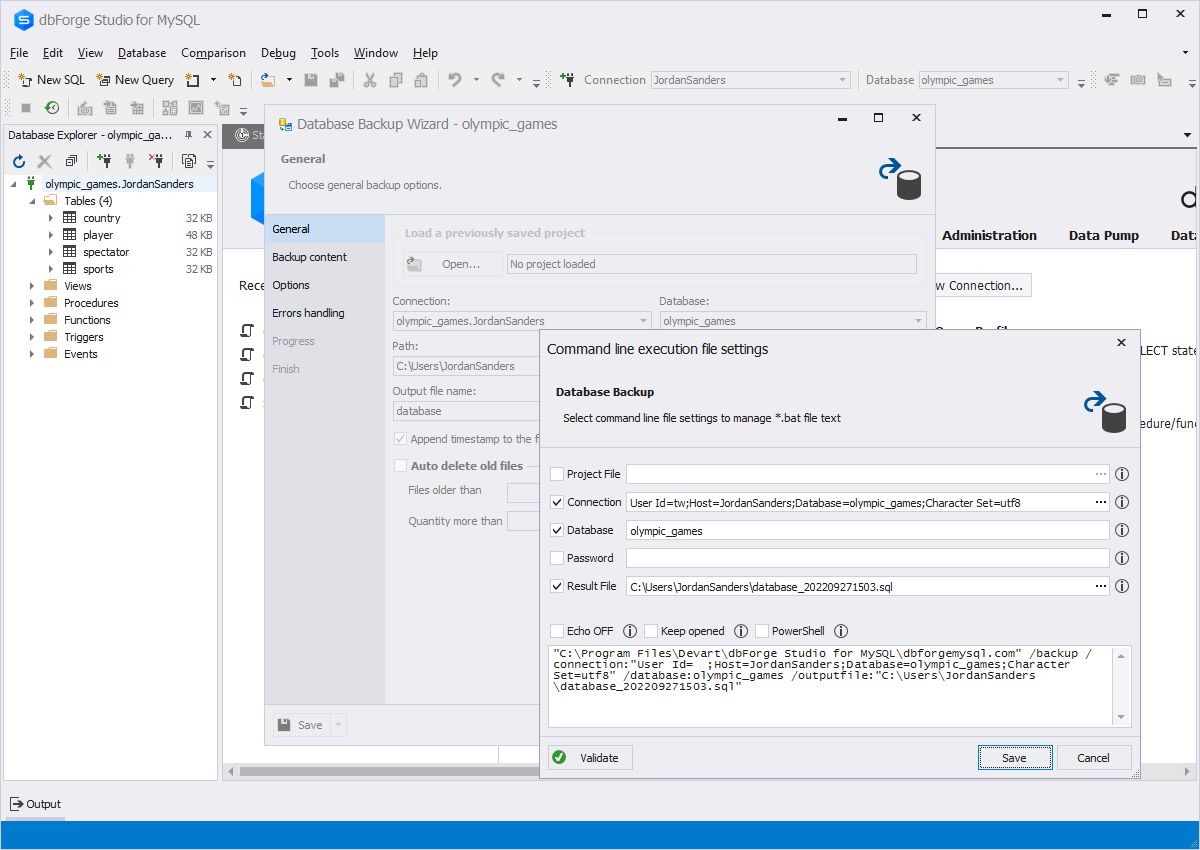
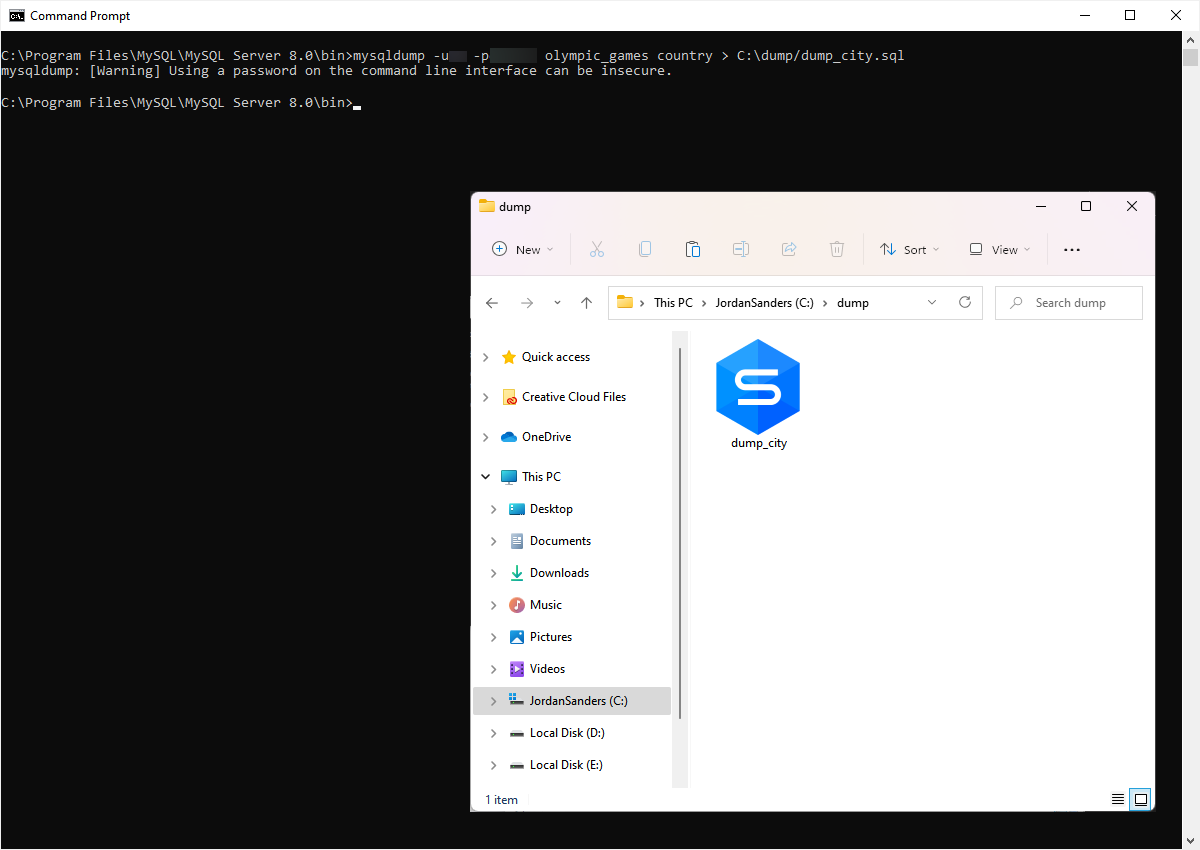
Command to export a database in MySQL

To create a dump file from the command line, you can use the mysqldump command:

mysqldump -u‹username› –p‹password› database_name table_name > dumpfile_name.sql
                                    

Where:

  • username and password are your credentials to connect to a MySQL server
  • database_name is the name of the database you want to dump
  • table_name is an optional parameter. You can specify it when you need to back up a certain table
  • ">" states that you back up the database. This sign "<" is used for showing that you restore the database
  • dumpfile_name.sql is the name of the dump file
Command to export a database in MySQL

Export a MySQL dump: the easiest way

If you're searching for a simple and trouble-free way to migrate a MySQL database, you can try to export data with the Devart IDE, dbForge Studio for MySQL:

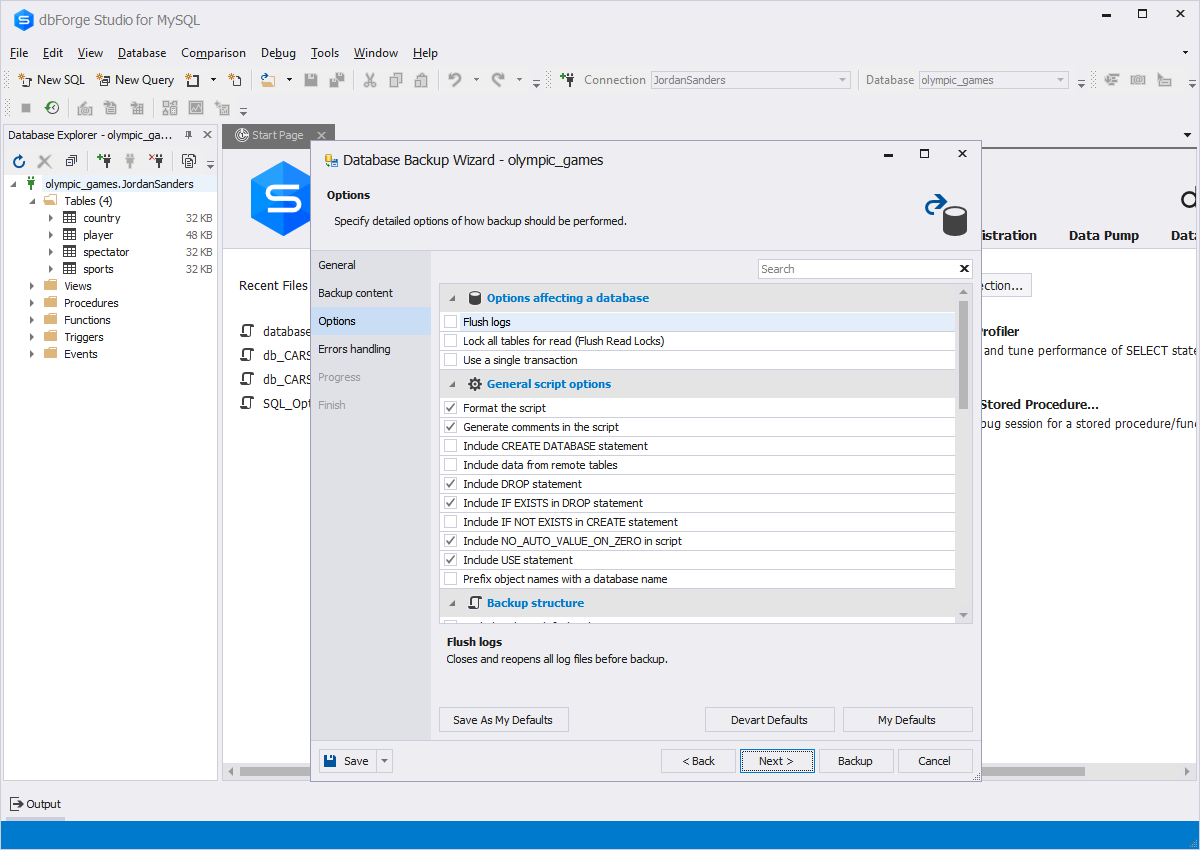
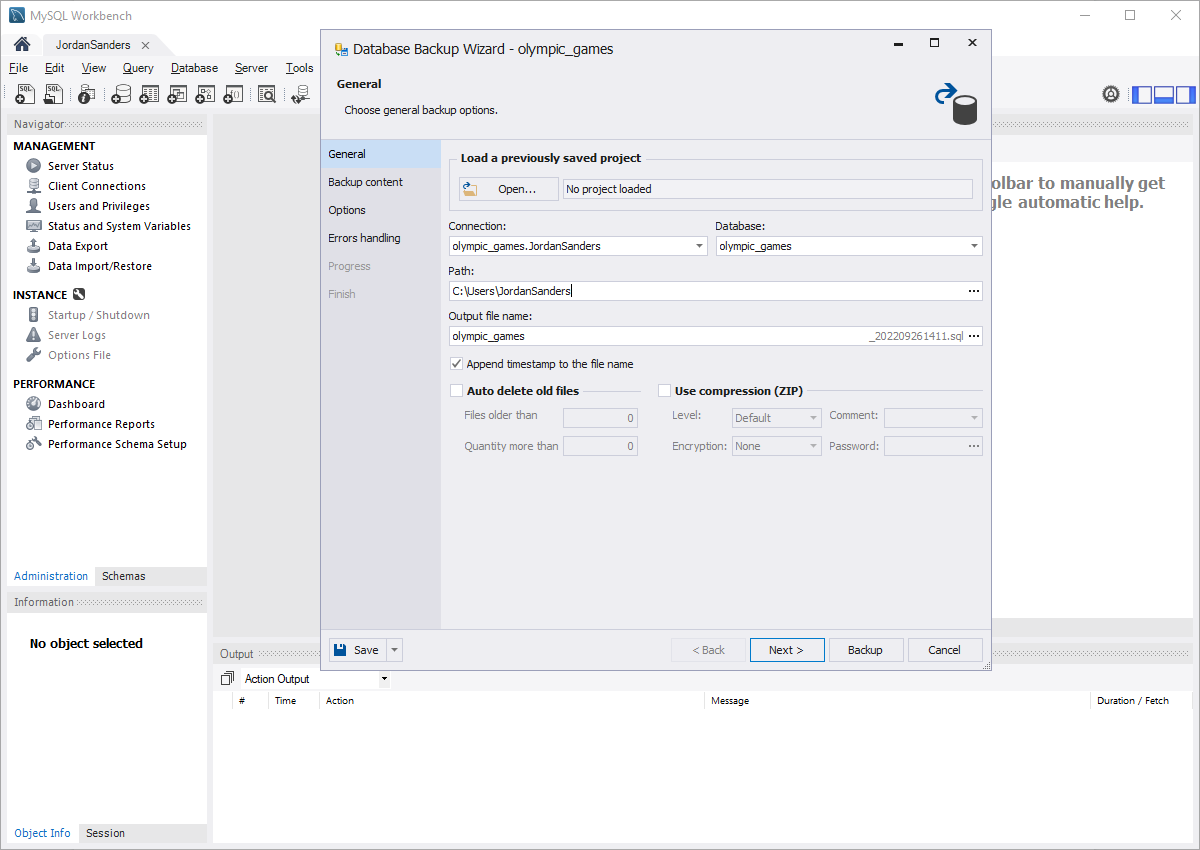
1. Navigate to Database > Backup and Restore > Backup Database.

2. Configure the options in the Database Backup Wizard window and click Next.

3. Select database objects to back up and click Next.

4. Set the backup options. To immediately export a MySQL database to a SQL file, click Backup. To configure the errors handling and log settings, click Next.

5. If you want the SQL file to open after the Wizard gets closed, select Open script.

6. Finally, click Finish.

Export a MySQL dump: the easiest way

IDE for MySQL export:
pros and cons

An IDE is an excellent solution for exporting databases in MySQL for those who do not want to bother. For example, dbForge Studio for MySQL has an intuitive user interface that allows you to save time and effort while migrating data. This process really takes several minutes even if you are a new user of the tool. You can export MySQL data to 14 widely used formats.

With dbForge Studio for MySQL, you do not need to use the utility and know all the parameters to dump a MySQL database. It's unnecessary to enter and set these parameters manually because you can do it in the application via already pre-configured options.

In case, you need to back up several MySQL databases simultaneously, then you should use the command line and the mysqldump utility.

IDE for MySQL export: pros and cons

Supported data export/import formats

With dbForge Studio for MySQL, you can easily export or import data. The tool has built-in Data Export and Data Import Wizards that guide you through the process. Also, it's possible to save your selected export and import options for further usage.

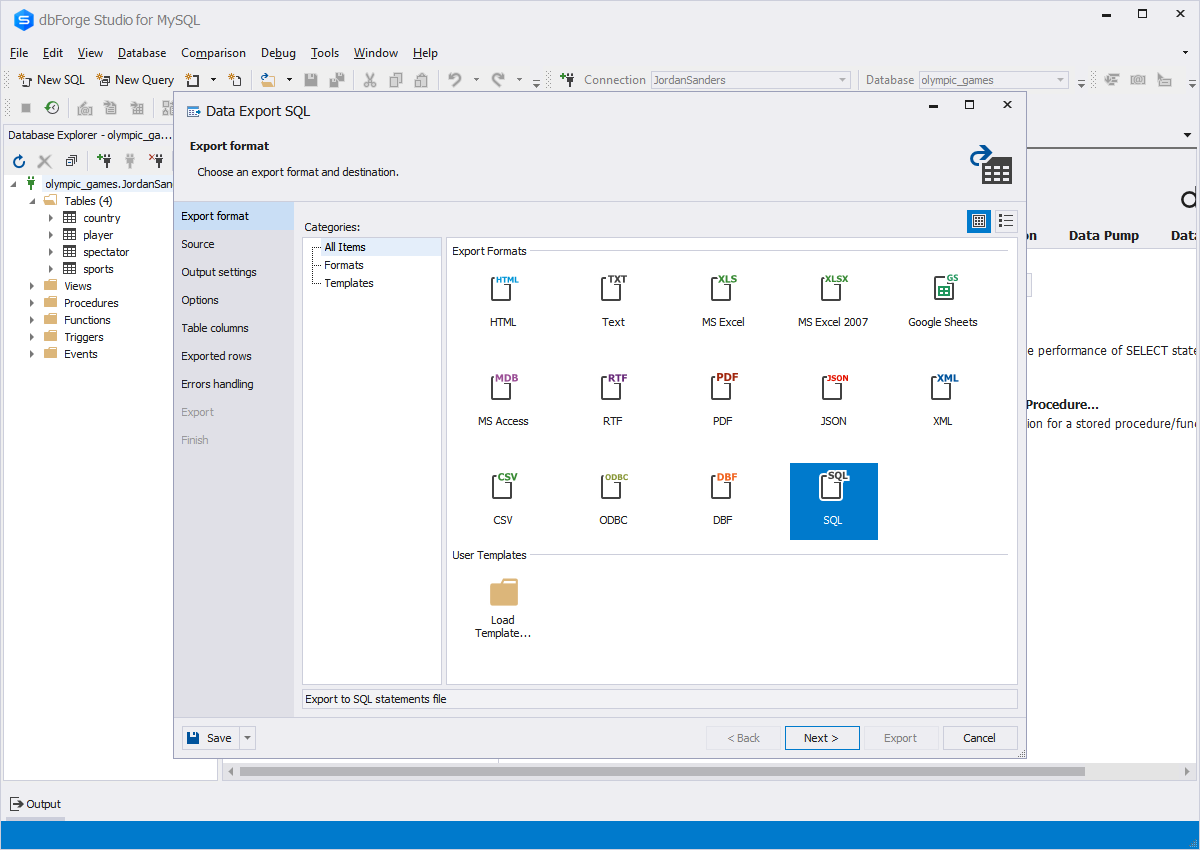
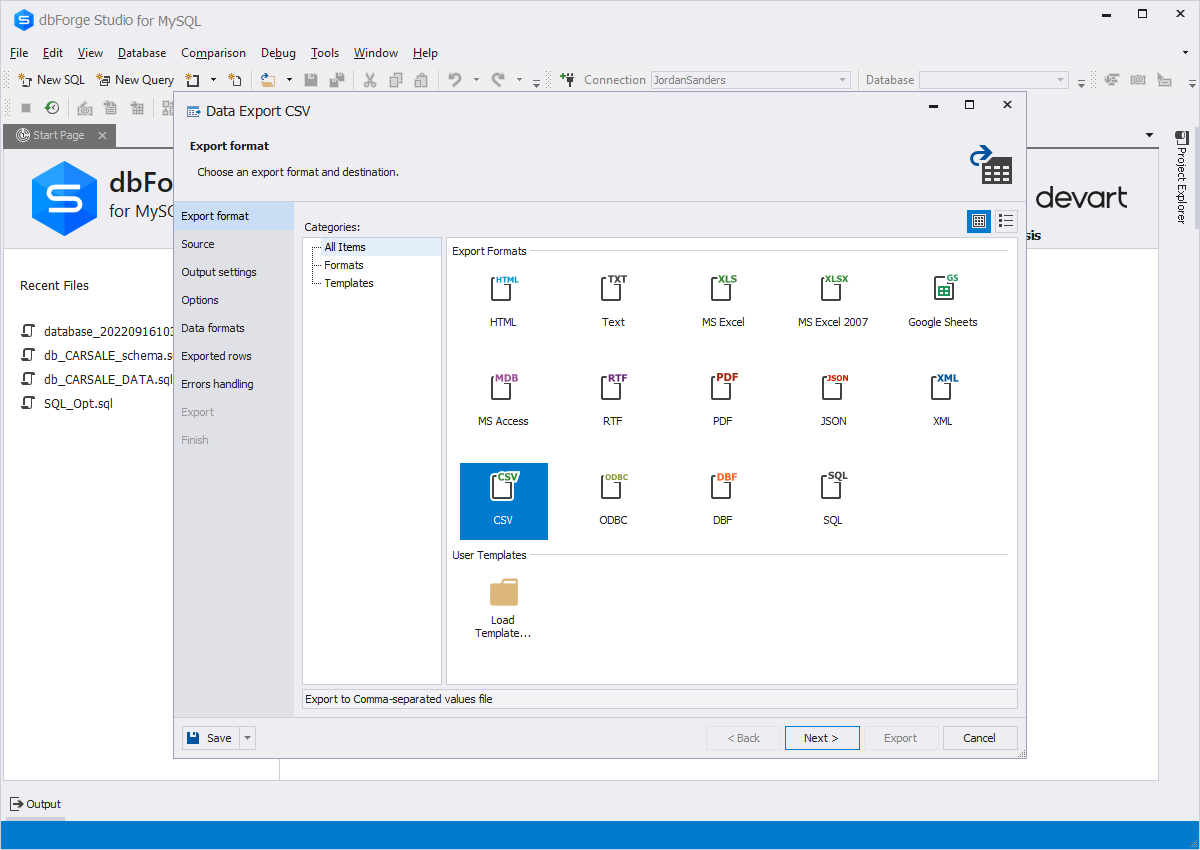
The Data Export Wizard helps you tune up export operations easily and export your MySQL data to the most popular formats: HTML, TXT, XLS, XLSX, MDB (Microsoft Access), RTF, PDF, JSON, XML, CSV, OBDC, DBF, SQL, and Google Sheets.

dbForge Studio for MySQL allows you to import data from the following formats in just a few clicks:

Supported data export/import formats

Data export

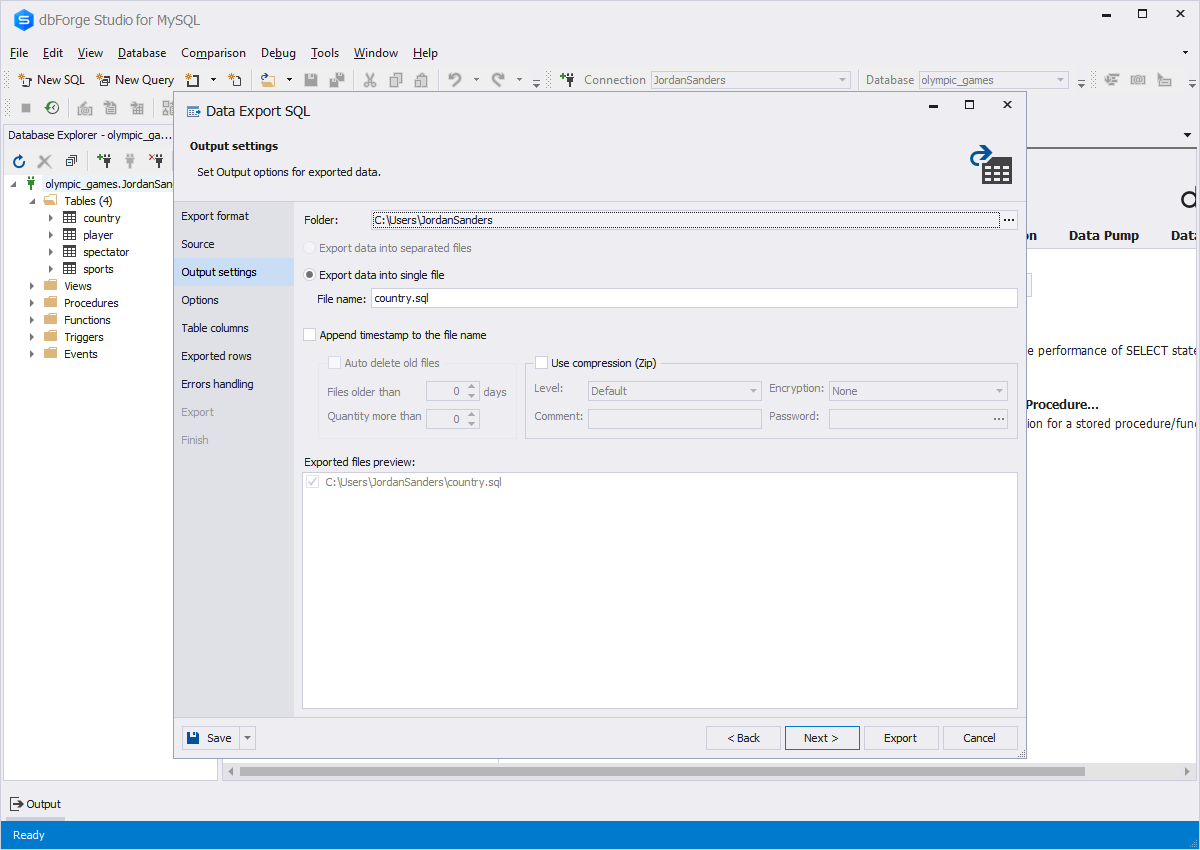
dbForge Studio for MySQL has advanced functionality that simplifies the data export process. For example, it's not necessary to export an entire table. You can select to export all rows, selected rows only, or export a certain range of rows. This feature makes data transfer easier and saves your precious time.

You can specify error processing behavior and logging options: prompt a user for an action, ignore all errors or abort at the first error. You can also create a log file with a report and allocate
a path to it.

dbForge Studio for MySQL allows you to save templates for recurring export scenarios. This helps you avoid wasting time configuring options repeatedly.

You can set up the table grid options for exported data. You can configure header text color and background, the width and color of borders, and the text color and background of rows. For your convenience, you can make even and odd rows look different.

By setting up data format representation, you can encourage and deliver unified data standards within your organization.

Data export

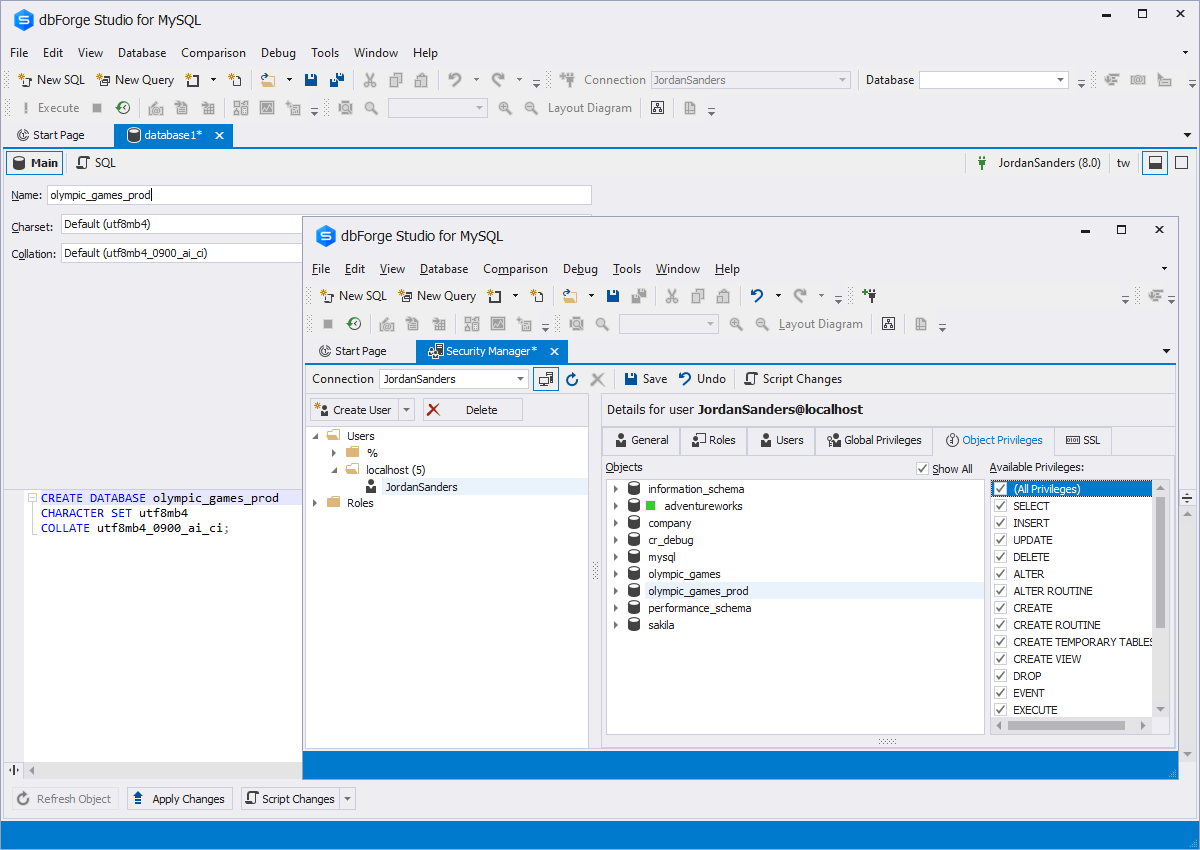
Create a new MySQL database and assign a user

To create a new database in MySQL with dbForge Studio for MySQL, proceed with the following steps:

1. Navigate to Database > New database.

2. Configure the Name, Charset, and Collation fields and click Apply Changes.

3. To check the created database, click Refresh in the Database Explorer.

After you create the MySQL database, you can grant
user privileges to it:

1. Navigate to Database > Security Manager.

2. Click the required user and click the Object Privileges tab in the left part of the Security Manager.

3. Adjust the options to your needs and click Save.

Create a new MySQL database and assign a user

How to import
a MySQL database

The import of MySQL data is closely connected with the export process - when you export a database, it means that you will recover it in another location soon. Quite often, these two operations are interrelated.

You can import the database to the same or different database server. You can find several ways to import a MySQL database on the Internet. But in the next sections, we provide two methods for it. They are:

  • With the help of the mysql program
  • Using dbForge Studio for MySQL

Also, you can import a database from an SQL dump file.

How to import a MySQL database

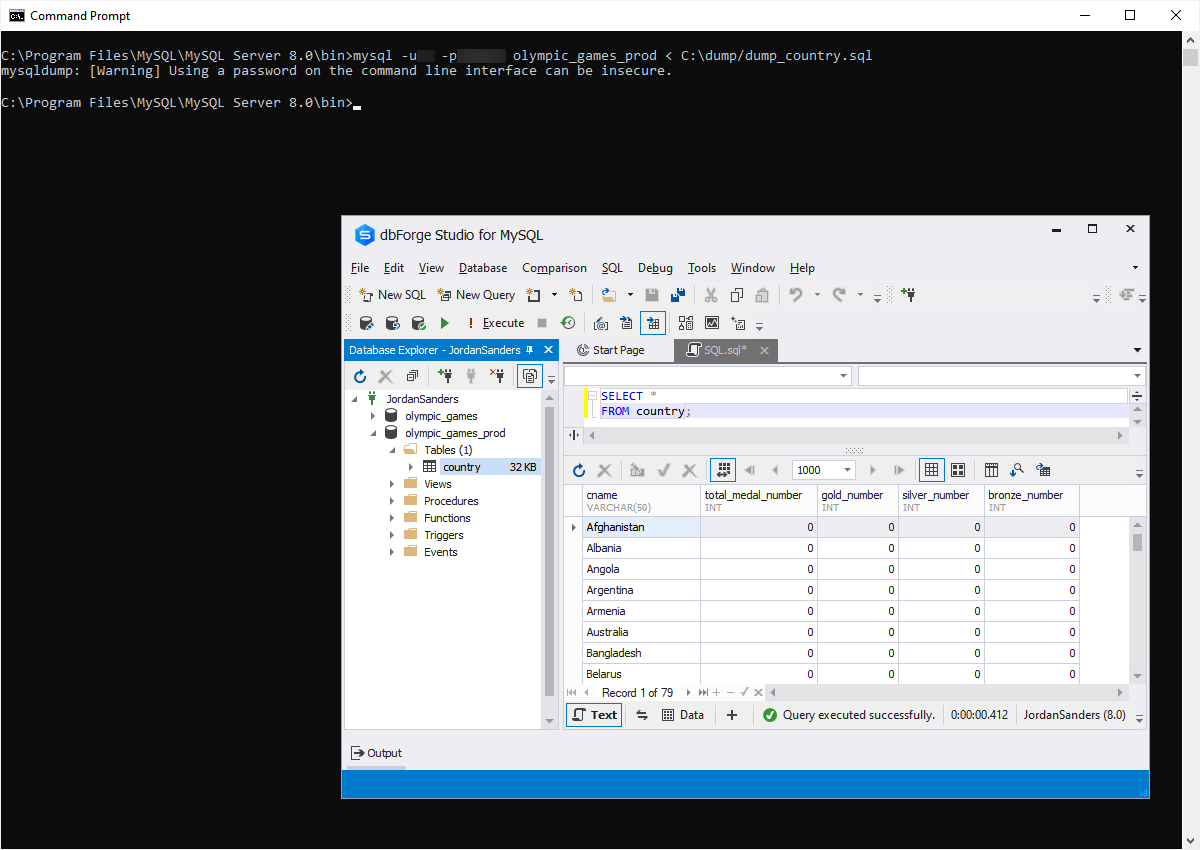
Import MySQL using the command line

You can also import MySQL data with the command-line interface using the mysql program:

mysql -u‹username› -p‹password› database_name < import_file_name.sql
                                    

Options used in the command:

  • username and password are your credentials to connect to a MySQL server
  • database_name is the name of the database you want to import
  • "<" states that you import the database
  • import_file_name.sql is the name of the import file

Import MySQL using the command line

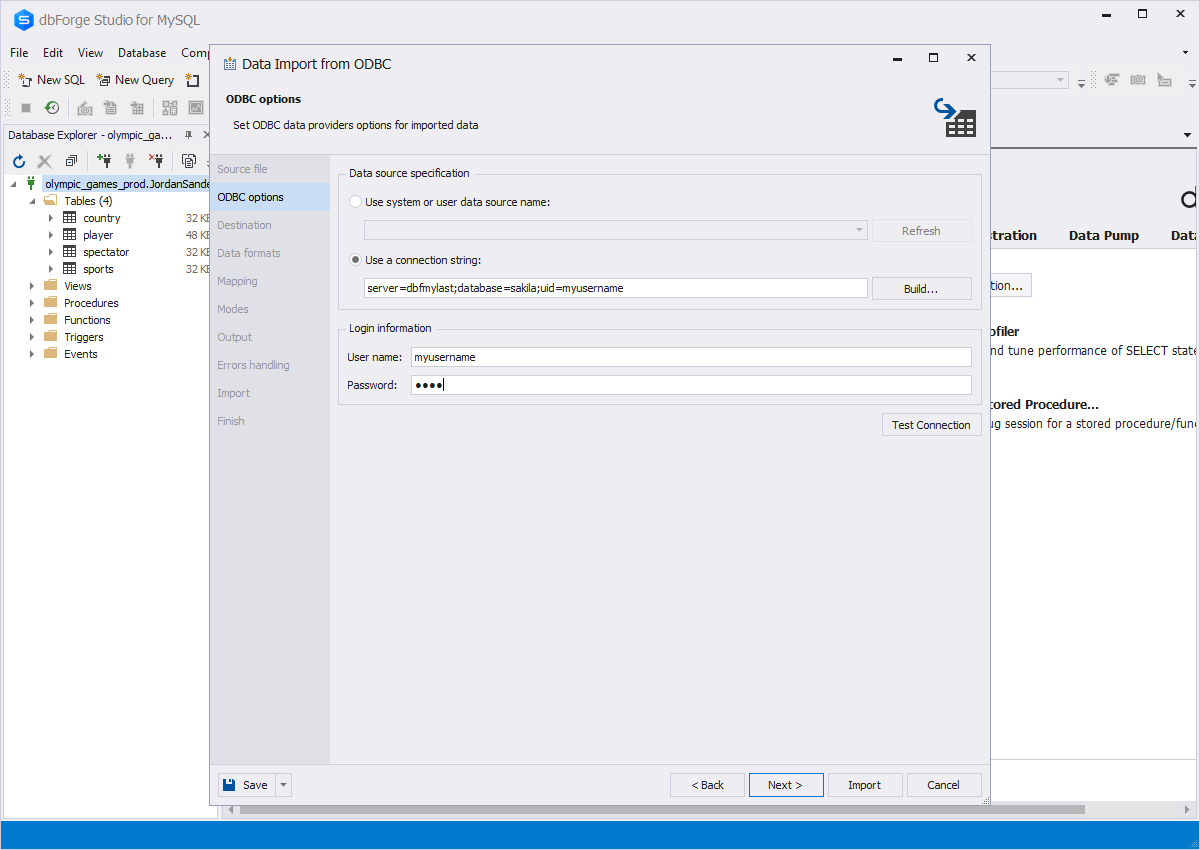
Load the import file using the IDE

You can easily import a MySQL database with dbForge Studio for MySQL:

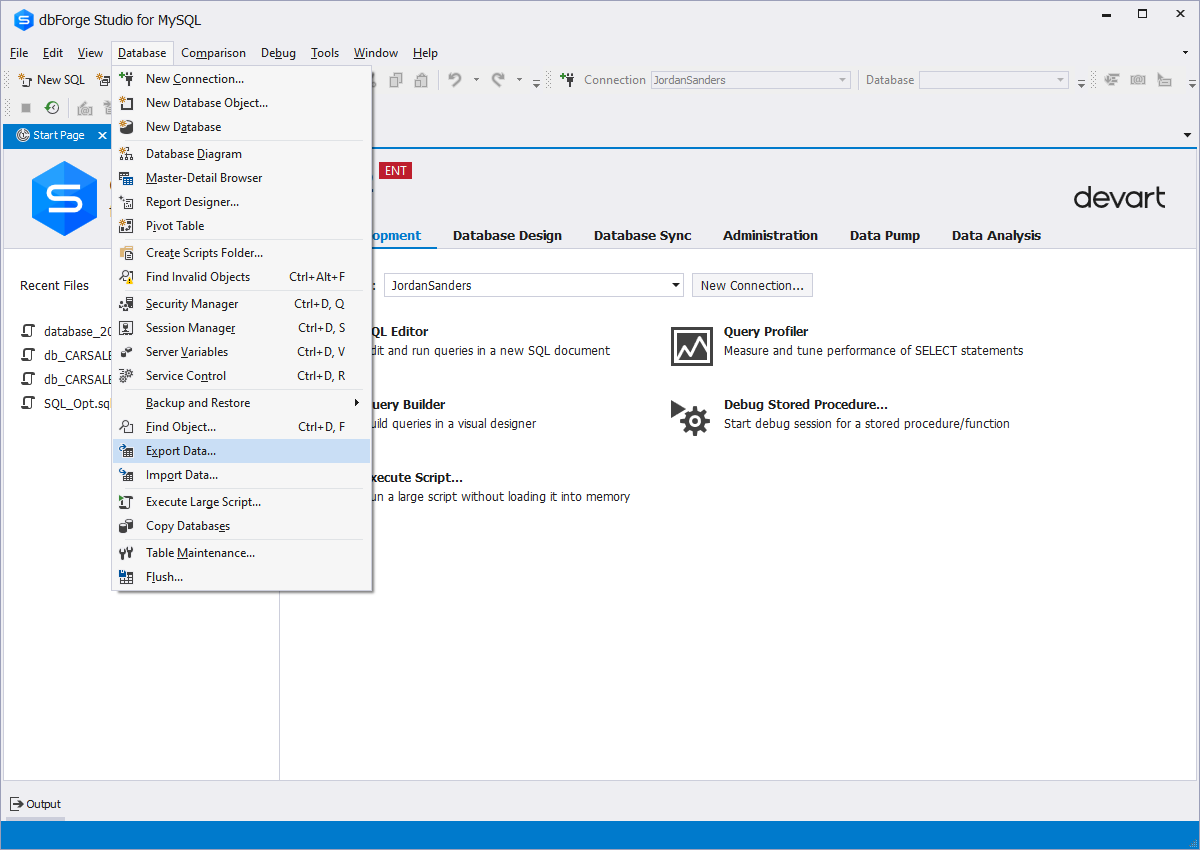
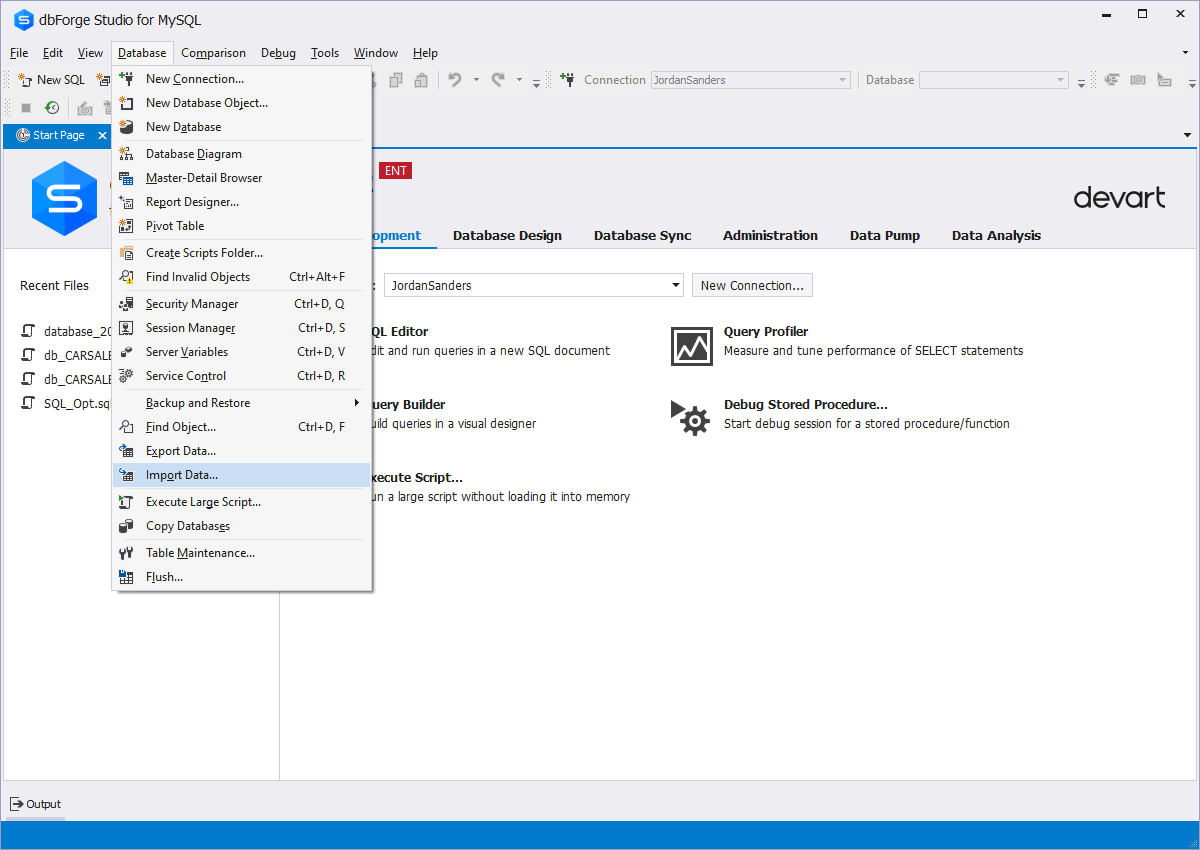
1. Navigate to Database > Import Data.

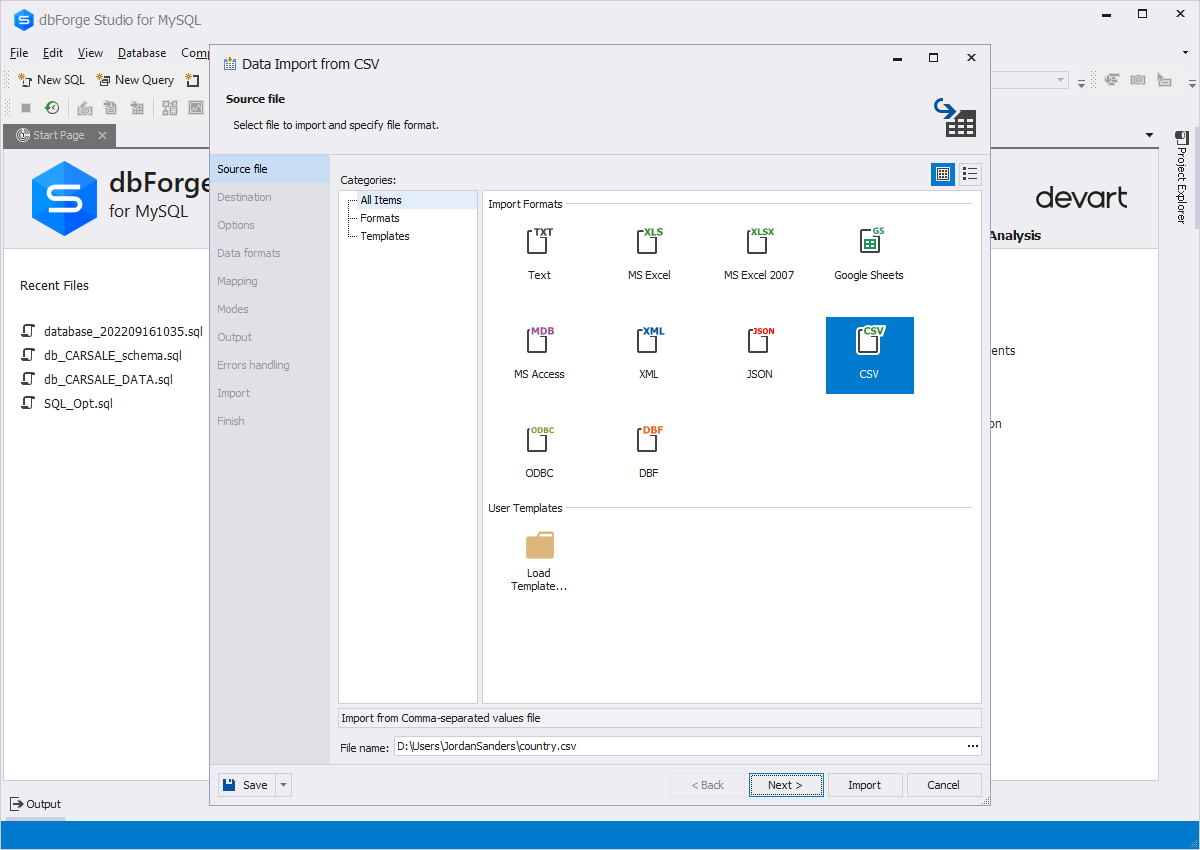
2. Choose the required import format, specify the location of the database file, and click Next.

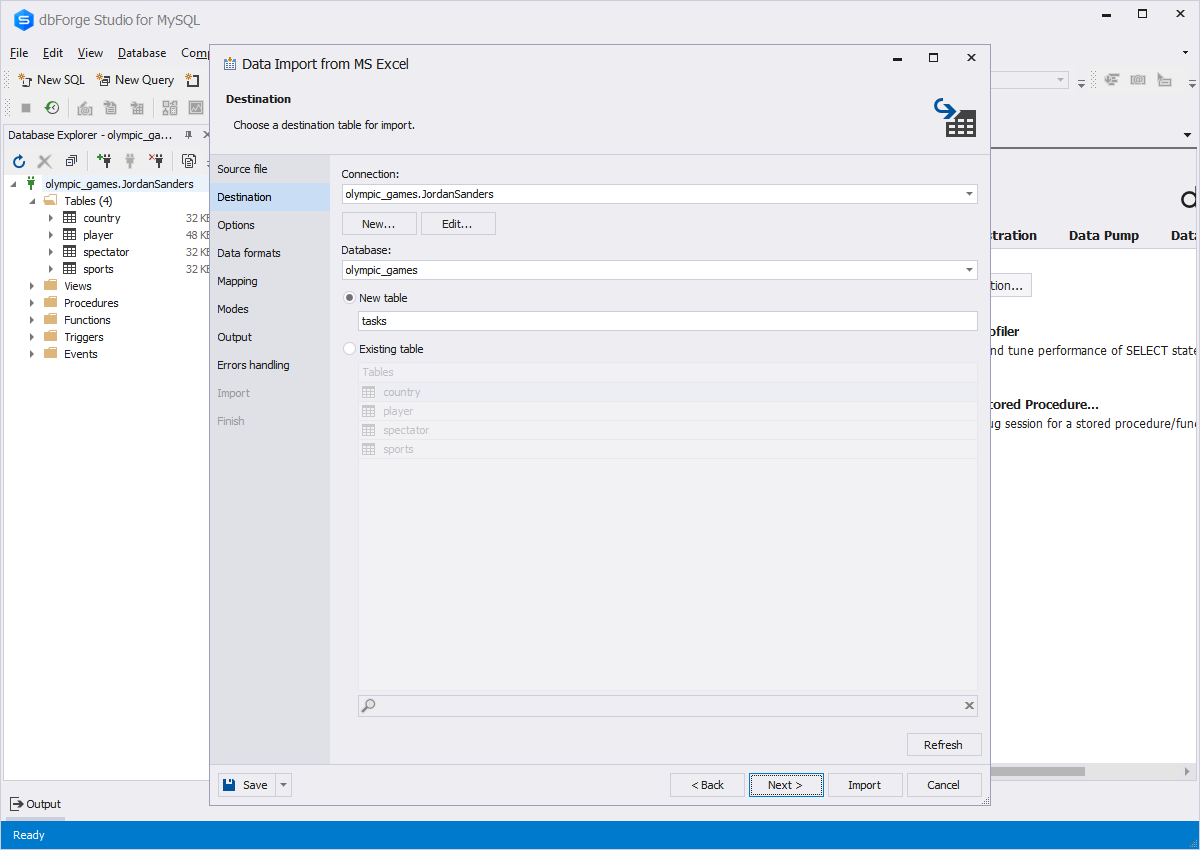
3. Specify where you want the file to be imported. Configure the Connection and Database options and select whether you need to import as a new table or to one of the existing tables.

4. Click Next and set the import options for the selected file format.

5. To configure additional import options, click Next. To immediately import, click Import.

By the way, you can save the import settings as a template file. For this just click Save on any Wizard page.

Load the import file using the IDE

IDE for MySQL import: pros and cons

As you can see, the import process in dbForge Studio for MySQL is simple and does not require much effort. You can import MySQL data from 10 commonly used formats. Thanks to the Data Import Wizard, which contains all necessary options and settings, you will be sure that MySQL data import will be completed successfully.

We would like to re-emphasize that it is not required to configure the import settings again and again. You can adjust them once and save as a template file. It will save your time and simplify the import process.

But when it comes to recovering data to more than one database, the mysql command can solve this challenge. So importing MySQL data depends on how you need to restore it.

IDE for MySQL import: pros and cons

Data import

dbForge Studio for MySQL makes it possible to import data to a different MySQL server connection, database, or schema. You can choose whether you want to import data to a new or existing table.

Also, you can select a data import mode according to the needs of your project: Append, Update, Append/Update, Delete, and Repopulate. It's possible to set to import data in a single transaction.

In dbForge Studio for MySQL, the import process is totally customizable. You can even configure a range of rows or columns you want to import.

Column mapping allows you to adjust the way your records should be restored to the target destination for maximum performance and efficiency. If you import data to a new table, the tool will automatically create and map all the columns. If you import data to an existing table, the columns with the same names will be already mapped. You can map the rest manually.

Data import

Data export and import
have never been easier

dbForge Studio is an easy-to-use GUI tool that helps you fully customize import and export operations and even do it automatically by schedule!

Check this video and see how you can import and export your MySQL data effortlessly with dbForge Studio at hand.

How to import a large
MySQL file

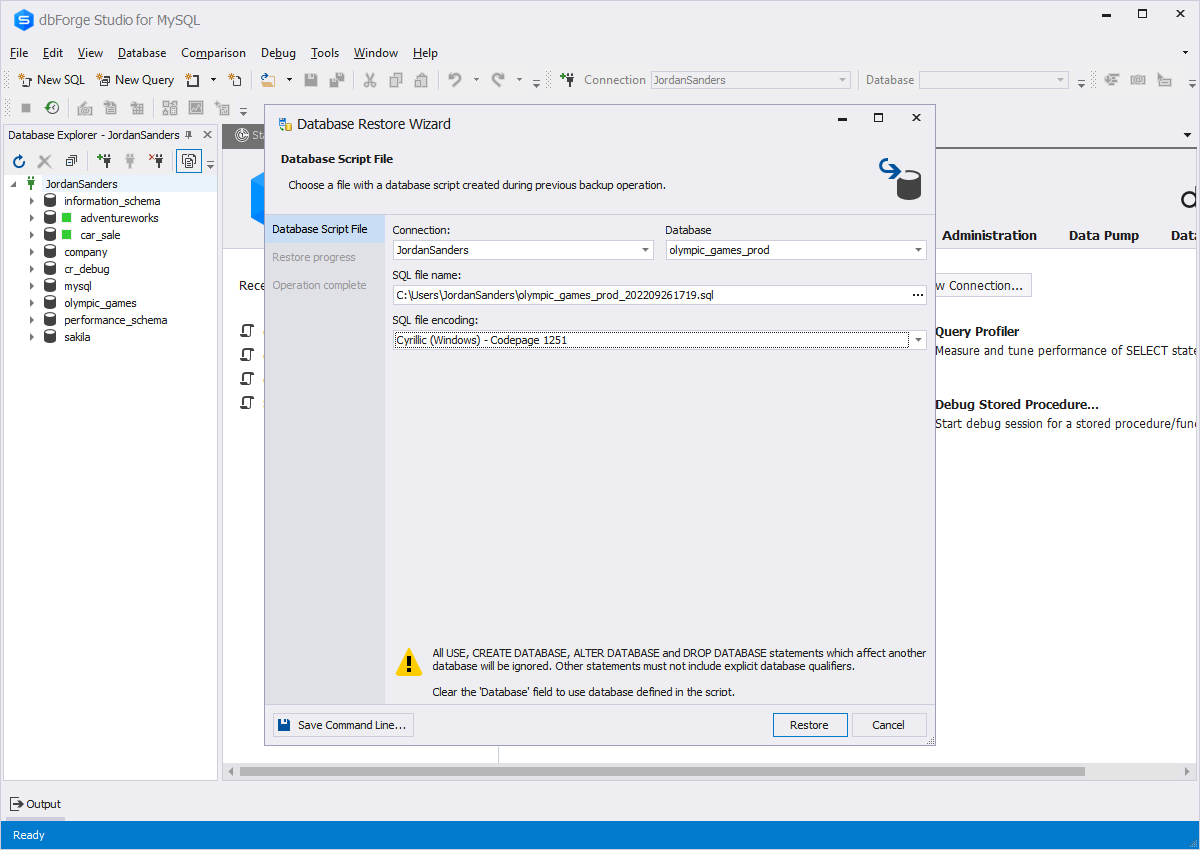
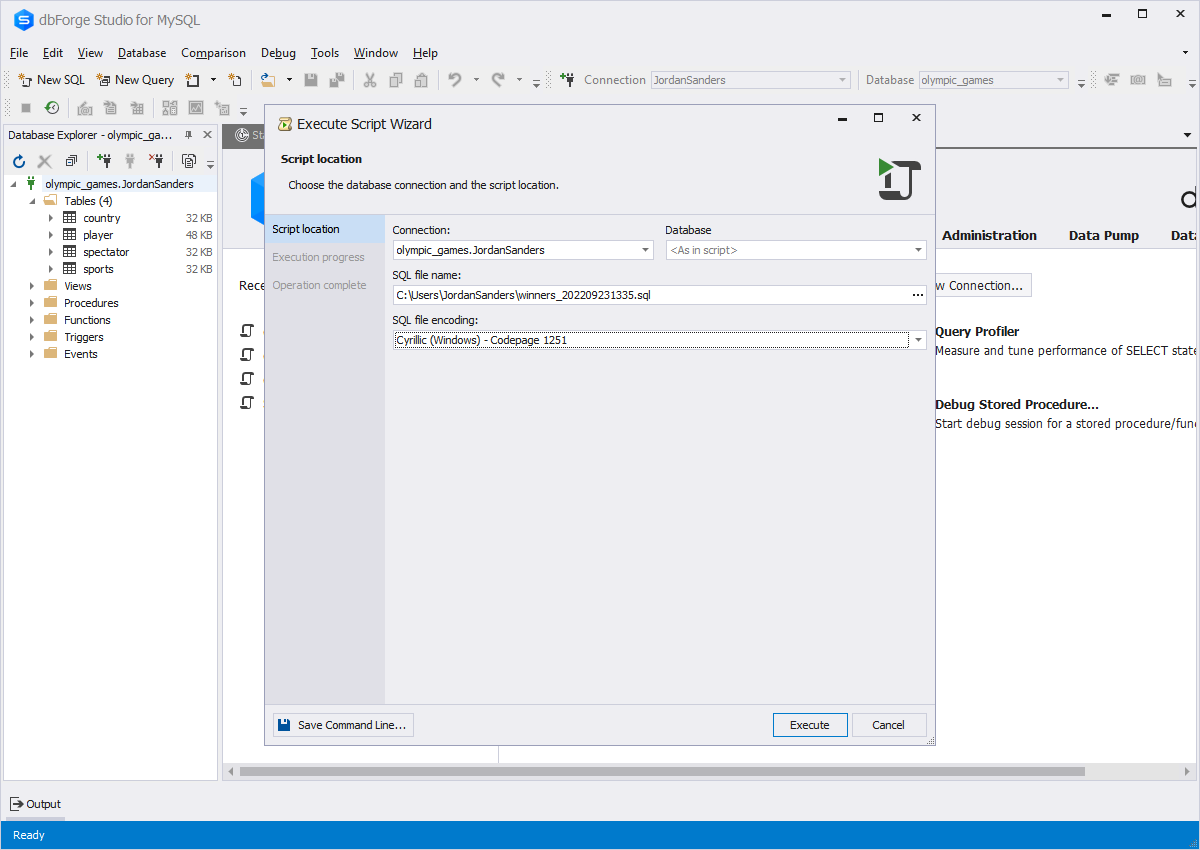
You can import a large MySQL database with the Execute Script Wizard. For this:

1. Navigate to Database > Execute Large Script.

2. Select the connection and database where you want to import the file.

3. Select the required file to be imported in the SQL file name field.

4. Select the desired encoding from the SQL file encoding dropdown.

5. Finally, click Execute.

How to import a large MySQL file

Import or export MS Excel data

In this section, you'll learn how to export and import MySQL data to/from
the MS Excel format.

1 - Choose a database you want to export

Step 1: Navigate to Database > Export Data
Export Data
Step 2: Select MS Excel

In the Data Export Wizard, select MS Excel and click Next.

Step 3: Configure the options on the Source tab

Select the required connection from the Connection drop-down menu. To edit the selected connection, click Edit. To add a new connection, click New.

Select the database you want to export from the Database drop-down menu and select the tables and views. And then click Next.

2 - Configure the necessary tabs in the Data Export Wizard

This step is optional because, at this stage, you can already export the database. But if required, you can adjust the settings to your needs on the remaining tabs.

3 – Export the database

To export the database, click Export. After the export process gets completed, click Finish. You can check the exported database in the location you have specified on the Output settings tab.

4 - Choose the XLS file to import

Step 1: Navigate to Database > Import Data
Import Data
Step 2: Select MS Excel

In the Data Import Wizard, select MS Excel and select the XLS file you want to import. And then click Next.

Step 3: Configure the options on the Destination page

Select the required connection from the Connection drop-down menu. To edit the selected connection, click Edit. To add a new connection, click New.

Select the database where you want to import the file from the Database drop-down menu. Select whether you want to import the file as a new table or to a new table.

Finally, click Next.

5 - Configure the necessary tabs in the Data Import Wizard

This step is optional, but additionally, you can configure other tabs in the Data Import Wizard.

6 – Import the XLS file

To import the file, click Import. After the export process gets completed, click Finish. You can check the imported table in the location you have specified on the Destination page.

Import and export MySQL
data to/from CSV
The process of importing and exporting MySQL data to/from
the CSV format is the same as the MS Excel format.

1 - Choose the required database to export

Step 1: Navigate to Database > Export Data
Step 2: Select CSV
Select CSV

In the Data Export Wizard, select CSV and click Next.

Step 3: Configure the options on the Source tab

Select the required connection from the Connection drop-down menu. To edit the selected connection, click Edit. To add a new connection, click New.

Select the database you want to export from the Database drop-down menu and select the tables and views. And then click Next.

2 - Adjust the tabs to your needs in the Data Export Wizard

This step is optional because, at this stage, you can already export the database. But if required, you can adjust the settings to your needs on the remaining tabs.

3 – Initiate the database export

To export the database, click Export. After the export process gets completed, click Finish. You can check the exported database in the location you have specified on the Output settings tab.

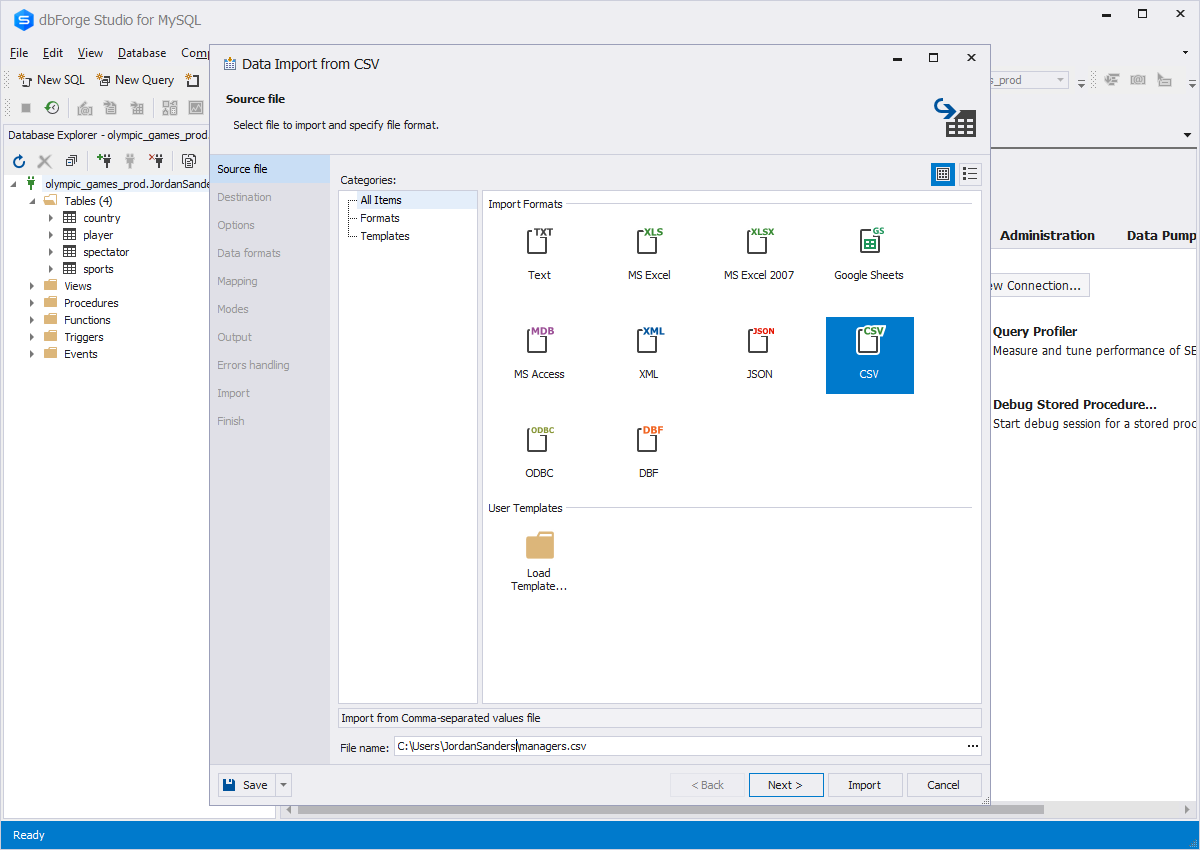
4 - Choose the CSV file to be imported

Step 1: Navigate to Database > Import Data
Step 2: Select CSV

In the Data Import Wizard, select CSV and select the CSV file you want to import. And then click Next.

Select the CSV file
Step 3: Configure the options on the Destination page

Select the required connection from the Connection drop-down menu. To edit the selected connection, click Edit. To add a new connection, click New.

Select the database where you want to import the file from the Database drop-down menu. Select whether you want to import the file as a new table or to a new table.

Finally, click Next.

5 - Configure the tabs in the Data Import Wizard

This step is optional, but additionally, you can configure other tabs in the Data Import Wizard.

6 – Start the CSV file import

To import the file, click Import. After the export process gets completed, click Finish. You can check the imported table in the location you have specified on the Destination page.

Conclusion

dbForge Studio for MySQL delivers tools that make import and export of data more flexible and convenient for you. Recurring tasks become automated. Routine operations can be triggered with just a couple of clicks.

This is just a small part of what our IDE can offer. Check dbForge Studio for MySQL to see what you can get with a full-fledged MySQL IDE at your service.

dbForge Studio for MySQL

Download a free 30-day trial of dbForge Studio for MySQL and
discover the multifunctional IDE for MySQL development and management

Availability in the editions of dbForge Studio for MySQL

Feature

Enterprise
Professional
Standard
Express
Data export to 14+ file formats
Yes
Yes
Yes
Data import from 10+ file formats
Yes
Yes
Yes