SQL Server Database Migration Definitive Guide

Businesses might need to migrate databases for various reasons. For example, Microsoft has recently discontinued support for SQL Server 2012. This means that companies that still rely on this version are now facing the necessity to move their business-critical workloads to stay secure and not miss out on opportunities.

Database migration is a potentially risky operation and requires a certain level of knowledge and expertise. According to the statistics, 30% of data migration projects fail. Thus, choosing the right migration strategy and tool is essential to reduce the risks involved.
What is SQL Server database migration?

Generally, in SQL, database migration presupposes taking data from one or more source databases and loading it to the target database or databases. It is a complex operation consisting of several steps or phases, each with its challenges.

The common reasons for database migration are:
  • Upgrading SQL Server to the latest version (e.g., migration from SQL Server 2012 to 2019)
  • Transferring on-premises workloads to cloud-based databases
  • Merging several databases into a single one
  • Creating and setting up a development server

MS SQL Server allows for database migration between different versions - you can even downgrade a SQL Server database to a lower version (e.g., migration from SQL Server 2016 to SQL Server 2014).

Understanding database migration

Roughly speaking, database migration consists of schema migration and data migration. Schema migration presupposes transferring the logical structure of a source database to a new environment — it essentially involves the migration of tables, indexes, and views to a target database. Business logic encoded in stored procedures sometimes needs to be moved too due to syntax changes or deprecated statements and clauses. Data migration, as its name implies, entails the transfer of the source database data.

What are the types of database migrations in SQL Server?

There are two methods to migrate a SQL Server database – manual and automated, with the latter being done from the command line. In practice, the choice of one strategy or another depends on the scope of the task. The manual method is ideal for selective migrations when you do not need to migrate the entire database, but only specific database objects or data. Also, manual migrations are often chosen over automated ones in scenarios where the migration of multiple databases is involved. Thus, support for both methods is a factor to consider when choosing the right database migration tool.

What are the migration challenges you should know about?

On the surface, database migration in SQL seems to be a direct and sequential process. However, this seemingly straightforward operation is attended by quite notable risks and may prove to be strenuous, expensive, and time-consuming.

Data loss and corruption

Data loss and corruption

Number one on our list is the risk of data loss and its corruption, as these are the most commonly encountered problems faced by those trying to perform SQL database migrations. Testing for data loss and data corruption must be an integral part of any migration process, which is especially relevant for complex projects. Data loss and data corruption might be caused by compatibility problems that can occur when migrating an MS SQL Server database, and that brings us back to the question of proper testing.

Data security

The privacy and security of customers' data are the issues of utmost importance to any business regardless of its size and sphere of activity. Therefore, data protection and the overall safety of the process should be a top priority, and data encryption during the transit is definitely worthy of consideration. Unfortunately, especially during cloud migrations, there are times when data is vulnerable and exposed—that's why having a reliable tool for database migration is so important.

Lack of planning and/or testing

We have partly covered the significance of thorough testing above. The only thing that needs to be added is that testing should be conducted in every database migration phase, and not just by the SQL developers. Planning is equally important: it allows foreseeing migration hurdles and thus mitigates common risks. Comprehensive planning is highly recommended when migrating databases for big companies having disparate data warehouses in different departments.

It is crucial to approach SQL Server migrations keeping these challenges in mind. However, a proper tool might help solve at least half of the potential problems.

Best tool for SQL Server
database migration

dbForge Studio for SQL Server offers robust utilities for migrating SQL Server databases to a variety of target environments. Users report that migration with dbForge Studio for SQL Server is seamless, safe, and reliable. The Studio is not limited to covering migration needs only, it comprises a rich suite of tools and services bound to meet all the database-related demands of SQL developers, data analysts, and DBAs.

Prepare to migrate

Let us walk through database migration in SQL Server step by step with dbForge Studio.

Create a database connection

1 - Create a database connection

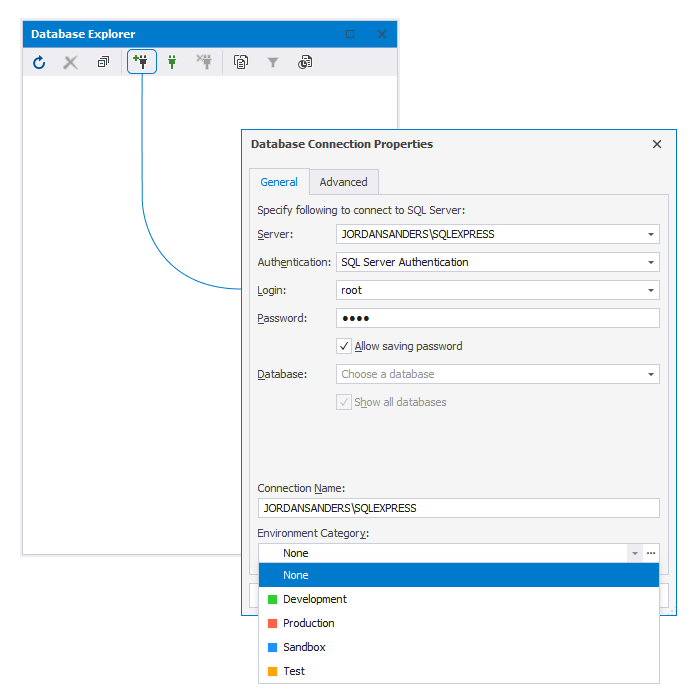
1. Launch the Studio and on the Database Explorer toolbar, click New Connection. Alternatively, in Database Explorer, right-click the connection and select New Connection on the shortcut menu.

2. In the dialog that opens, set up the connection parameters and click Connect.

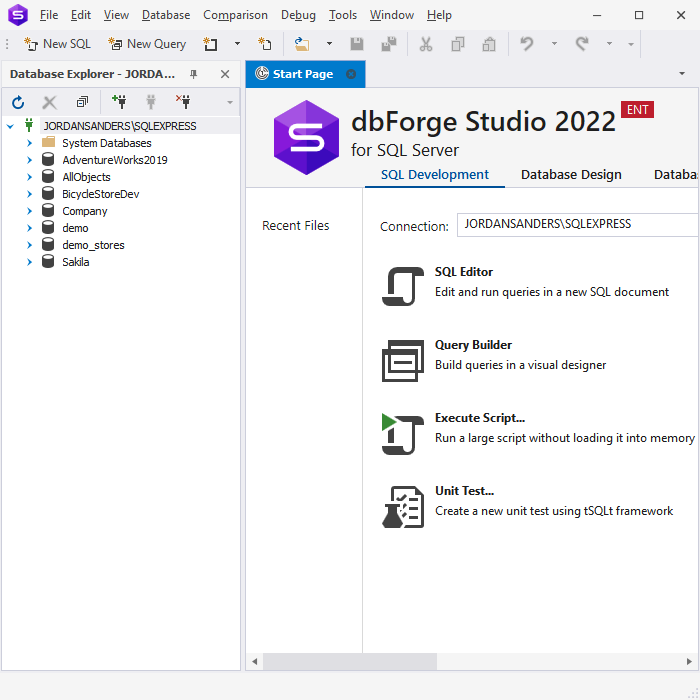
3. The new connection will appear in the Studio’s Database Explorer, which offers a visual, quick, and simple way to manage database connections.

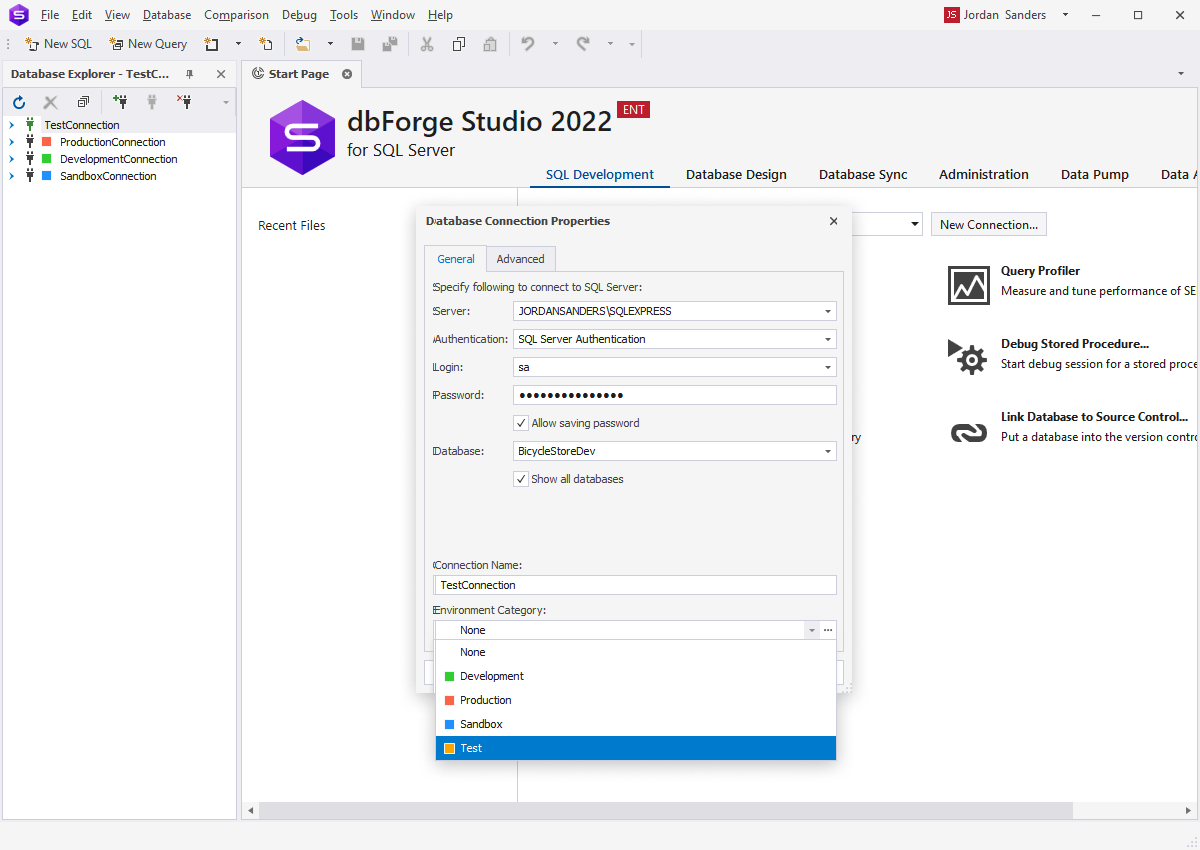
2 - Assign a category and color to SQL Server connections

You can assign a category and color to SQL Server connections when creating a new connection or modifying the existing one from Database Explorer. In the Data Connections Properties > Document Category, select the required category from the drop-down list.

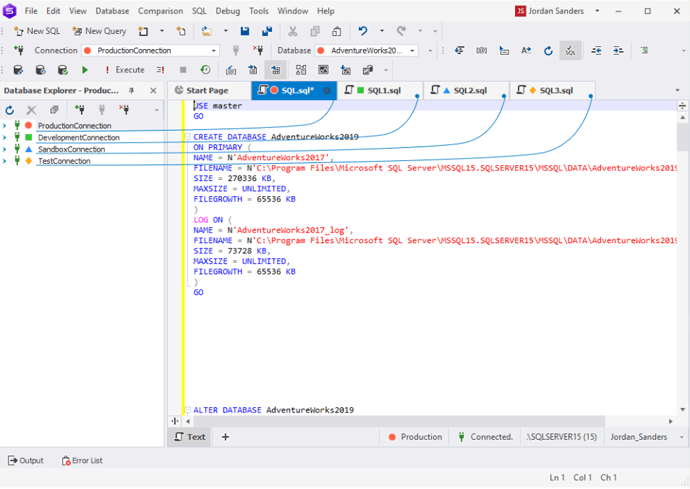
3 - Assign environment categories

By assigning environment categories you will always know which server you’re connected to. It is a good way to separate, for instance, testing and production servers. You can add coloring for every server connection

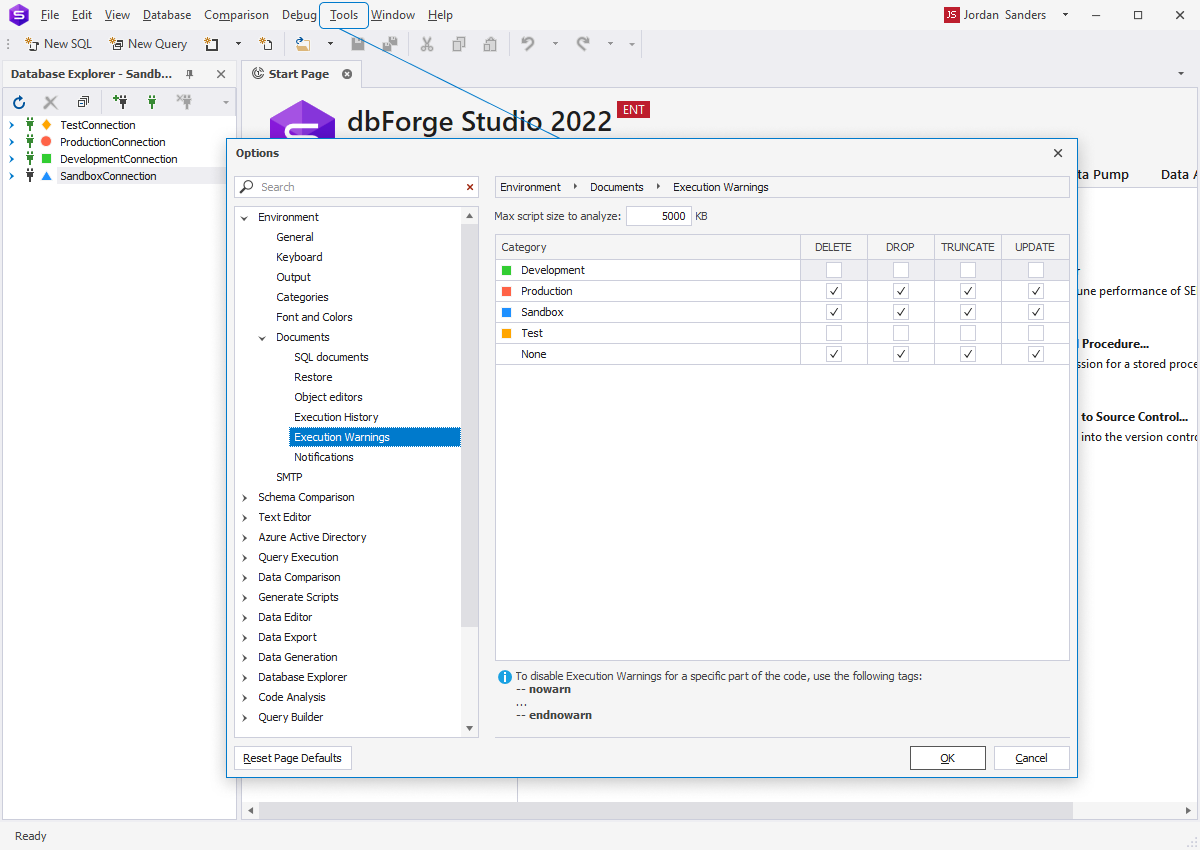
4 - Setup warnings

Configuring execution warnings is a proactive step that can help you anticipate and prepare for any unexpected outcomes that may arise when working with SQL queries. dbForge Studio can analyze the script to be executed for the DELETE, DROP, TRUNCATE, and UPDATE statements and produces a blocking message if the statements are used in certain types of environments.

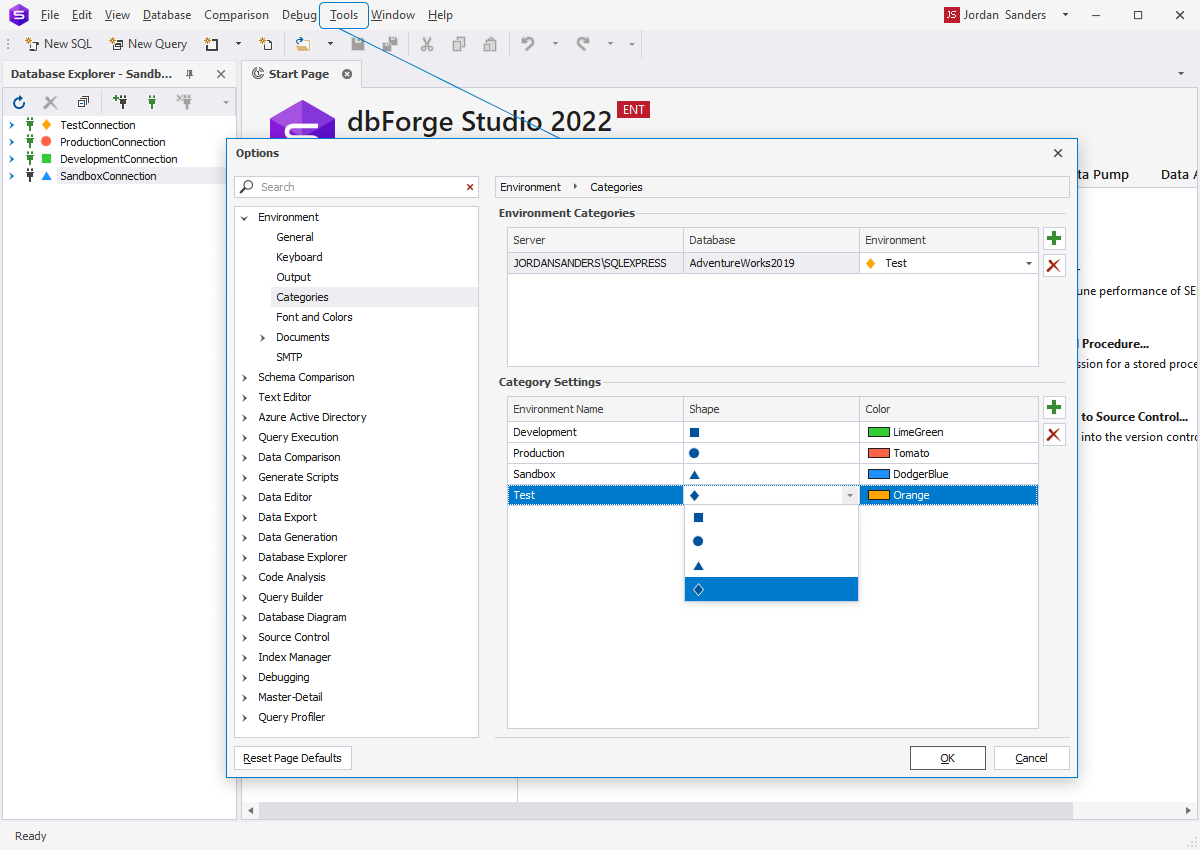
5 - Manage categories and customize the server connection environment

To manage categories and customize the server connection environment, go to the Tools menu and select Options. Then navigate to the Environment > Categories, where you can:

  • Modify the name, shape, and color for the available environment category
  • Select a color for the environment category from the color grid
  • Add or delete the color match for the environment category
  • Change the server for the environment
  • Reset the changes applied to the default settings

Analyze your current data

Data assessment is a crucial step preceding the actual database migration operation. To guarantee data accuracy and completeness after DB migration, you need to ensure data type compatibility, eliminate duplicate and redundant data, detect possible conflicts, etc.

Thorough data audit and preparation will help you reduce the likelihood of delays, cost overruns, or even total failure. You won’t need additional software tools or third-party resources for this—dbForge Studio for SQL Server will cope with all the tasks in question.

How to migrate data in SQL Server in 4 simple steps

Let's look at the worked example of database migration using dbForge Studio for SQL Server. This all-in-one IDE for SQL Server development, maintenance, and administration tasks is easy to use and requires virtually no learning curve. All you need is just follow visual step-by-step migration wizards. So, fasten your seat belts, we are leaving for our migration journey.

Step 1: Create a database schema comparison project

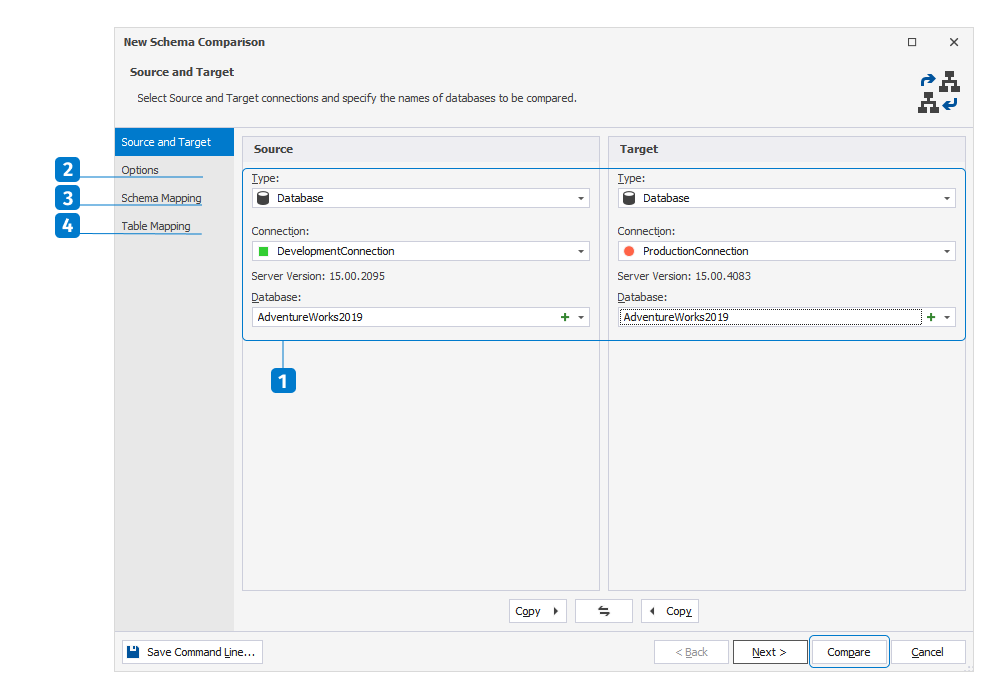
Before migrating SQL Server schemas, you need to run a schema comparison between the source and target databases. A handy New Schema Comparison wizard of dbForge Studio provides a guided walkthrough for setting up the comparison process. To invoke the wizard, navigate to Comparison > New Schema Comparison, then make all the necessary configurations on the wizard’s pages.

The New Schema Comparison wizard leads you through the following steps of setting up SQL schema migration:

  • 1. Configure connection settings
  • 2. Tune up comparison options
  • 3. Map schemas
  • 4. Map tables and columns
  • Once done, click Compare.
Note
If you intend to migrate an existing database to a brand new one, you can create an empty database on the required server right from the wizard.
Create new schema comparison project
How to start new schema comparison

Step 2: Run Schema Synchronization

The idea behind this step is to migrate a SQL Server database to a new schema with the help of a robust SQL schema migration tool that comes with dbForge Studio for SQL Server.

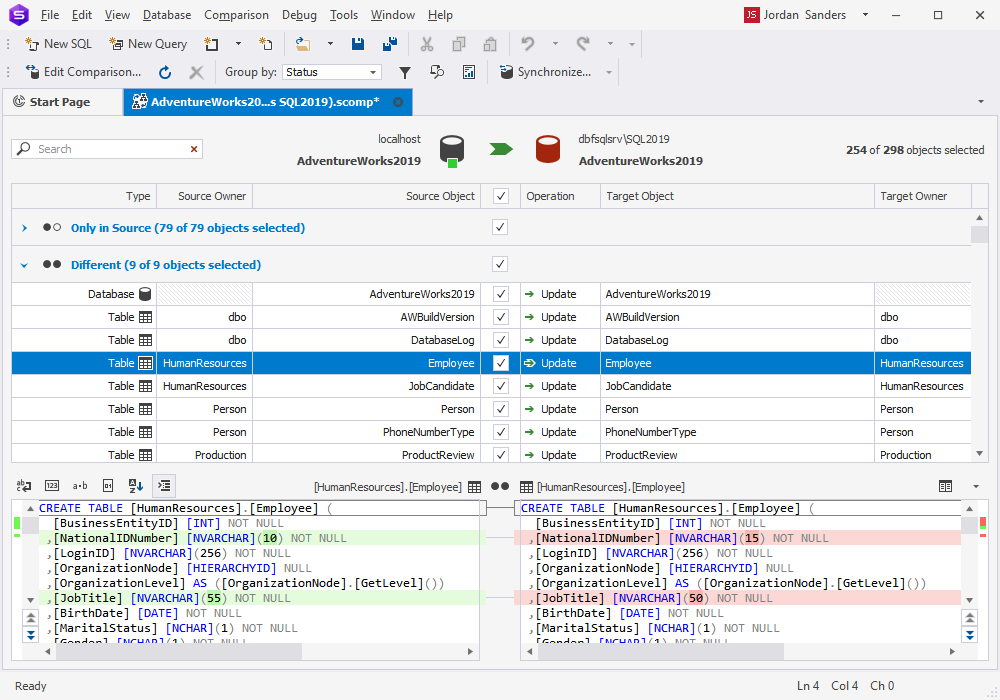
After you click Compare in the previous step, the Studio displays the schema comparison results.

In the upper pane, you can see the objects that you can select for schema synchronization. The lower pane displays a side-by-side DDL differences between the objects selected in the upper pane. Select the schema objects you want to deploy and click the green arrow button to open the Schema Synchronization wizard.

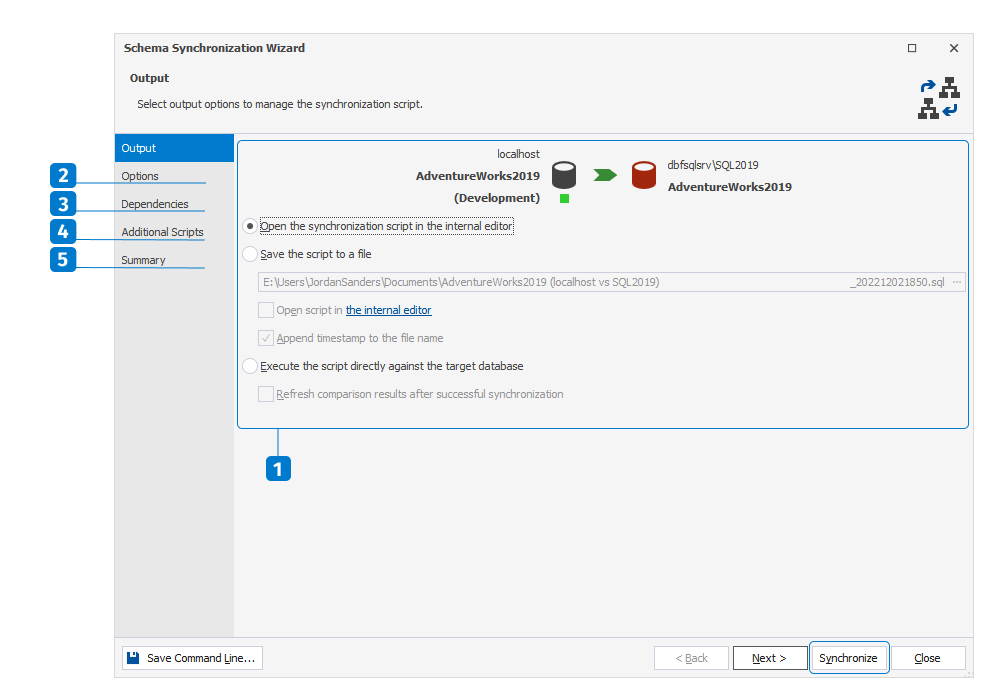
This wizard is highly intuitive too, and it guides you through the following steps of schema migration in SQL Server:

  • 1. Configure the output
  • 2. Set up schema deployment options
  • 3. View the dependencies and select additional objects to synchronize if necessary
  • 4. Add pre- and post-execution scripts if necessary
  • 5. Review the synchronization action plan and warnings

Once done, click Synchronize.

On successful completion of the step, the structure of your source and target databases will be identical, and you will be able to proceed to SQL Server data migration.

Schema Synchronization Wizard
How to perform data comparison

Step 3: Perform Data Comparison

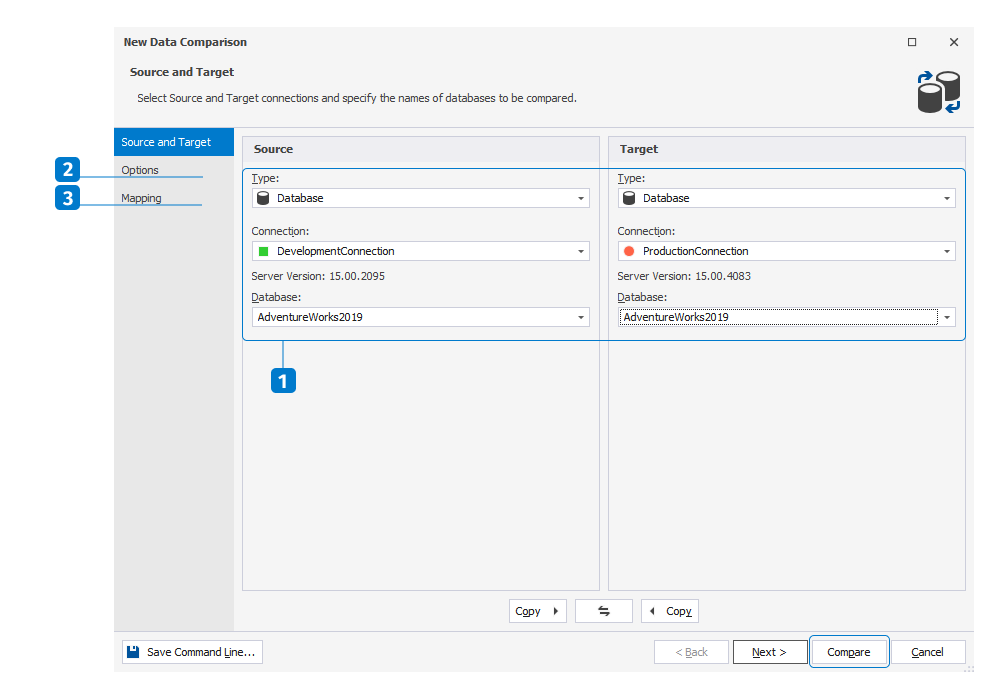
In this step, we are going to compare data between the Source and the Target. For this, we need to invoke a New Data Comparison wizard. Pretty much repeating step 1 but now with data, navigate to Comparison > New Data Comparison. Then go through the wizard’s pages making the necessary configurations.

The steps of the wizard are designed to set up SQL data migration and are as follows:

  • 1. Configure connection properties
  • 2. Tune up data comparison options
  • 3. Perform object mapping
  • Once done, click Compare.

Step 4: Quick Data Migration and Synchronization

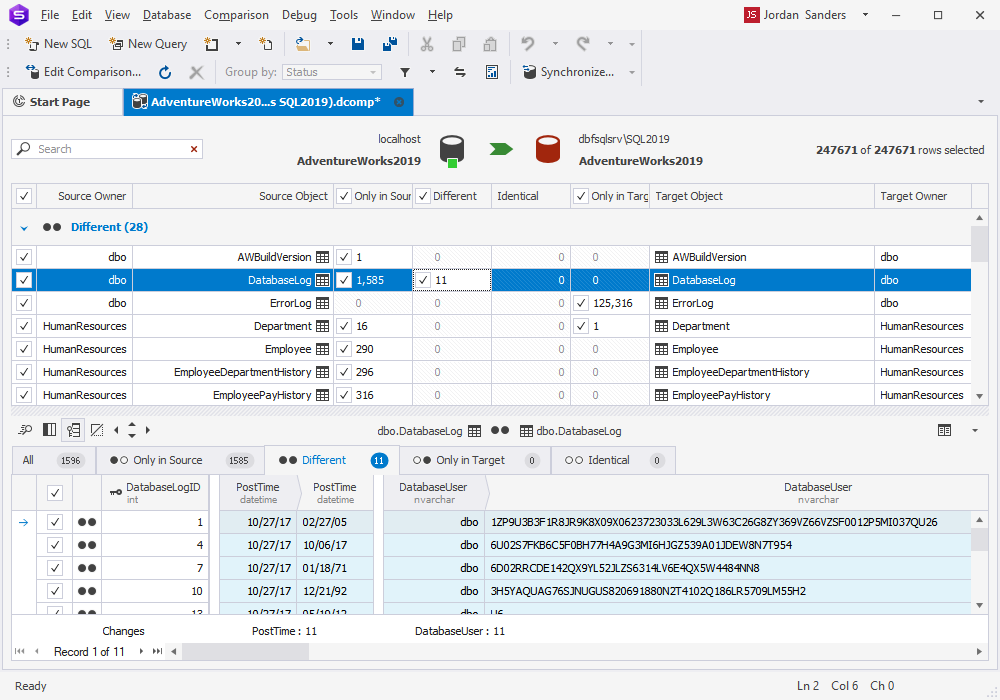
And again, after you click Compare in the previous step, the Studio displays the comparison results, but this time these are data comparison results.

The upper grid shows the objects you can select for deployment. For a better and more convenient analysis, objects are divided into the following groups: Different, Identical, Only in Source, and Only in Target.

The lower grid of the Comparison results window allows viewing exact data differences. Select an object in the upper grid, and the data of that object will be displayed below.

After reviewing and analyzing the comparison results, click the green arrow button to open the Data Synchronization wizard.

Migrate and synch data
dbForge Studio for SQL Server - Data Comparison Wizard

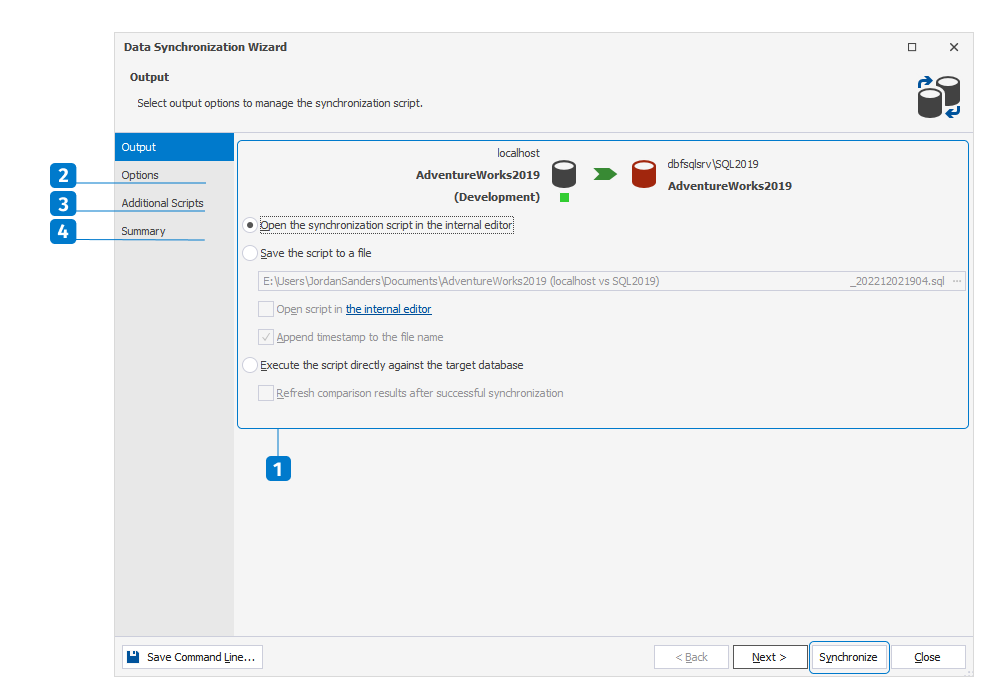
And once again, walk through the wizard’s steps to configure and run data synchronization:

  • 1. Configure the output
  • 2. Set up data deployment options
  • 3. Add pre- and post-execution scripts if necessary
  • 4. Review the synchronization action plan and warnings

When done, click Synchronize.

After that, your source and target databases will be identical: both in terms of their structure and data.

Useful checklist for SQL database migration planning

  • Analyze the disk space required for the target database on the target server
  • Collect information on database logins, users and their permissions
  • Make a FULL backup of all the databases involved in the migration
  • Check linked servers
  • Conduct migration
  • Transfer logins

Ready to migrate your databases? We have prepared this concise and useful SQL migration checklist for you to go through the compulsory migration steps in the correct order and not miss anything.

  • Check Orphan Users issues
  • Update statistics on the migrated databases
  • Re-organize indexes on the migrated databases
  • Point the application to a new server
  • Conduct thorough post-migration testing

Conclusion

On top of a hefty suite of advanced tools and features, dbForge Studio for SQL Server delivers a robust Schema Compare and Data Compare utilities, designed to facilitate SQL Server migrations of any complexity. You can test-drive and evaluate the Studio’s functionality during 30 days for free.

Try dbForge Studio for SQL Server and speed up your database tasks! Try now