How to connect to a SQL Server database
dbForge Studio for SQL Server, a fully-featured Integrated Development Environment (IDE) for SQL Server and Azure SQL databases, offers a quick and simple way to work with multiple databases. Its features allow for easy connection to databases through various authentication methods and efficient management of existing connections.
Advantages of using dbForge Studio for SQL Server for connecting to databases
The Studio features the Database Explorer that aids users in effortlessly connecting to databases, managing connection states (open/close), and viewing and editing connection details.
Here are some of the advantages of managing database connections with dbForge Studio for SQL Server:
- User-friendly visual interface for easy database connection setup
- Capability to connect to multiple databases concurrently
- Support for various authentication methods
- Support for encrypted connections for enhanced security
- Color-coded connection marking for quick identification
- One-click opening of collections
- Simplified modification of database connections
- Detailed view of database connection information
- Immediate navigation through database objects upon connection
How to connect to a SQL Server database with dbForge Studio
To connect to a database, we need to create a server connection in the following way:
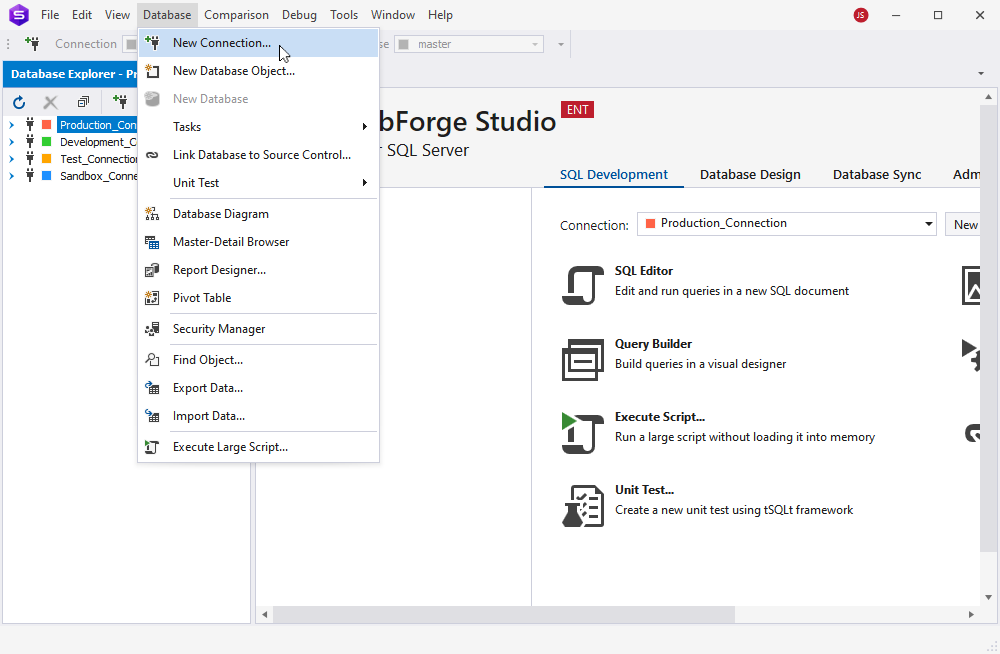
1. On the Database menu, click New Connection.

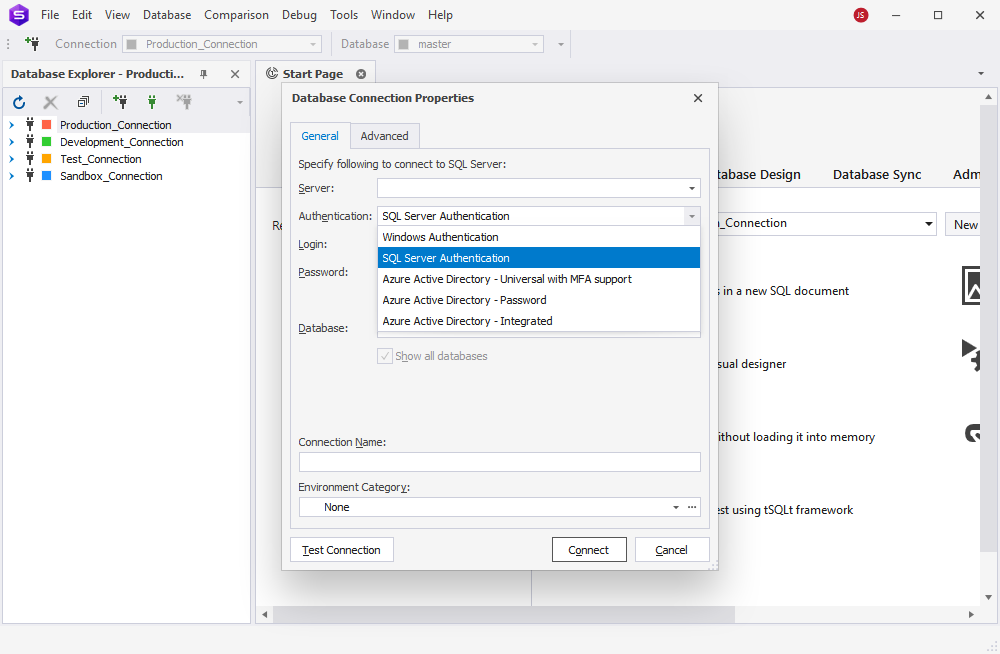
2. The Database Connection Properties dialog box opens.
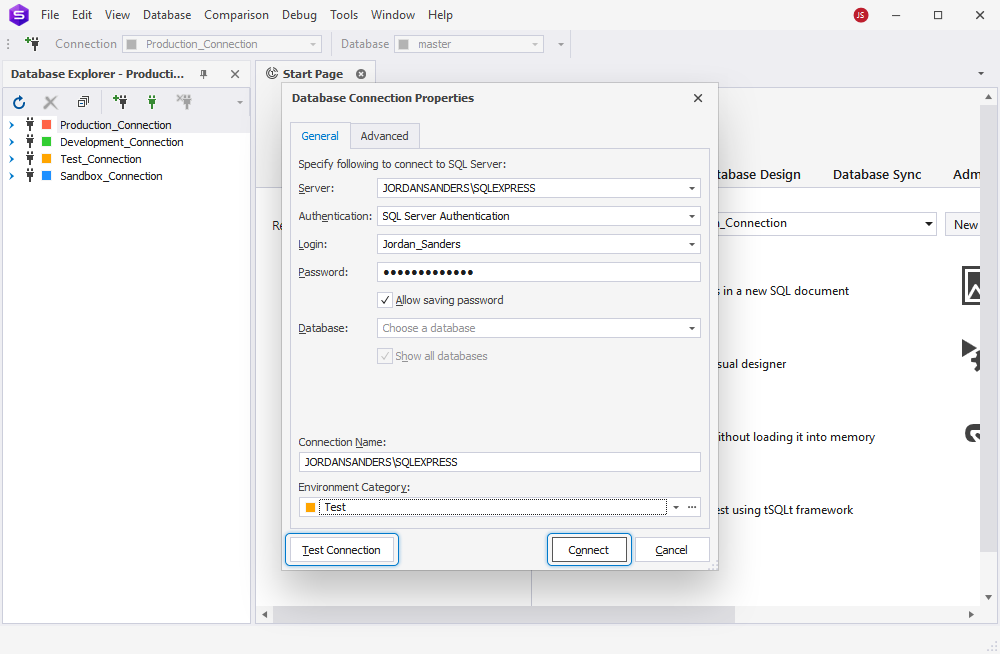
On the General tab, specify the connection details:- Server: Select the server from the drop-down list.
- Authentication: Choose the authentication mode from the drop-down list: Windows Authentication SQL Server Authentication Active Directory - Universal with MFA authentication Azure Active Directory - Password Azure Active Directory - Integrated
For more information about connecting to a database with the Azure Active Directory authentication, refer to the How to connect with Azure Active Directory authentication article.
Then, provide your credentials and the database you plan to work with:
- Login: Enter your login
- Password: Provide your password. By default, the password is saved automatically. If you don't want to save it, clear the Allow saving password check box.
- Database: Enter the name of a SQL database you want to connect to or select the database from the drop-down list. By default, the Show all databases check box is selected. If you want to hide all available for the connection databases in Database Explorer, clear the check box.
Optionally, you can also specify additional parameters:
- Connection Name: The connection name is generated automatically from the host name. If you want to create a distinctive name for the connection, type it directly.
- Environment Category: You can select the category (Development, Production, Sandbox, or Test) from the drop-down list and mark it by color to manage connections conveniently further.

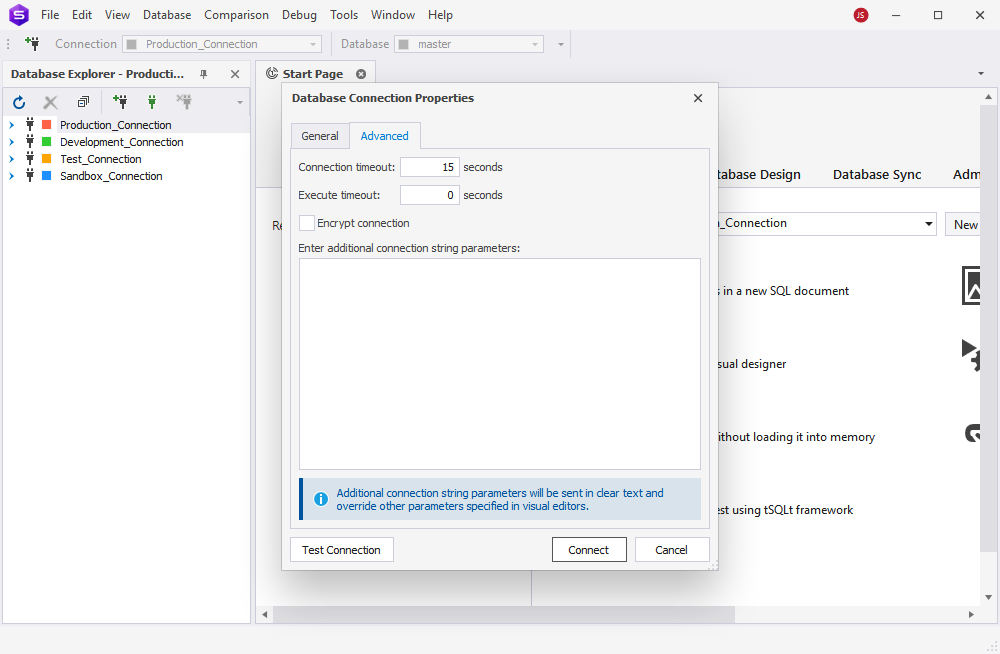
3. On the Advanced tab, you can optionally configure additional connection properties:
- Connection timeout: Set the amount of time (in seconds) during which the server should wait to establish a connection. The default value is 15 seconds.
- Execute timeout: Set the amount of time (in seconds) during which the task should be completed. The default value is 0 seconds.
- Encrypt connection: Select the check box if you want to use the encrypted connection.
- Enter additional string connection parameters: Set additional connection properties to the connection string.

4. When all the connection details are provided, you can verify them by clicking Test Connection. dbForge Studio for SQL Server will perform the test attempt and allow you to connect immediately or inform you about any failure taking place and its causes. Or, you can click Connect to create the connection at once.

Video tutorial
Additionally, we suggest you watch the video tutorial that shows in detail how to create a connection to the SQL Server database in dbForge Studio for SQL Server.
Also, you will learn how to: select the environment category, modify the connection properties, save the created connections using the Import and Export Settings wizard, and retrieve data from a table.
Conclusion
We have shown how to connect to a SQL Server database using dbForge Studio for SQL Server. This process is fast and uncomplicated. Additionally, the Database Explorer section allows you to efficiently manage your connections. You can open and close them as needed, view and modify details, and use the Studio to work with multiple databases, whether they are hosted on-premise or in the cloud. dbForge Studio for SQL Server greatly simplifies database access and enhances the user experience.
