How to import data from a text file to SQL Server
Data transfer is an important operation that helps you import or export data in different file formats to SQL Server databases.
To perform these operations, you can use dbForge Data Pump. It is a versatile SSMS add-in that migrates data between external
sources and SQL Server databases. The tool supports multiple data formats to export or import data including Excel, CSV, XML, JSON, Text, MS Access, etc.
In this article, we'll take a closer look at how to import data from a text file into a SQL Server database using dbForge Data Pump.
A text file supports human-readable plain documents, where each line represents a record, a paragraph, or other textual information.
Although TXT files are compatible with different computer systems or software programs, they do not contain special fonts,
colors, styles, or other rich text attributes.
Here are some of the advantages of using text files:
- Simplicity: TXT files are plain and human-readable text files that can be easily created or edited with a basic text editor
- Cross-platform compatibility: They can be opened and modified on any operating system or text editing software
- Data transfer: They are often used for transferring data between different programs and systems as they can be easily read and parsed
- Archiving: TXT files are used for storing records, logs, and other text-based data over time
- Documentation: Readme files and other plain text documentation are frequently stored in TXT files for easy access and readability
Prerequisites
To get started, ensure you have a .txt file with data you want to import into a SQL Server database and dbForge Data Pump downloaded and installed on the machine where data import will be performed.
Step-by-step guide
Now, let's see how to import data from a text file into a SQL Server database using dbForge Data Pump.
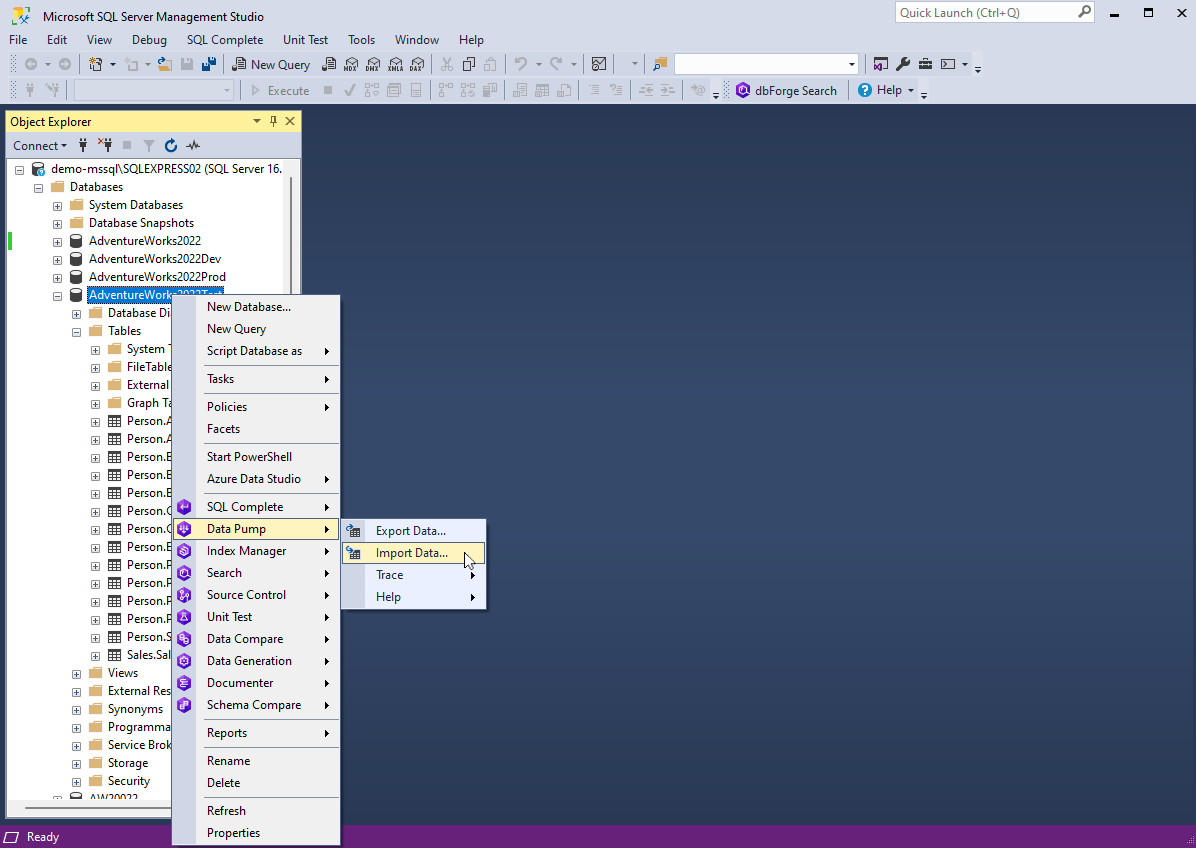
1. In SSMS Object Explorer, right-click the required database and select Data Pump > Import Data to open the Data Import wizard.
2. On the Source file page of the Data Import wizard, select the Text format and click more options menu in the File name field to load the source file you want to import. To proceed, click Next.

3. On the Destination page, select a server connection, a database, its schema, and a table to import data - a new one or an existing one.
If you want to import data into a new target table, specify its name. In our example, we select the existing table and click Next.

4. On the Options page, you can configure the formatting options for imported data:
- Encoding: Check whether the encoding is set correctly or select another one from the dropdown list.
- Quote string: Specify the character to be used for string quoting.
- Skip lines: Specify the number of lines to be skipped during import. The lines are counted from the top.
- Header: Specify the header position (the required number of lines); otherwise, the imported columns will get default names - column1, column2, etc. The header will be highlighted in blue in the Preview section.
- Optional: Select the Import even lines only option.
Additionally, there is the Splitting section with the following options:
- Manual means manual splitting. Go to the Preview section and double-click the required places to set column ranges. The markers will appear. You can move them forward or backward to change the column length. To remove a marker, double-click it.
- Fixed width is defined by a specified value. The default value is 50. When the option is selected, you can view in the Preview section how the columns are split.
- Text Separator has four options to choose from: Tab, Space, Custom, and Auto defined (default option).
So, select the splitting option, preview the source data, and then click Next.

5. On the Data formats page, do the following:
-
Common Formats: Specify the formats for null strings, thousand and decimal separators, boolean variables, date and time. The Autodetect Date and Time format option
is selected by default.
-
Column Settings: Configure the format settings for individual columns. These settings include Null String, Left Quote, Right Quote, and Date and Time. Note that if a format mask is not set, the application will identify date/time values automatically.
6. On the Mapping page, map the source columns to the target ones. If you are importing data into a new table, the application will automatically create and map all the columns. The results will be displayed in the Preview section.

Note that If you are importing data into an existing table, only columns with the same names will be mapped,
while the other columns should be mapped manually. If no columns with the same name are found, they are mapped in the following succession:
the 1st column in Source with the 1st column in Target, etc.
You should select at least one column with a primary key by selecting the corresponding Key checkbox. Otherwise, some of the import modes on the Modes page will be unavailable.
You can click View on the toolbar to view column properties. Finally, to clear the mapping of all columns, click Clear Mappings on the toolbar. To restore it, click Fill Mapping.
7. On the Modes page, select an import mode. If you select to import data into an existing table, all the options will be available. If you import data into a new target table, only the Append mode can be used.
- Append - add records to the target table
- Update - update a record in the target table with a matching record from the source table
- Append/Update - update a record if it exists in the target table; otherwise, add a record
- Delete - delete records in the target table that match records in the source table
- Repopulate - delete all records in the target table and repopulate them from the source table
Optionally, you can select the Use a single transaction and Use bulk insert checkboxes, the latter of which reduces the quantity of statements and speeds up import but can affect the error handling mechanism.
8. On the Output page, select one of the following output options to manage a data import script:
- Open the data import script in the internal editor
- Save the data import script to a file. To use this option, specify the path and the file name. Additionally, you can select the Add timestamp to the file name and Open in the internal editor checkboxes
- Import data directly to the database

9. On the Errors handling page, you can define the error processing behavior:
- Prompt the user for an action
- Ignore all errors
- Abort at the first error
In addition, you can specify a path to write reports to a log file.
10. Click Import. When the data import process is completed, you can view the log file or click Finish to exit the wizard.
Additional notes
If you want to save your import settings as templates for recurring scenarios, click Save Template.
To make data import efficient and thus maintain data accuracy and optimize database performance, you can follow some tips such as:
- Select the appropriate data import method that suits your specific needs. These may be BULK INSERT or tools such as the Import and Export Wizard available in dbForge Data Pump.
- When dealing with large datasets, consider using bulk loading techniques such as BULK INSERT or BCP (Bulk Copy Program) utility for faster data transfer.
- Use appropriate data types that match the data types in your text files to minimize data conversion and improve performance.
- Use batch files to reduce memory usage and enhance efficiency.
- If the target table has indexes, consider removing them before data import and recreating them afterwards. This will accelerate the data import process.
- Check that your data files do not contain inconsistencies or errors before importing.
- Use appropriate transaction management settings. In some cases, removing or reducing transaction logging during the import may improve speed.
- Implement robust error handling to capture and manage errors during the import process
- Automate the data import process for repeating tasks.
Remember that choosing the right strategies can significantly improve the speed and reliability of data import operations in SQL Server.
Conclusion
In this tutorial, we have offered a step-by-step guide about how to transfer data from a text file to a SQL Server database table using the Data Import wizard
available in dbForge Data Pump for SQL Server. The tool streamlines the process, requiring minimal effort and saving time. In addition, we have shared some tips for making the data import process efficient and smooth.