Black Friday is here! Get up to 30% off on Devart products!
ends in   {{days}}
Days
{{timeFormat.hours}}
:
{{timeFormat.minutes}}
:
{{timeFormat.seconds}}

Check History of Executed Queries in MySQL Easily!

The MySQL Query History feature in dbForge Studio for MySQL helps developers and DBAs track past queries, troubleshoot issues, and optimize performance. It provides quick access to query statistics and history, making it easier to identify errors and improve efficiency.

MySQL Query History keeps you updated about all executed MySQL queries:

  • Check MySQL query history and be aware of who performs queries
  • Access and review the full text of executed MySQL queries
  • Customize executed MySQL queries and run them again, if necessary
  • Export the MySQL Query History to CSV
  • Filter executed MySQL queries to find required ones faster
  • View the data in the query history for a particular period

Set up the MySQL Query History

To customize the MySQL Query History behavior, select Options on the Tools menu. Then, navigate to Environment > Documents > Query History.

The window allows you to:
  • Enable/disable tracking of the MySQL Query History
  • Set up the number of days to store executed queries
  • Configure maximum script size to store
  • Customize output of the MySQL Query History at startup
  • Specify the location of the folder storing the MySQL Query History

How to check MySQL query history

To open the Query History document, select Show Query History on the SQL toolbar or press Ctrl+Alt+H. Alternatively, navigate to the View menu and select Other Windows > Query History.

See the detailed history of executed queries

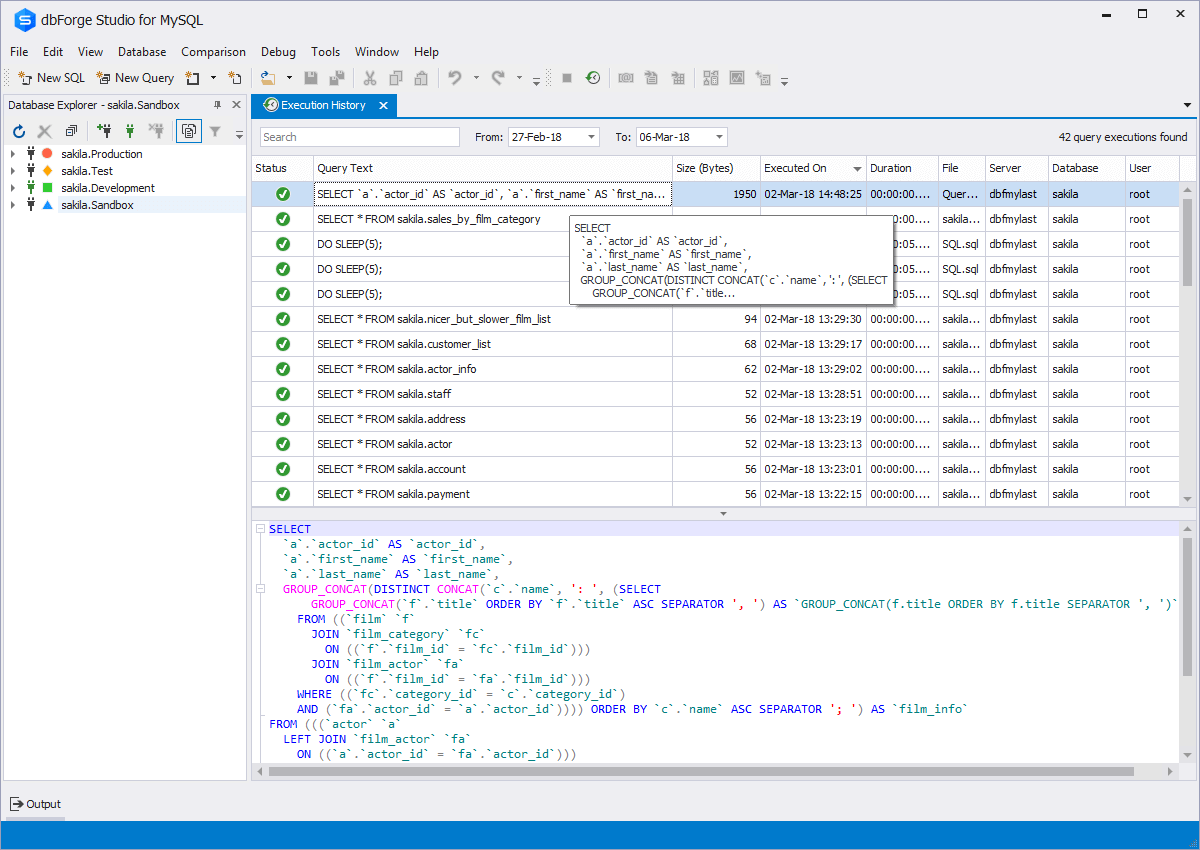
The Query History document displays a list of executed queries with the following details:

  • Execution status indicating whether a query is executed successfully or completed with errors
  • Query Text
  • Query size in bytes
  • Execution timestamp
  • Query execution time
  • Name of the query file
  • Name of the sever against which a query is executed
  • Name of the database against which a query is executed
  • Name of the user who executes a query

Also, the window displays DDL of the selected query.

Execution window

How to filter executed queries

To quickly find a required MySQL query in the list, you can:

  • Type the search string into the Search box
  • Sort, group, and filter execution data by columns

Edit and execute commands from the history log

To edit or re-execute an executed query, you can:

  • Right-click a query in the list and select To New SQL Window or To Clipboard. Depending on your choice, the selected query will be opened in a new SQL window, or copied to clipboard
  • Double-click a query in the list to open it in a new SQL window, where you can edit and re-execute the query

Get the history of executed queries in MySQL in one tool!

As you can see, there is nothing easier than tracking executed MySQL queries with the MySQL Query History feature of the best MySQL IDE for Windows by Devart.

You can export the entire query list or only selected queries, with all details such as query text, server and database names, execution time, and query size. The data will be saved in a .csv file format for easy review and further analysis.

Conclusion

dbForge Studio for MySQL offers a query history tool with an intuitive and user-friendly drag-and-drop interface. MySQL Query History allows you to have a report on performed queries in one place that you can access at any time. Using the feature, you can modify already executed MySQL queries and reuse them again.

Along with MySQL Query History, dbForge Studio for MySQL provides a lot of useful and intelligent database development and management tools and capabilities.

Frequently Asked Questions

How can I view the last queries executed in MySQL?

To view the last executed queries, navigate to the upper View menu and select Other Windows > Query History or press Ctrl+Alt+H. This will open the Query History grid, displaying the list of queries. To see the most recent queries, use the sort glyph in the Executed On column. This allows you to sort the queries in either descending or ascending order.

For more information, refer to the SQL Query History documentation.

Can I view query history using the performance_schema in MySQL?

Yes, you can view recent query history using the performance_schema in MySQL by querying the events_statements_history or events_statements_history_long tables.

First, check that performance_schema is turned on. By default, it is enabled in newer versions of MySQL. You can verify it by executing the following query:

SHOW VARIABLES LIKE 'performance_schema';

If it's turned off, you'll need to enable it by setting performance_schema=ON in the MySQL configuration file (my.cnf or my.ini) and restarting the server.

To view the most recent SQL queries executed by active sessions, query the events_statements_history table. This table captures a limited number of recent statements.

SELECT event_id, sql_text, timer_wait, current_schema
FROM performance_schema.events_statements_history
ORDER BY event_id DESC;

If you need to view more queries than what is stored in the default history table, you can query the events_statements_history_long table, which maintains a longer history of executed queries.

SELECT event_id, sql_text, timer_wait, current_schema 
FROM performance_schema.events_statements_history_long 
ORDER BY event_id DESC 
LIMIT 10;

Note that the events_statements_history table retains only a limited number of queries (default: 10). For longer histories, use events_statements_history_long (default: 100 rows); however, these limits can be configured. In addition, capturing extensive query histories may affect server performance.

If you want to deepen your understanding of database concepts and learn about essential database functions, and advanced SQL data manipulation techniques, such as insertion, deletion, and retrieval, go to the MySQL tutorials.
How long does MySQL keep query history?

The default period to store the executed queries is 60 days; the maximum interval you can set is 365 days. You can modify this period by following these steps:

  1. Go to the upper Tools menu and select Options.
  2. In the dialog that opens, navigate to Environment > Documents > Query History.
  3. In the Automatically remove queries older than: [number of days] d. field, specify the period to store the queries.
  4. Click OK to save the changes.

After the specified period has ended, the history is automatically deleted. If you want to back up your query history before it is deleted, you can manually copy the query history file from the following default folder: C:\Users\Username\AppData\Roaming\Devart\dbForge Studio for MySQL\ExecutedQueries. Note that these files cannot be viewed directly within dbForge Studio once the data is auto-deleted.

If you want to learn how to enable, configure, and use MySQL query logging, refer to this blog article.

For more information, refer to the SQL Query History documentation.

Is there a way to clear the query history in MySQL?

Yes, you can clear the query history directly from the Query History grid. To do this, click Clear on the toolbar or press Ctrl+Del.

Alternatively, you can configure the tool to automatically remove query history after a specified time period. To do this, follow the steps:

  1. Go to the upper Tools menu and select Options.
  2. In the dialog that opens, switch to Environment > Documents > Query History.
  3. In the Automatically remove queries older than: [number of days] d. field, set the period to store the queries.
  4. Click OK to save the changes.

For more information, refer to the SQL Query History documentation.

Can I filter MySQL query history by specific users or databases?

Yes, you can filter the query history by specific users or databases in dbForge Studio for MySQL as follows:

To filter by specific users:

  • In the Query History grid, click the filter icon in the upper-right corner of the User column header.
  • On the Values tab that opens, select the username you want to display.
  • Click Close.

To filter by specific databases:

  • In the Query History grid, click the filter icon in the upper-right corner of the Database column header.
  • On the Values tab that opens, select the database you want to display.
  • Click Close.

Alternatively, you can apply more advanced text filters:

  • In the upper-right corner of the required column header, click the filter icon.
  • Switch to the Text Filters tab.
  • From the Begins With list, select the operator, such as Equals, Contains, etc.
  • From the bottom list, choose the value to filter by.
  • Click Close.

For more information, refer to the SQL Query History documentation.

Does MySQL store query history in memory?

MySQL does not store query history in memory. Instead, dbForge Studio for MySQL manages query history and stores it in files. The default storage location for these query history files is: C:\Users\Username\AppData\Roaming\Devart\dbForge Studio for MySQL\ExecutedQueries. Note that older data in this folder may be auto-deleted based on your configured settings, and files cannot be viewed directly in dbForge Studio once they have been deleted.

To change the storage location of the query history, follow the steps:

  1. Navigate to the upper Tools menu and select Options.
  2. In the dialog that opens, switch to Environment > Documents > Query History.
  3. In the Storage location: field, specify the new folder where you want to store query history.
  4. Click OK to save the changes.

For more information, refer to the SQL Query History documentation.

dbForge Studio for MySQL

The most intelligent MySQL management tool

Availability in the editions of dbForge Studio for MySQL

Feature

Enterprise
Professional
Standard
Express
Executed queries history
Yes
Yes
Yes
Export the MySQL Query History to CSV
Yes
Yes
Yes
No