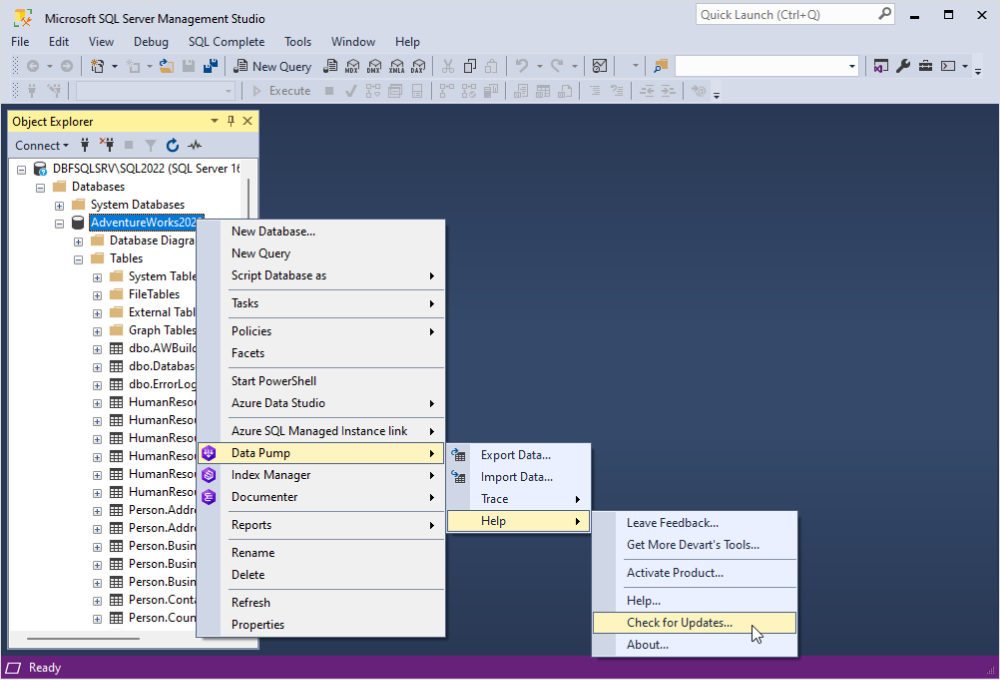
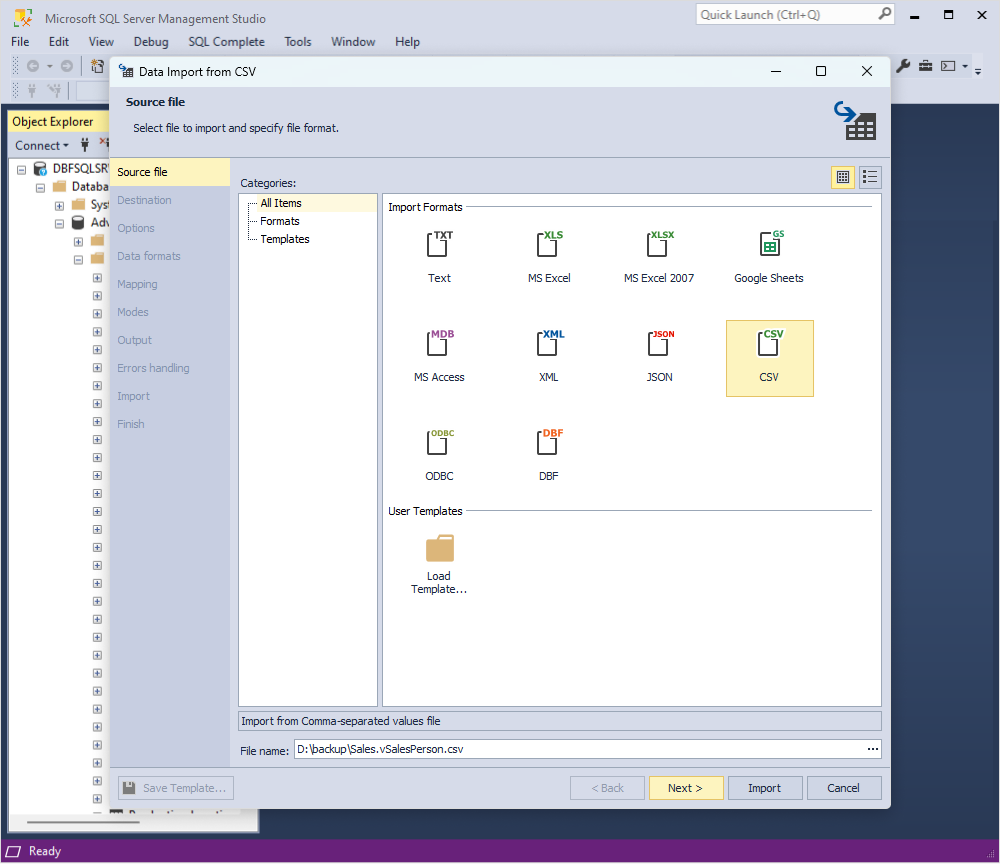
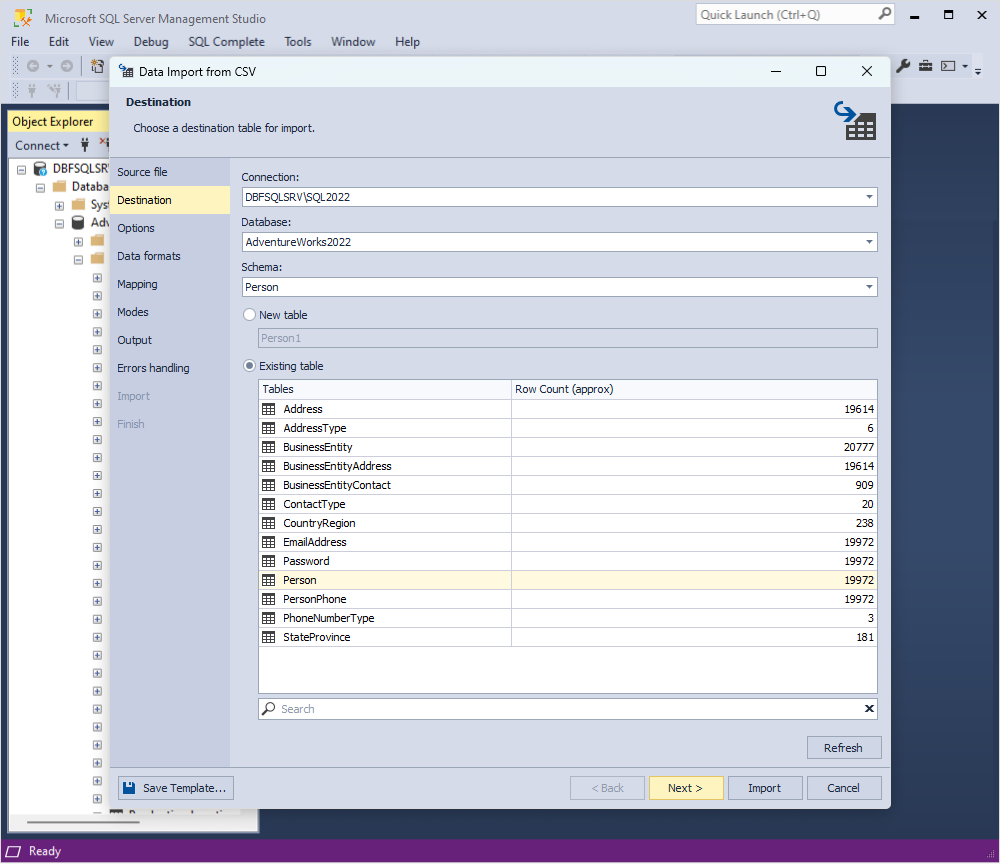
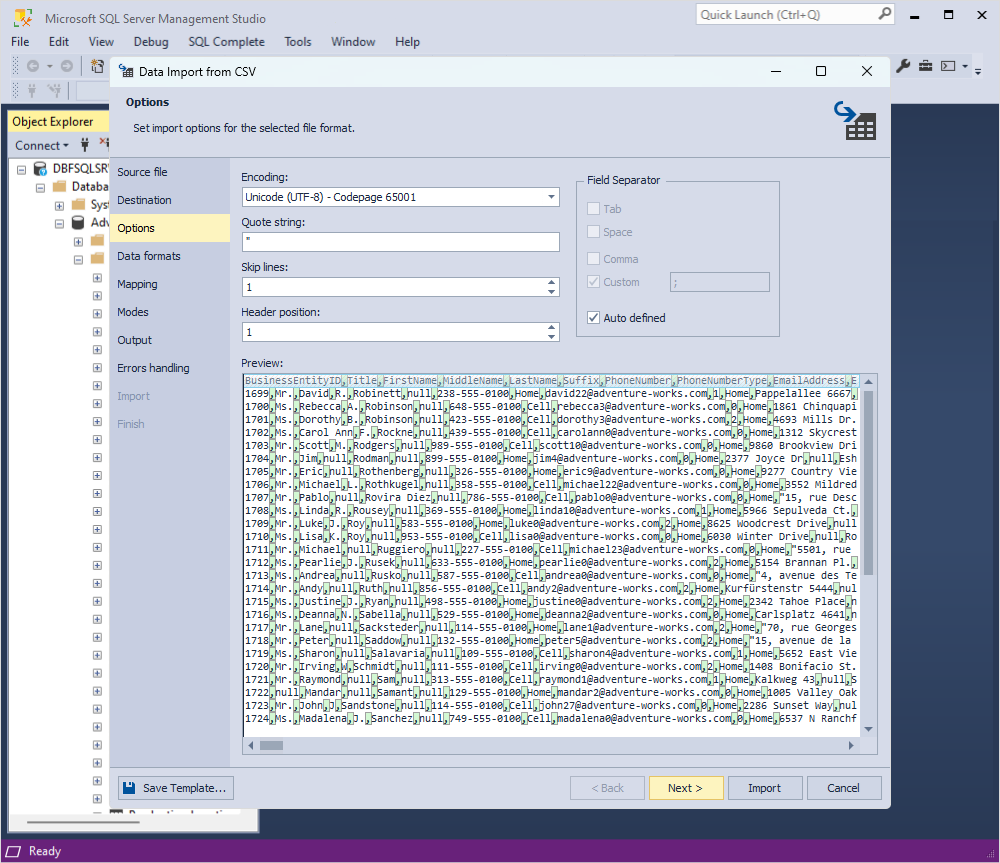
How to import data from CSV to SQL Server

CSV files serve as a widely used format for storing tabular data in a plain text format. They allow organizing data into rows and columns, with each line representing a separate record and the values separated by commas.

The simplicity and universal compatibility of CSV files make them a preferred choice for data interchange between different applications and platforms. This comprehensive guide provides you with a detailed tutorial on how to seamlessly import data from CSV directly into your SQL Server database.

Contents:

Pre-requisites

Before initiating the data import process, ensure that you have a compatible version of Data Pump for SQL Server installed. This essential tool facilitates seamless data transfer between CSV files and your SQL Server database. Alternatively, you can check for the updates directly from the shortcut menu.

Additionally, you will need to prepare the source data in the form of a CSV file. Ensure that the CSV file is well-structured, with column headers accurately representing the data fields. This will streamline the import process and help maintain data integrity during the transfer to SQL Server.

Data Pump - Checking for Updates

Step-by-Step Guide

CSV files represent plain text files that contain records of data with comma-separated values. Every line in a CSV file is a new record from the set of records contained in the file. Easy recognition of comma-separated records by applications makes import and export to CSV convenient.

To import data from CSV:

1. In Object Explorer, right-click a database, point to Data Pump, and then click Import Data.

2. On the Source file page, select the CSV import format. Load import options from a template file in User Templates if you saved it previously. Specify the path and the name of your source file and click Next.

Data Pump - Import CSV Source File

3. On the Destination page, select a server connection, a database, and its schema.

4. Select whether the data will be imported into a New table or into an Existing table.

  • In case you select New table, you will need to specify its name.
  • If you select Existing table, you will be able to choose a destination table from the list. Use Search to easily navigate databases with many tables.

5. Once done, click Next.

Data Pump - Import CSV Destination File

6. On the Options page, you can configure the formatting options for imported data:

  • Check whether the Encoding is set correctly or select another one from the drop-down list.
  • In Quote string, specify the character to be used for string quoting.
  • In Skip lines, specify the number of lines to be skipped during import. The lines are counted from the top.
  • Specify the Header position (the required number of lines). It will be highlighted in blue in the Preview section. If you don't specify the header position, the imported columns will get default names - column1, column2, etc.
  • Specify the Field Separator. You can either keep the Auto defined checkbox selected or clear it and select one of the following options: Tab, Space, Comma, or Custom character.

Preview the source data and click Next.

Data Pump - CSV Options

7. On the Data formats page, you have two auxiliary tabs. The first one is Common Formats, where you can specify the formats for null strings, thousand and decimal separators, boolean variables, date, and time. There is also a checkbox Autodetect Date and Time format, selected by default.

The second one is Column Settings, where you can configure the format settings for separate columns. You have four options here: Null String, Left Quote, Right Quote, and Date and Time. Note that if a format mask is not set, the application will identify date/time values automatically.

8. On the Mapping page, you can map the source columns to the target ones. If you are importing data into a new table, the application will automatically create and map all the columns. You can see the results in the Preview section.

To clear the mapping of all columns, click Clear Mappings on the toolbar. To restore it, click Fill Mapping.

Data Pump - CSV Mapping

9. On the Modes page, select an import mode. There are five available modes:

  • Append - add records to the target table
  • Update - update a record in the target table with a matching record from the source
  • Append/Update - update a record if it exists in the target table; otherwise, add a record
  • Delete - delete records in the target table that match records in the source
  • Repopulate - delete all records in the target table and repopulate them from the source

Optionally, you can select the checkboxes Use a single transaction and Use bulk insert (the latter of which reduces the number of statements and speeds up import but can affect the error handling mechanism).

Data Pump - CSV Modes

10. On the Output page, you have three options:

  • Open the data import script in the internal editor.
  • Save the data import script to a file. To use this option, specify the path and the file name. Additionally, you can select the checkboxes to Add timestamp to the file name and Open in the internal editor.
  • Import data directly to the database.
Data Pump - CSV Output

11. On the Errors handling page, you can specify the error processing behavior (using one of the three available options: Prompt the user for an action, Ignore all errors, or Abort at the first error) and opt to write reports to a log file with a specified path.

12. Click Import. When your data import is successfully completed, you can view the log file or click Finish to exit the wizard.

Data Pump - CSV Errors handling

Additional Notes

In addition to the step-by-step instructions for importing data from CSV to SQL Server, we would like to enhance your experience by offering several valuable tips and tricks.

Conclusion

Data Pump offers more than just a seamless CSV to SQL Server import capability. It provides extensive support for over ten commonly used data formats, including Excel, CSV, XML, JSON, Text, and MS Access. Additionally, it boasts a range of advanced options and templates tailored for recurring scenarios, further enhancing its versatility and efficiency. Download SQL Tools for SQL Server package that includes Data Pump to try its benefits yourself.

dbForge SQL Tools

Incorporate essential add-ins and tools, like Data Pump,
into SSMS to improve its functionality
SAVE UP
TO $1749