MySQL Sample Database: Sources, Installation, and Basic CRUD Operations
Before you implement any new software solution, you should test it properly against the database under a full workload. However, this should not involve your production databases. You may either create and configure another database or use a sample database.
The question of where to get a high-quality sample database for MySQL is common in many development teams. A copy of the production database suits well for test purposes. However, there are always learning or demonstration tasks, etc. They require a sound, properly configured database, which does not reveal any sensitive data.
In this case, example databases are the best option, and this article will explore where and how you can get one to use in your work successfully.
MySQL sample databases
MySQL specialists in need of an appropriate test database often search for such on GitHub. You will undoubtedly find a bunch of variants there in return for the MySQL sample database GitHub request. Another approach is getting a sample database created by MySQL itself.
MySQL offers several sample databases — already configured, filled with data, and supported by the community. You don't need to waste time configuring such databases — just download the MySQL sample database and start working with it.
As MySQL (GNU general public license) is free, all its database samples are free of charge too. The official MySQL page provides an extensive list of MySQL sample databases with setup guides. Which one to choose depends on your preferences.
Sakila is the most popular database for MySQL demonstrations. It has 16 tables, 7 views, 3 stored procedures, 3 stored functions, and 6 triggers. In various tutorials, you will find practical scenarios with query examples performed on the sakila database. So, whenever you need to explore various MySQL features, you can use this test database. The first official Sakila version was developed by Mike Hillyer and released in 2006. The entire MySQL user community supports this test database: you can be sure that any possible bugs are immediately reported and fixed. Every user's feedback is valued.
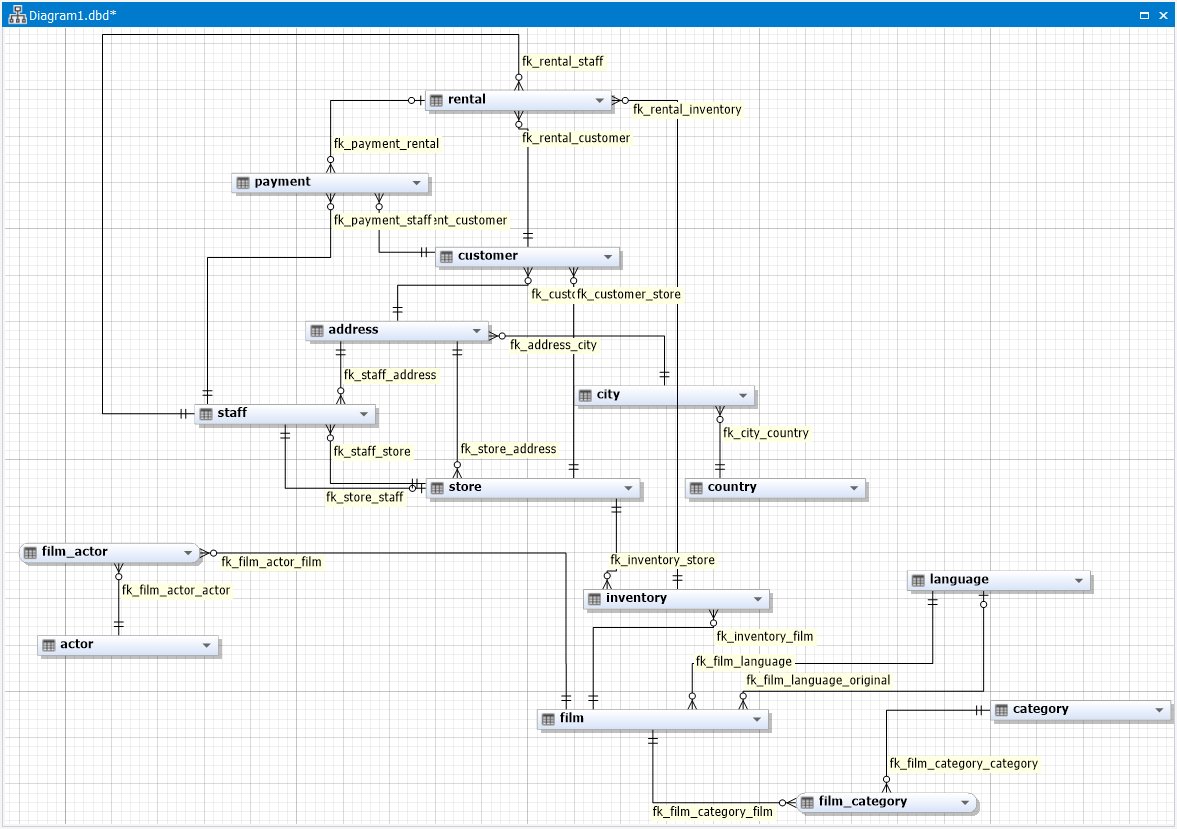
How to download and install a MySQL sample database
If you choose the sakila sample database, its download ZIP package is available on the official page. The unpacked folder contains three files:
- sakila-schema.sql — the file contains all the CREATE statements necessary to reproduce the complete sakila schema and thus create the database on your machine.
- sakila-data.sql — the file contains all the INSERT statements to populate the schema and the trigger definitions. This way, you receive all the data for your database.
- sakila.mwb — the file contains the data model for MySQL Workbench (the default MySQL IDE). You can open the file with that IDE and explore the database structure.
The process of installing the sakila MySQL sample database is simple:
Step 1. Unpack the sakila-db.zip archive into the temporary folder (usually, it is C:\temp\, but it can also be a different /tmp/ path). The unpacked directory will contain those three files we named earlier.
Step 2. Connect to your MySQL server. Use the command-line client for MySQL (it is better to use the root user account, but you can use a non-root one too if it has the create new database privilege):
$> mysql -u root -p
Step 3. Execute sakila-schema.sql and then execute sakila-data.sql. These scripts will create the database schema and populate it with the data.
mysql> SOURCE C:/temp/sakila-db/sakila-schema.sql;
mysql> SOURCE C:/temp/sakila-db/sakila-data.sql;
When the database is installed correctly, you'll get the confirmation message. That's all. You can use this sample database to design and test queries of any complexity, manually or with the help of professional tools.
Above, we mentioned the default MySQL IDE — Workbench. It is popular, but not the only option available. dbForge Studio for MySQL is a comprehensive GUI-based IDE that allows you to manage and administer MySQL-related tasks. It is highly efficient, lightning fast, and extremely user-friendly. Thus, you can use it to work with sakila or any other test/production database. The approach is the same.
Connect to MySQL server in dbForge Studio for MySQL
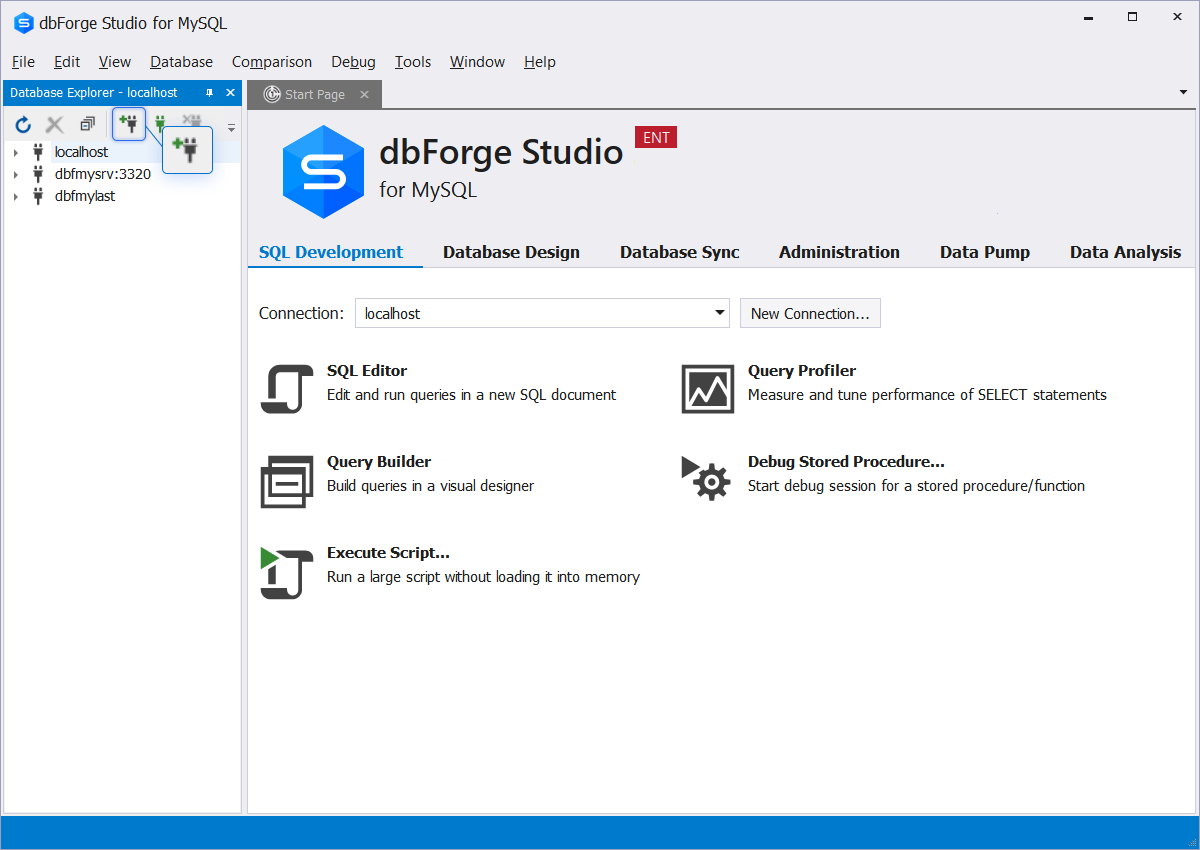
To start using dbForge Studio for MySQL, we first of all need to connect to MySQL server. Open the Studio and you will see the "connection" icon in the Database Explorer menu.
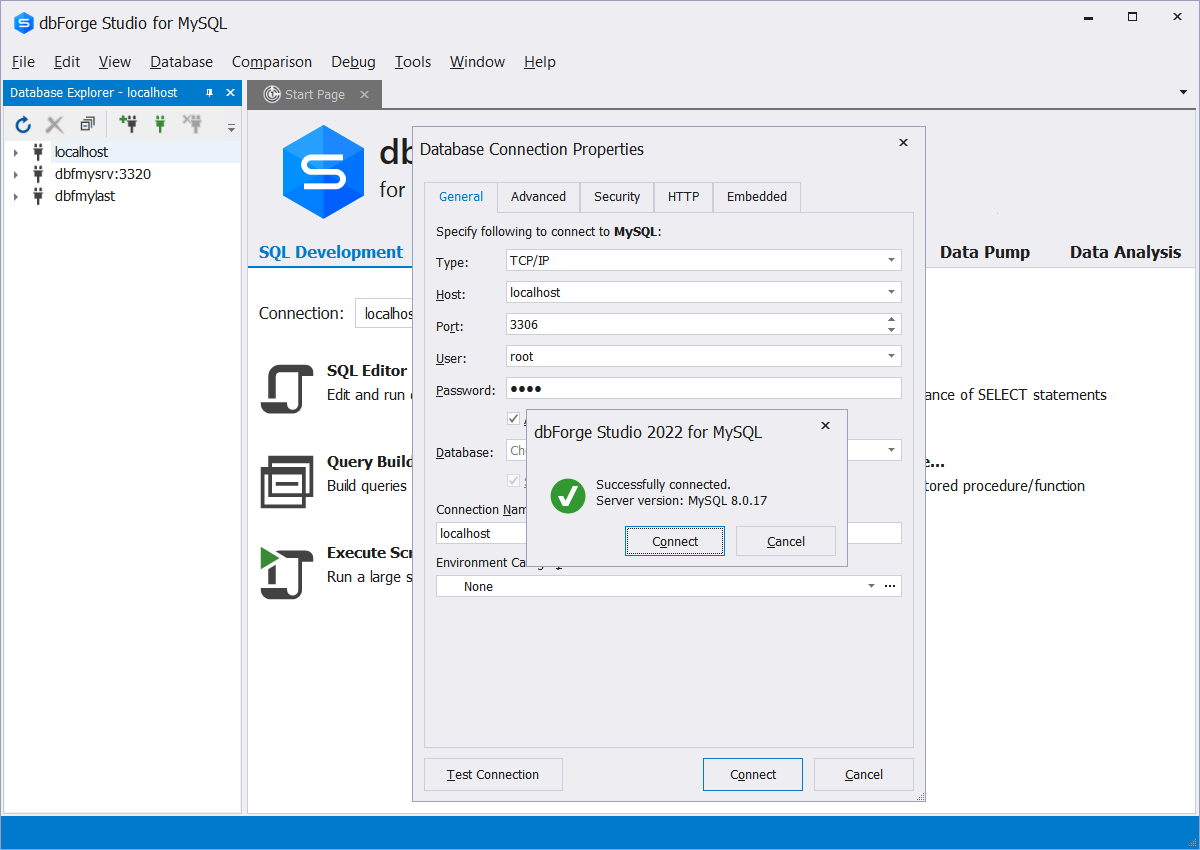
In the new window that will appear, provide the information about the MySQL server instance to connect to (the root user name, password, the database instance name, etc.). Then click Test Connection. If the connection is successful, you'll see the confirmation message.
Create a new database
Suppose you are not going to use a test database created by MySQL for some reason. Instead, you can create your own database from scratch. dbForge Studio for MySQL makes this task quick and easy.
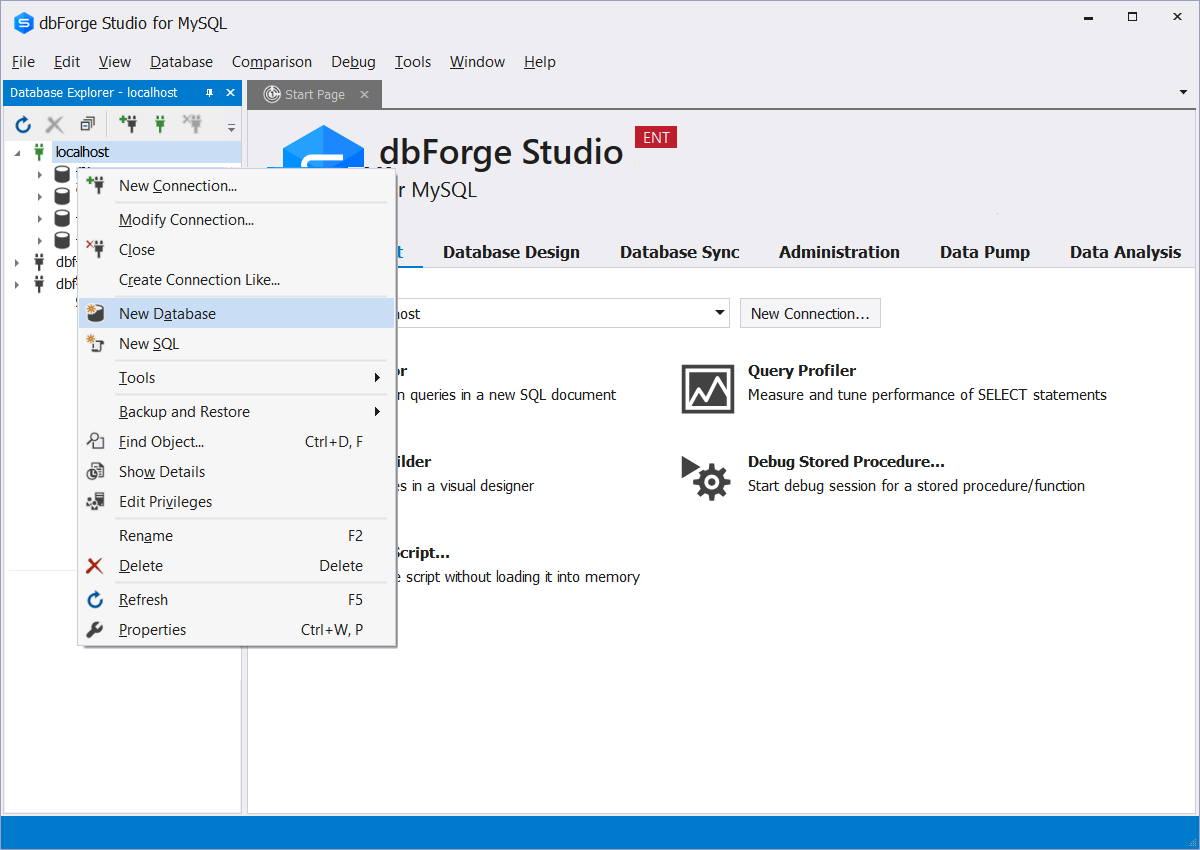
To create a new database, right-click the MySQL server name in the Database Explorer and select New Database.
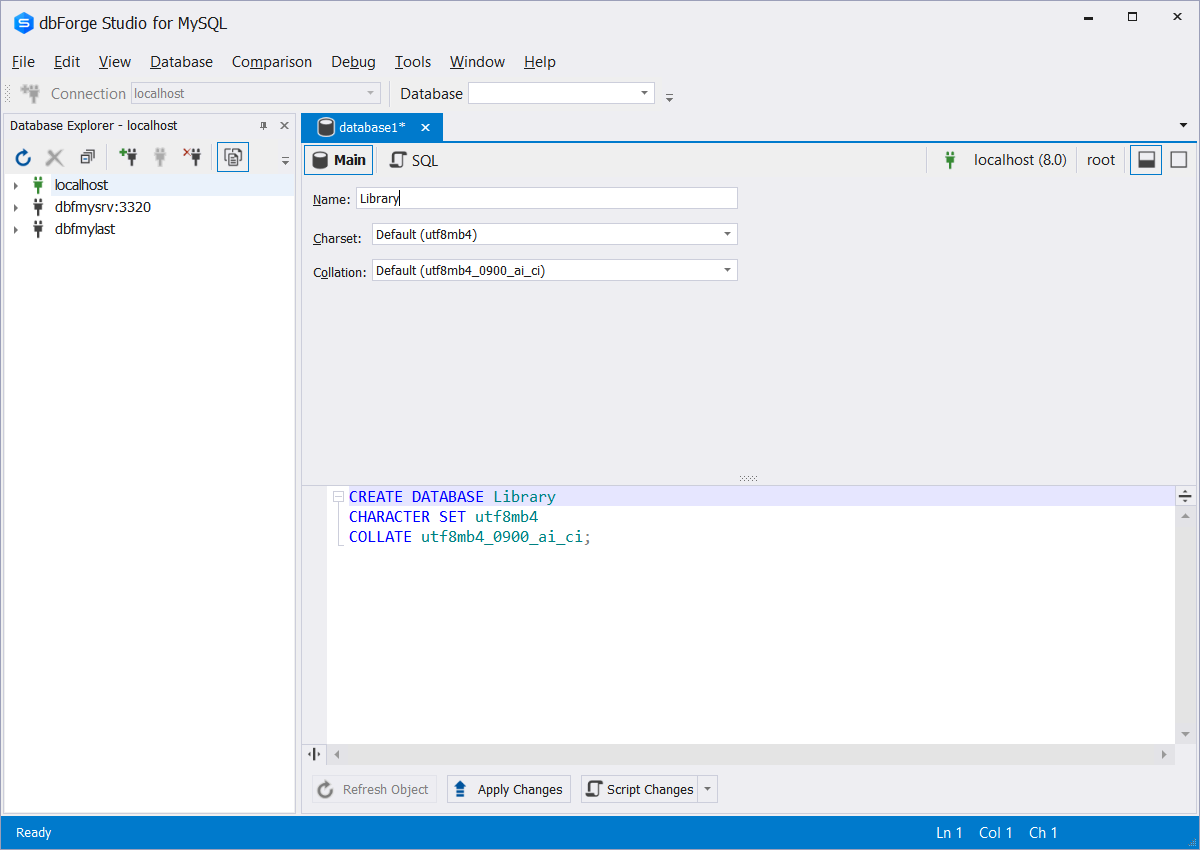
Enter the name of your database (Library in our case). At the bottom of the dashboard, you will see the SQL query generated to create that database. To complete the database creation, click Apply Changes.
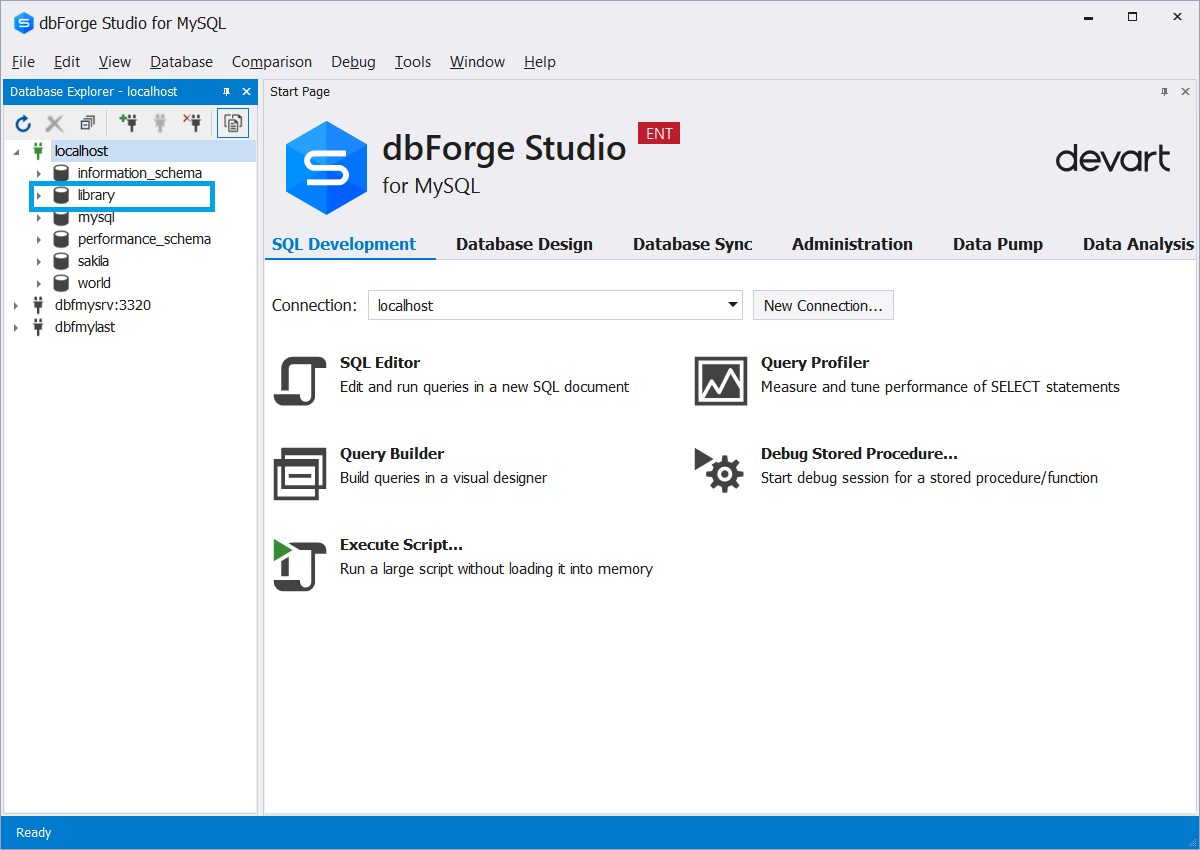
Now you should see the new database name in the list under the corresponding server name.
Create a new table
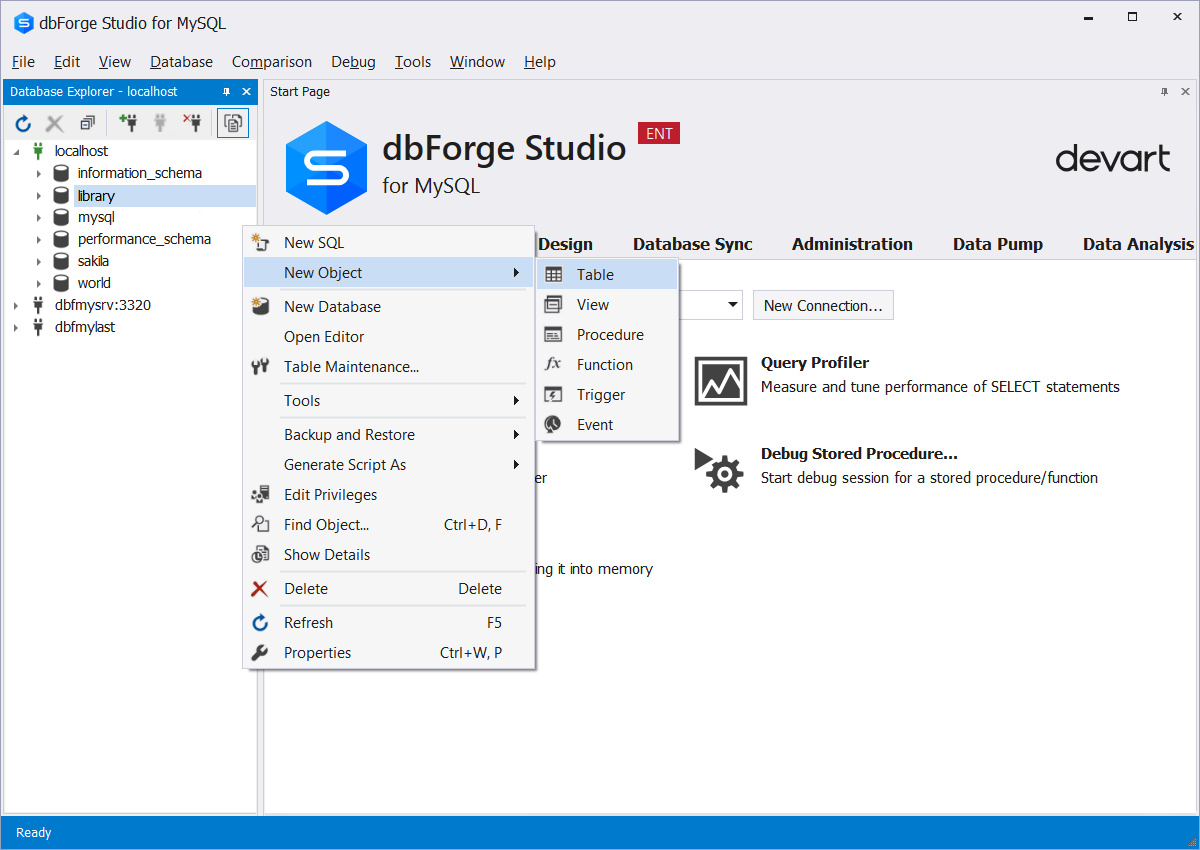
Our database is empty. To add a table, right-click that database name and then select New Object > Table.
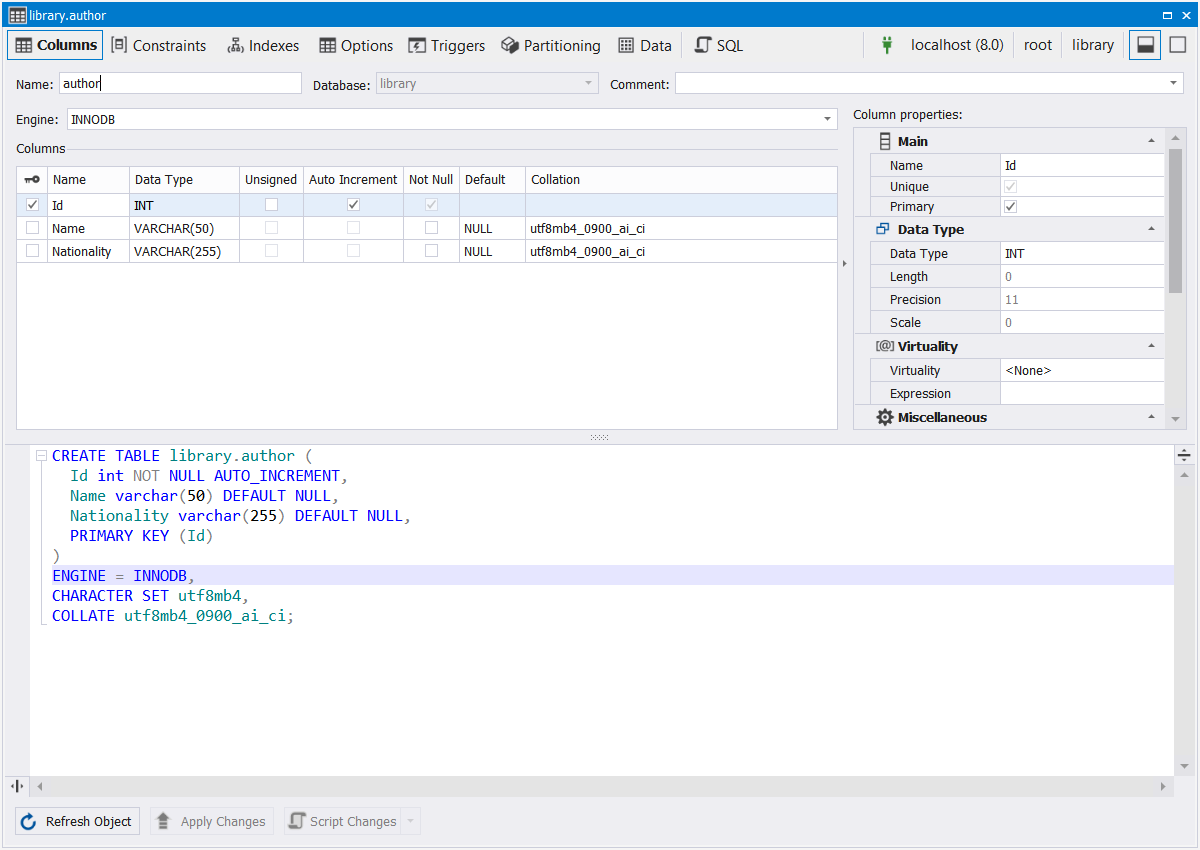
A new window will open. Give the table a name in the corresponding field and add columns by clicking the empty row beneath the column window. Enter the column name, specify data type, and configure other settings.
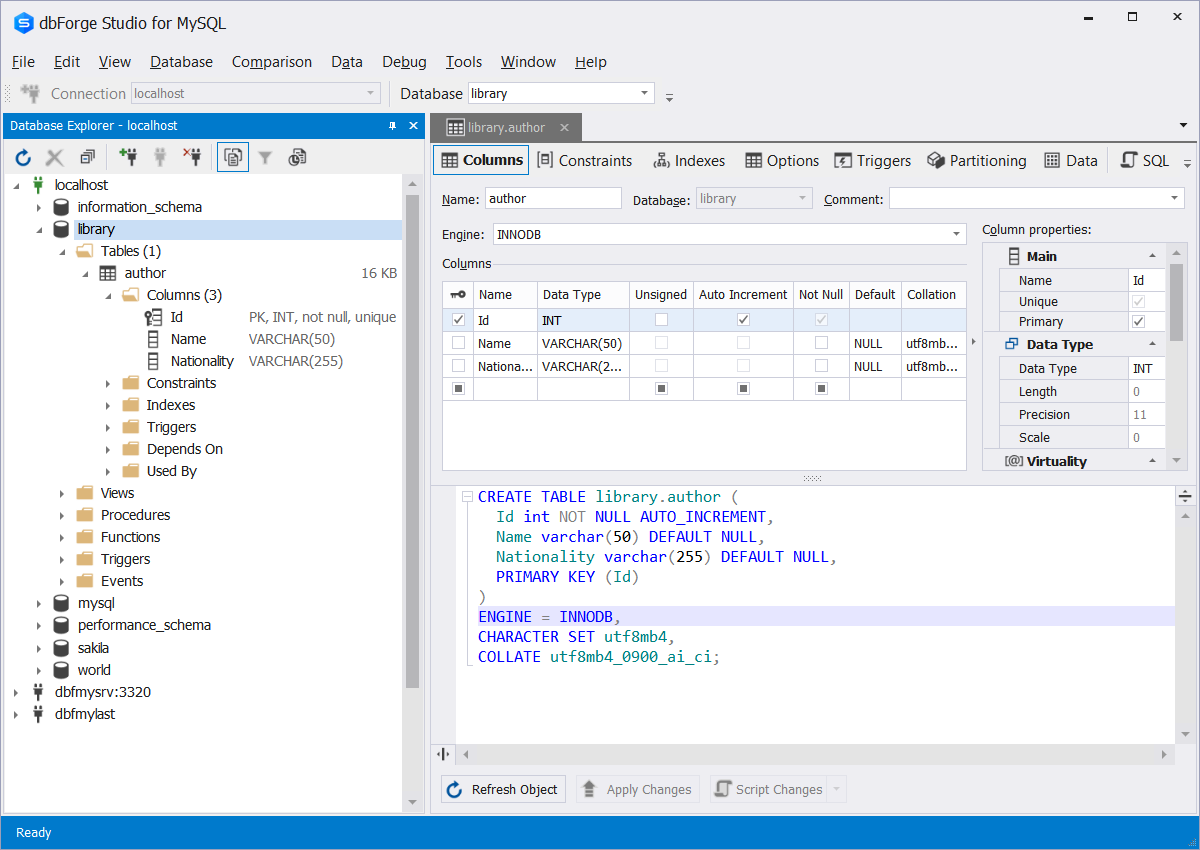
Below, you can see the example. We have created a table named author with three columns - Id, Name, and Nationality. Id is the primary key column — see the ticked checkbox on the left under the key icon. The Studio also generates the SQL script to define the new table and its columns. You can see more table properties in the Column properties section on the right.
Click Apply changes to save the columns. Then refresh Database Explorer and expand the author table node.
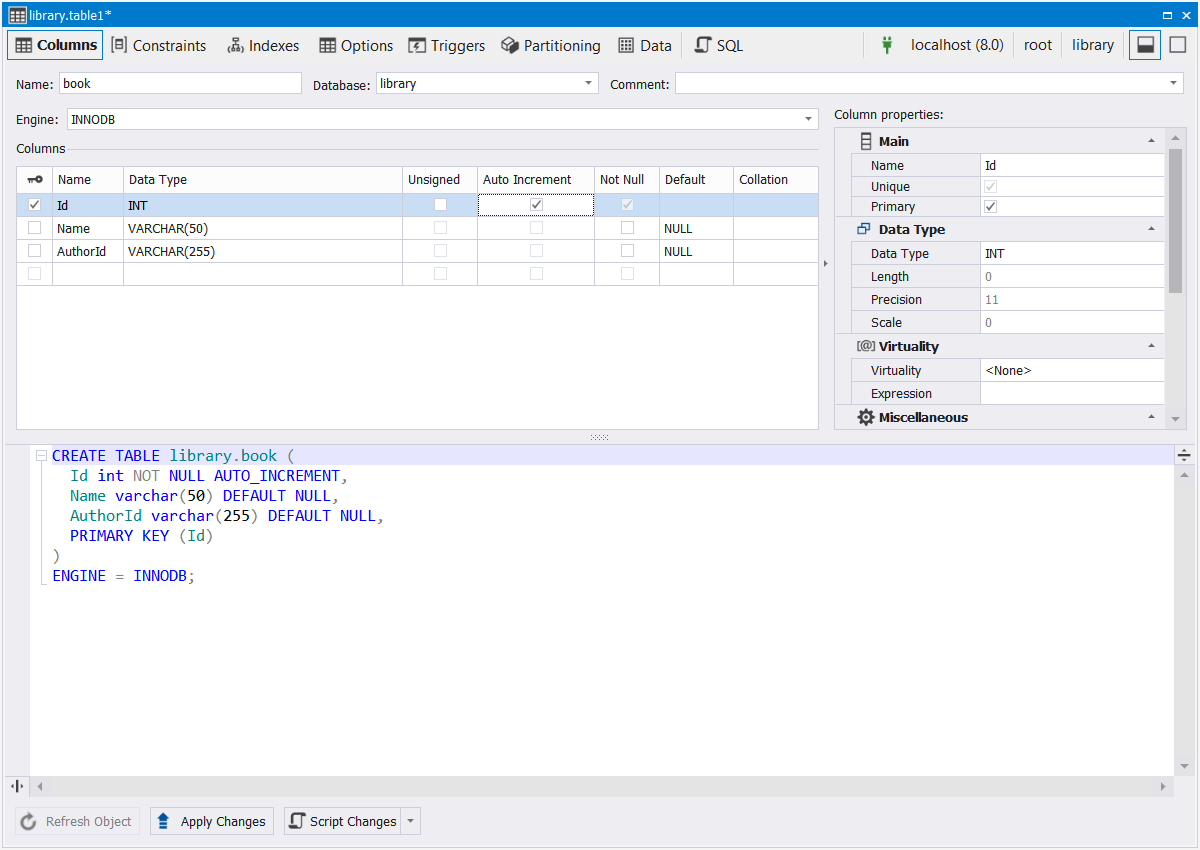
Similarly, we are creating another table book with three columns: Id, Name, and AuthorId.
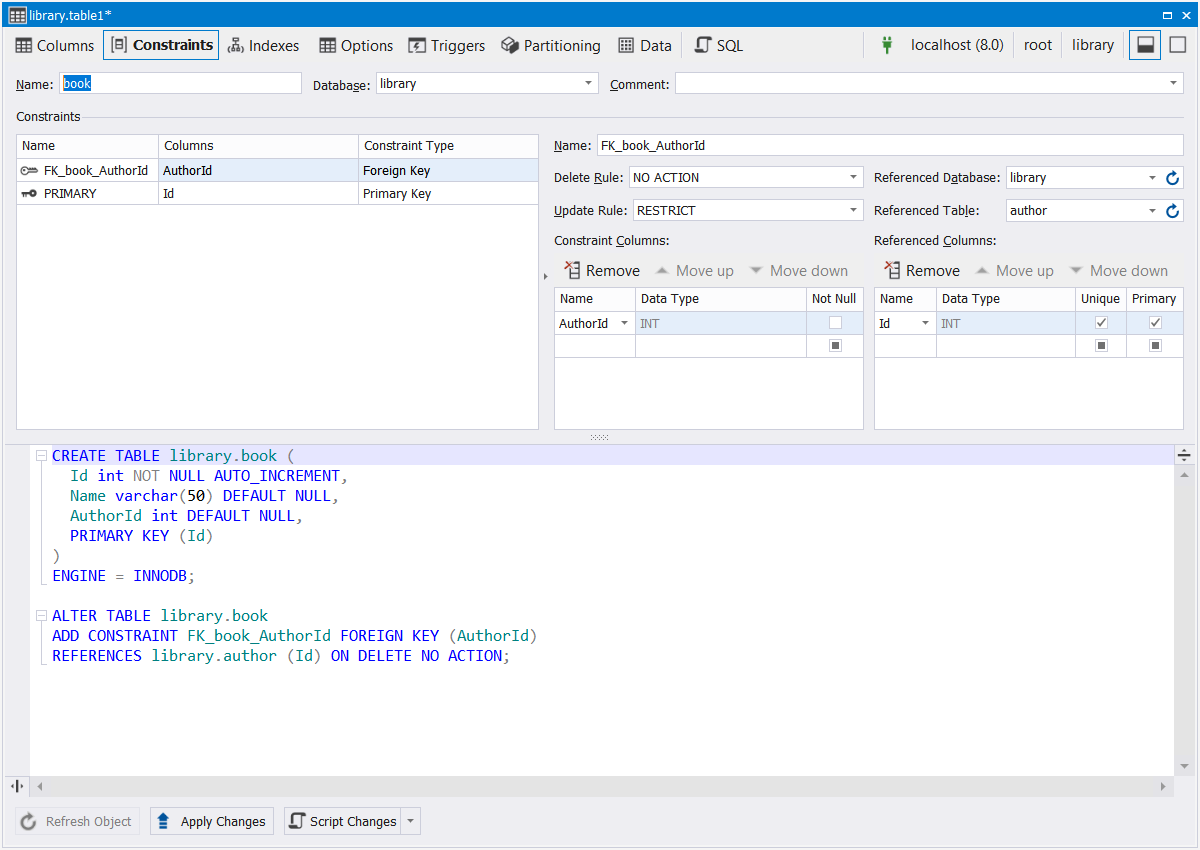
Now we want the AuthorId column of the book table to act as a foreign key column that references the Id column of the author table. To do so, we need to add the foreign key constraint to the book table.
Click the Constraints tab of the window. By default, you can see the primary key constraint. To add a new constraint, right-click on the empty space and select Add Foreign Key.
In a new window that will appear on the right, set the Referenced Table value to author. Then enter AuthorId in the list of columns on the left and enter Id on the right. A foreign key constraint FK_book_AuthorId has been added to the list of constraints.
Perform CRUD operations
CRUD (create, read, update, and delete) operations are fundamental, and you can't work with databases properly without performing them. MySQL specialists are all well aware of how to design such queries, but this task becomes much simpler if you use specialized tools.
There are two ways to perform the CRUD operations on MySQL tables with dbForge Studio for MySQL:
- Using raw SQL queries
- Using the GUI-based grid interface
Further, we'll review all operations and illustrate both methods.
Add records
To create or insert new records through SQL queries, click New SQL on the main toolbar. In the SQL Editor window that will appear, type your SQL INSERT query and click Execute (or press F5).
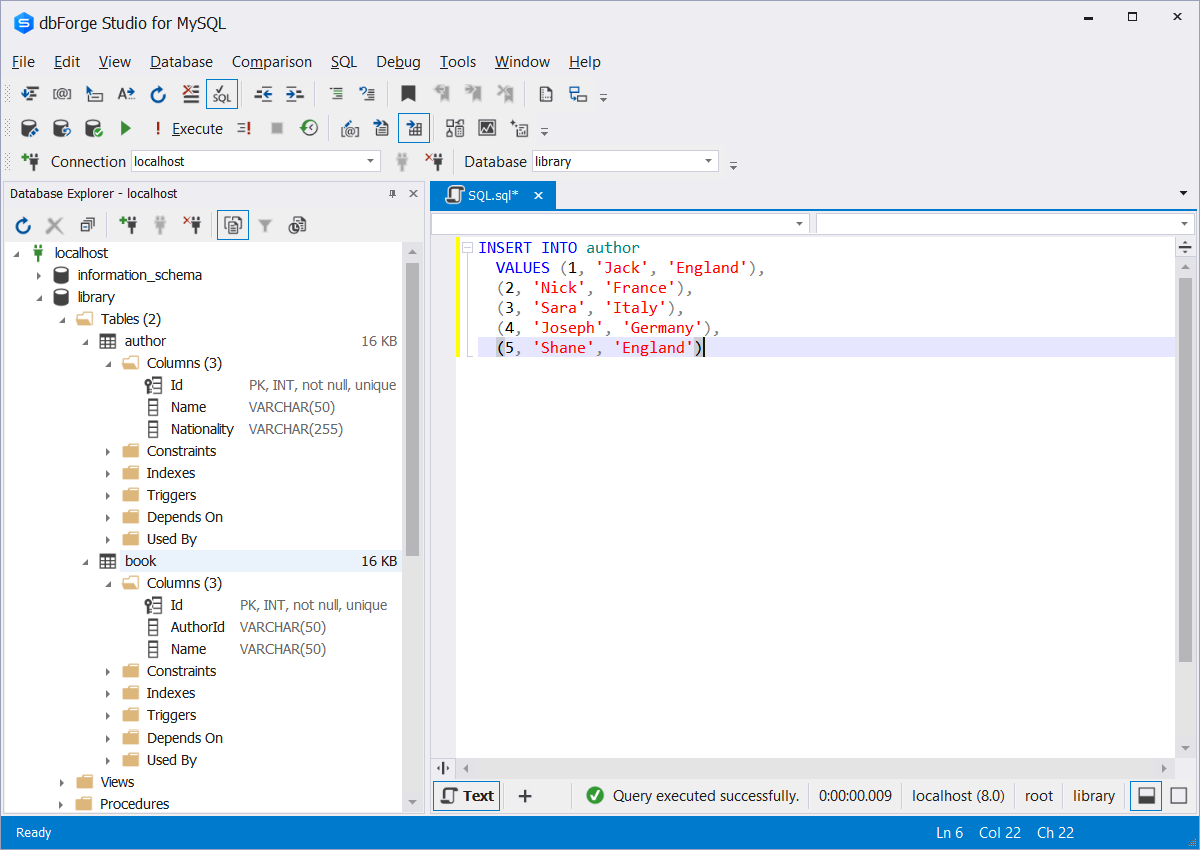
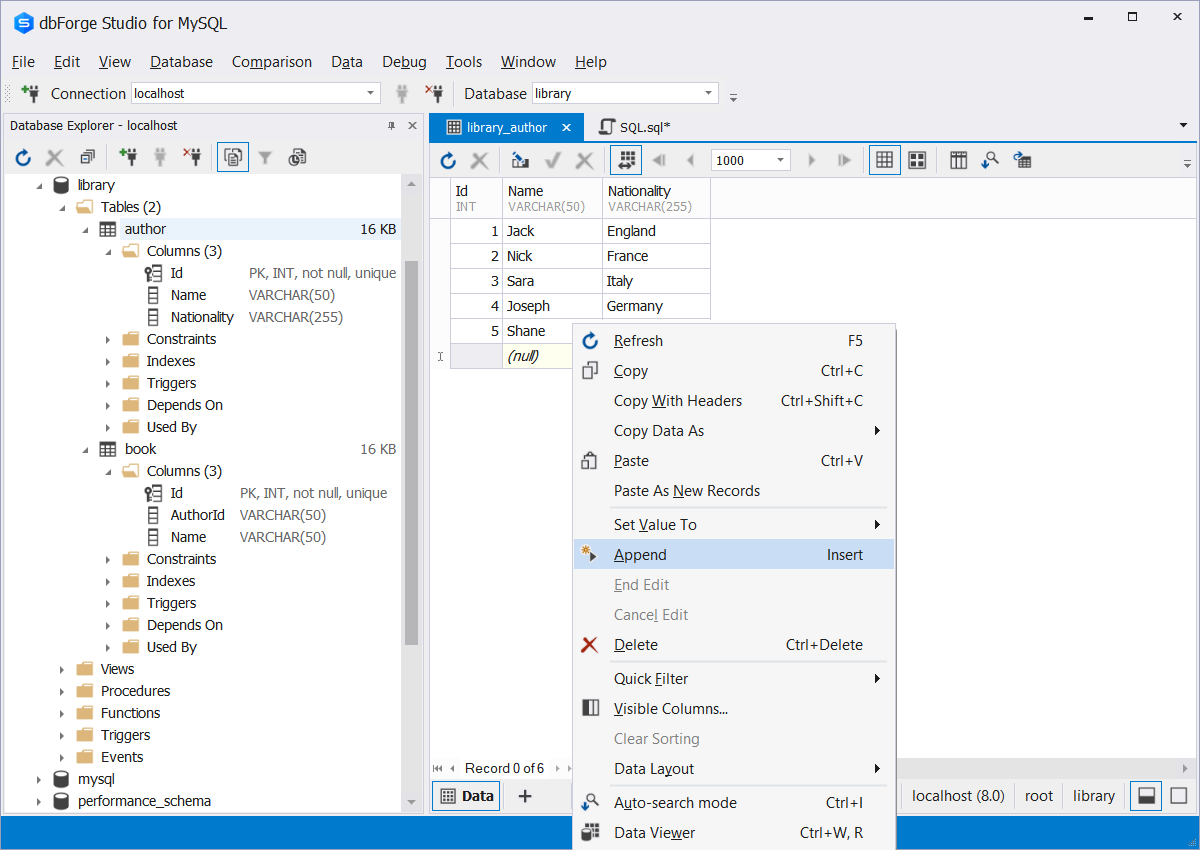
Or, you can use a different approach. Right-click the table name and select Select All Rows. This opens the window containing all records from that table. To insert new records, right-click the SQL Editor body and click Append. A new row will appear at the bottom. All you need to do is enter the values.

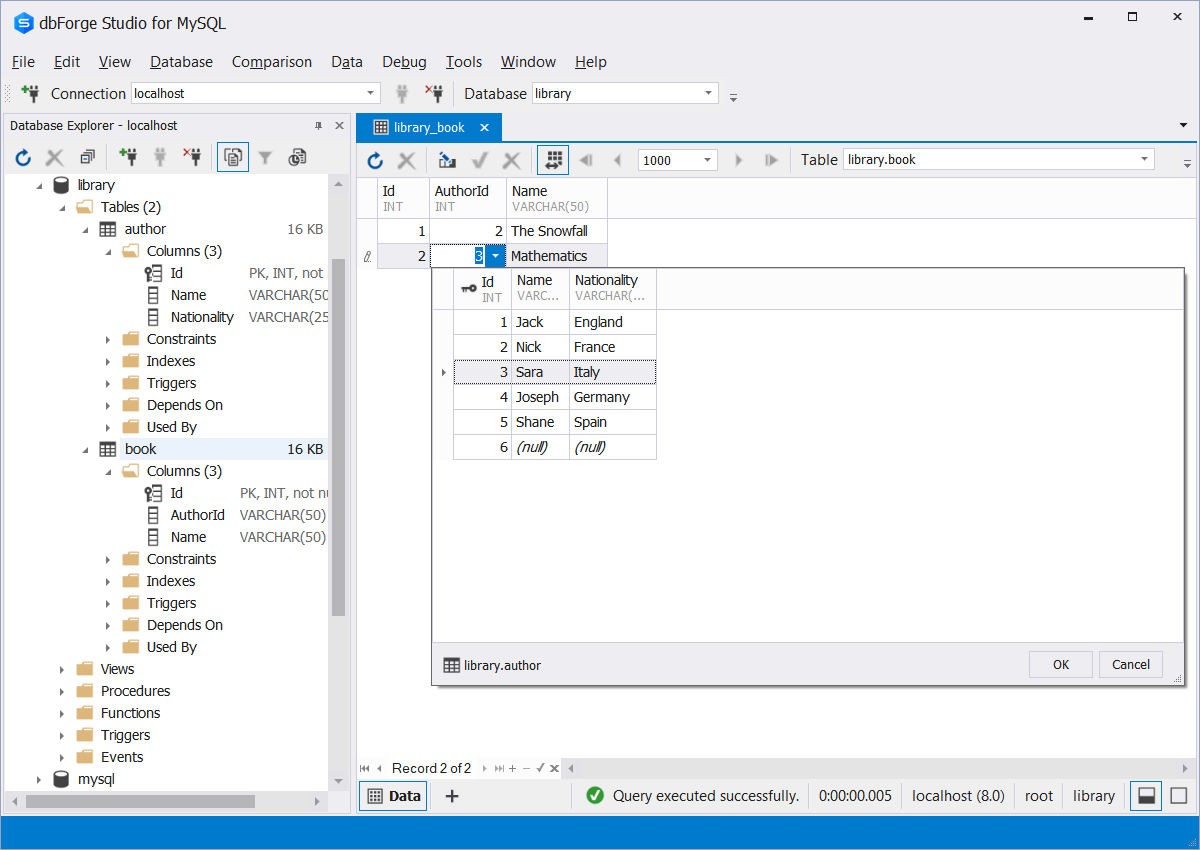
Similarly, you can add new records to the book table. The AuthorId column of the book table is a foreign key column that references the Id column of the author table. When we try to enter the value into the AuthorId field, a preview of the author table appears. There, you can select the value for the AuthorId column.
Read/Select records
To select rows from a MySQL table, you can use the same the following methods:
- Execute the SQL query
- Retrieve data visually
- Use the Query Builder functionality
You can read MySQL data in a traditional way by writing and executing query in SQL Editor. When doing that in the Studio you can benefit greatly from the advanced inbuilt features: code completion, column picker, syntax checker, etc.
To quickly retrieve all the data from a MySQL table, simply right-click the required table in Database Explorer and then select Retrieve Data.
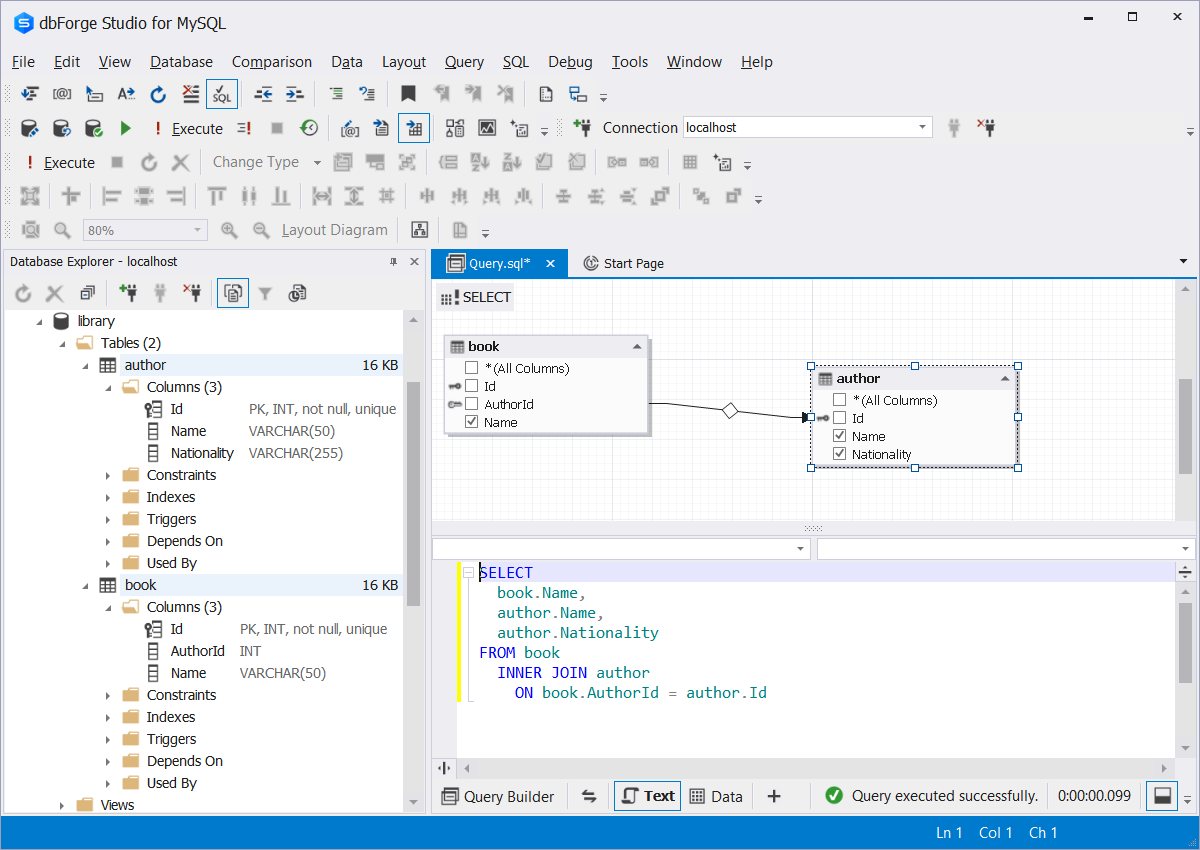
The Query Builder functionality allows for a better flexibility when selecting MySQL rows. Select and right-click the tables you want to retrieve data from in Database Explorer, then go to Send to > Query Builder. Next, on the diagram, select the columns you need to select data from and click Execute. If you switch to the Text view, you will see the auto-generated query. Note, that it contains a JOIN clause.
Update records
You can update a record in a MySQL table using the SQL query. For example:
UPDATE author a
SET Name = "Mark"
WHERE Id = 3;
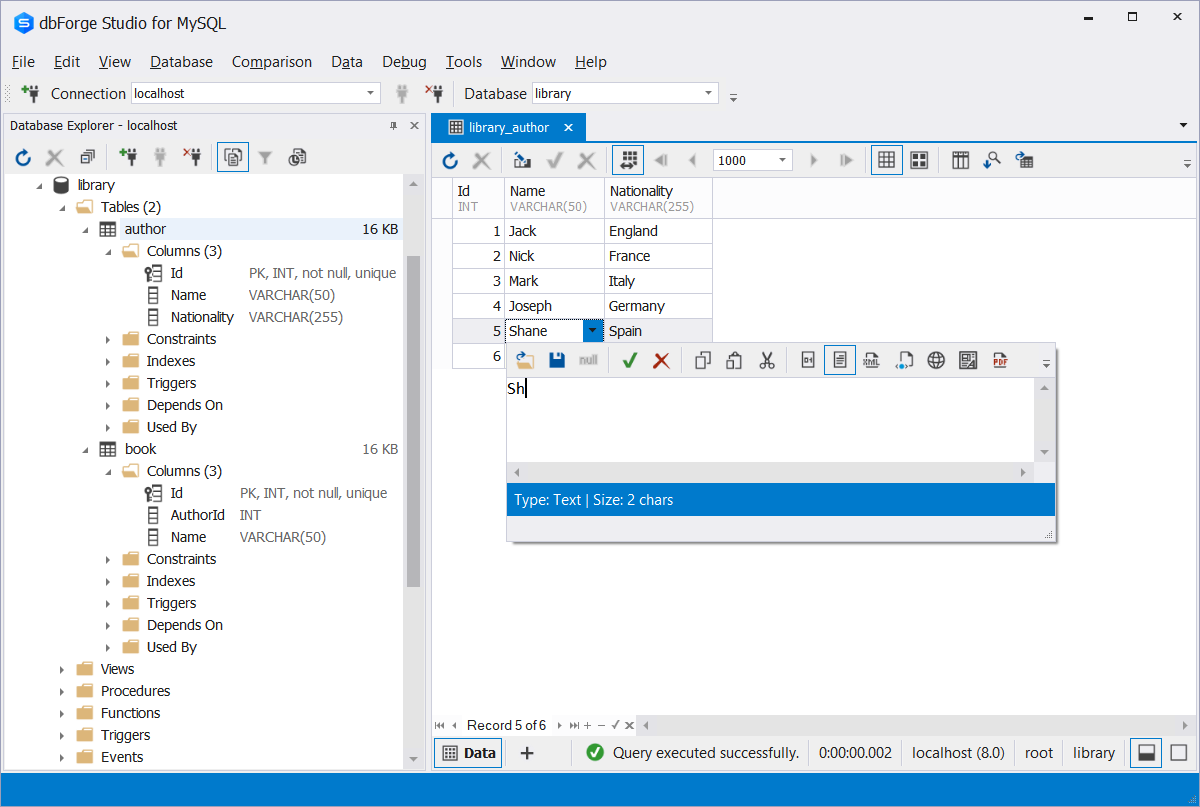
It is also possible to update records visually in the grid view. First, select records using the Select All Rows option as demonstrated in the previous sections. Then, right in the results grid you can update the record. Just make sure that the table is not in the read-only mode.
Delete records
And again, there are several ways to delete records in a MySQL table. The first, however not the easy one is to write and execute the DELETE query.
DELETE
  FROM author
WHERE Name = 'Jack';
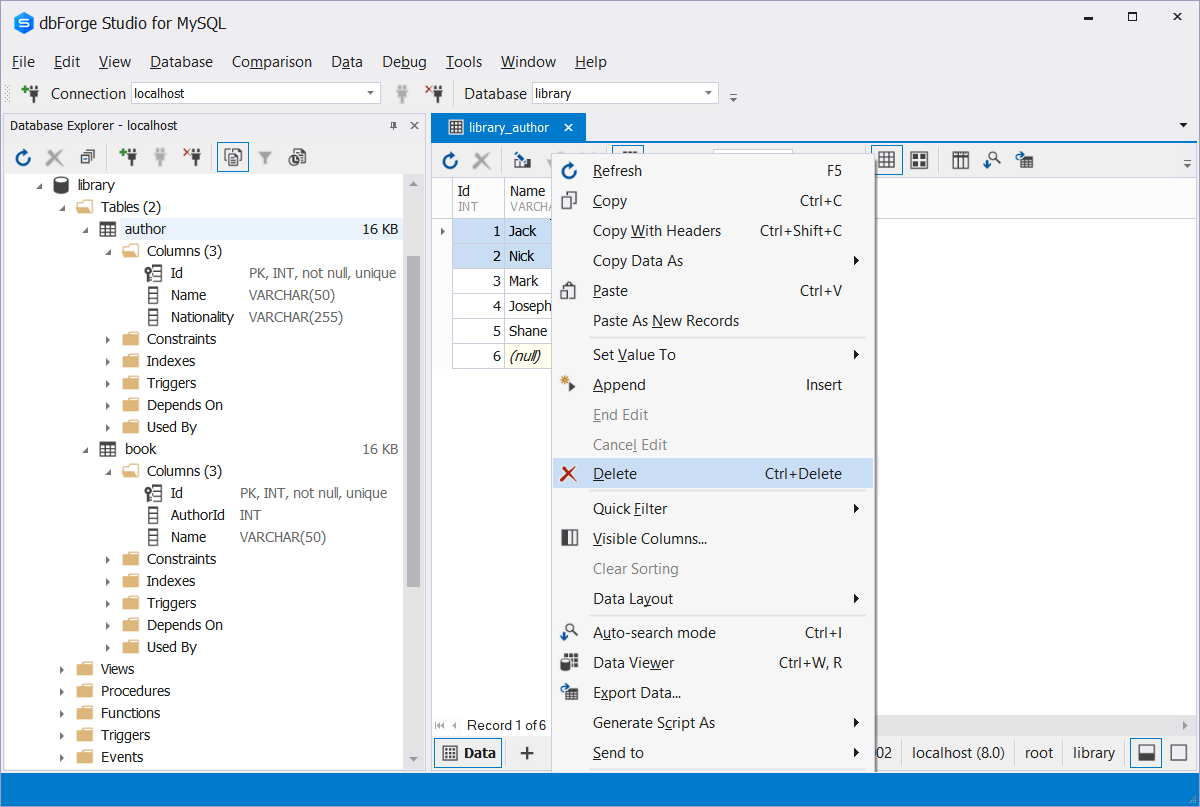
To delete records visually in dbForge Studio for MySQL, first, retrieve data. Next select and right-click the required records, then select Delete from shortcut menu that appears.
Export MySQL sample database using dbForge Studio
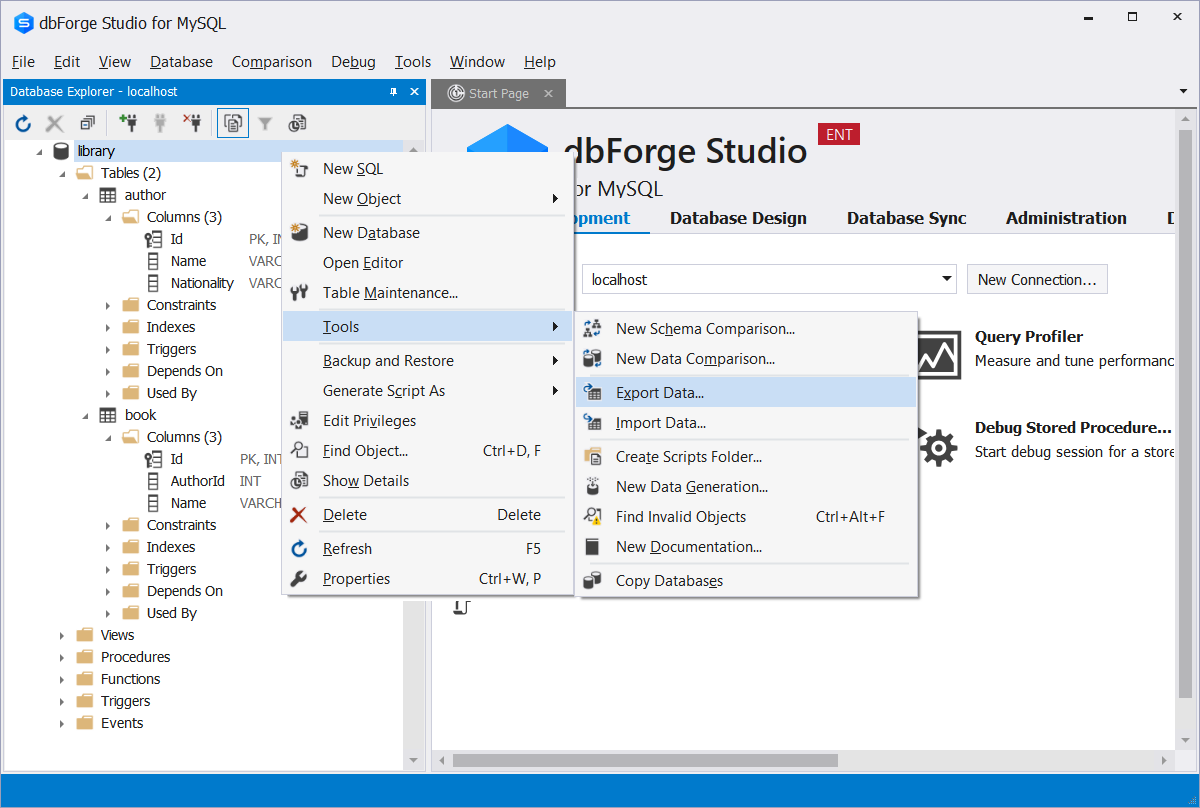
Once you have the MySQL sample database, you can download and export it to transfer it to other stakeholders. With dbForge Studio for MySQL, you can export database data into various formats. For this, right-click the database name > Tasks > Export Data.
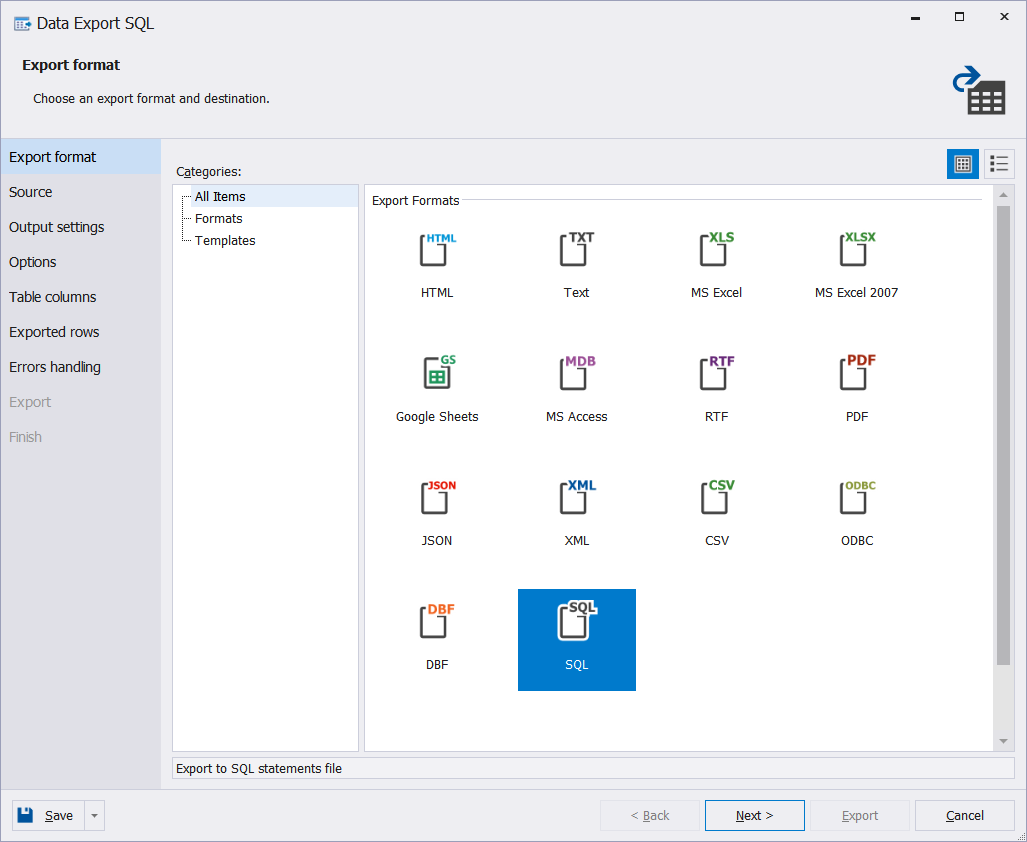
On the first page of the wizard that opens, you will see the list of supported data export formats. As an example, we select the SQL format and click Next.
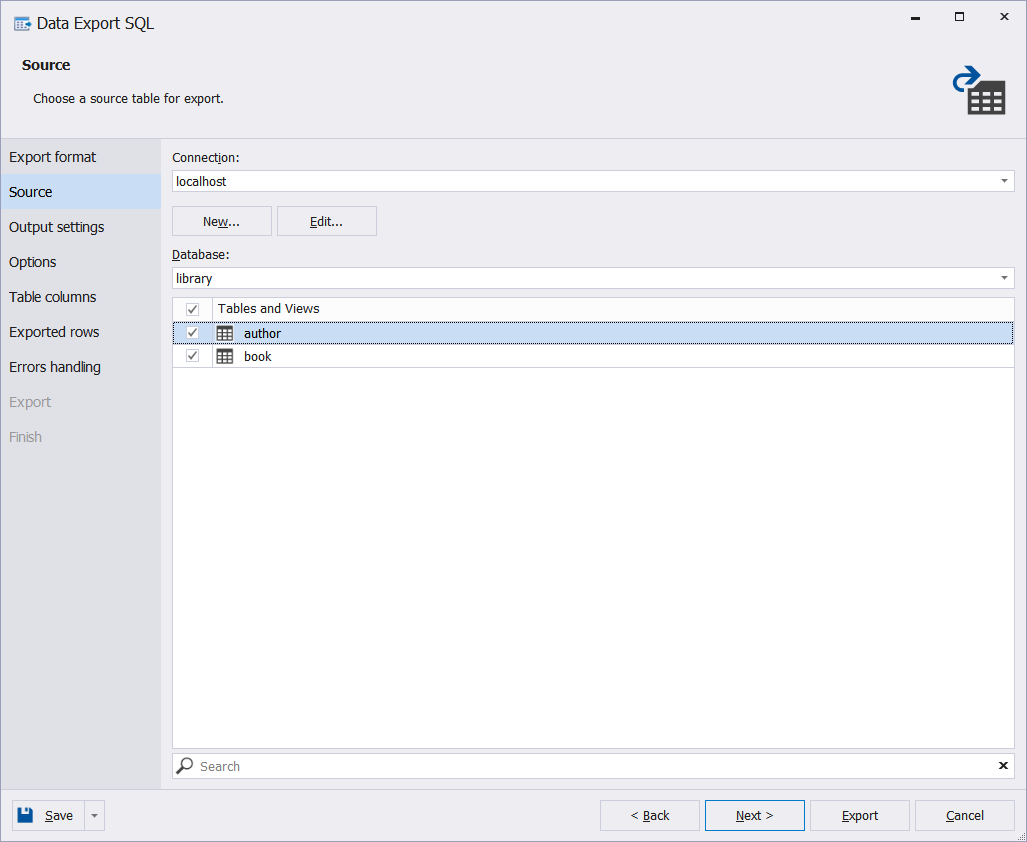
On the Source page of the Export wizard, you need to select views and tables to be exported. Let's select them all. Click Next to continue.
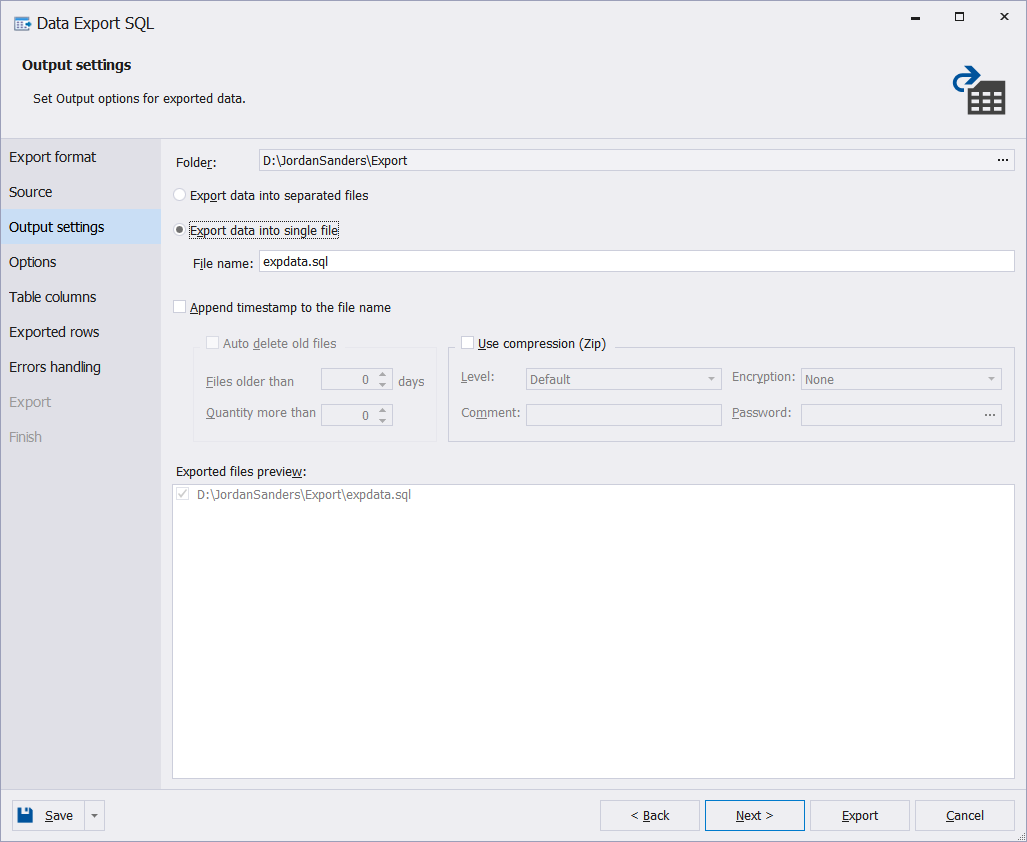
Now, you need to configure the output settings. You can select to export data as a single file or multiple files. Also, you select to zip the data and append the timestamp to the file name. Click Next to proceed.
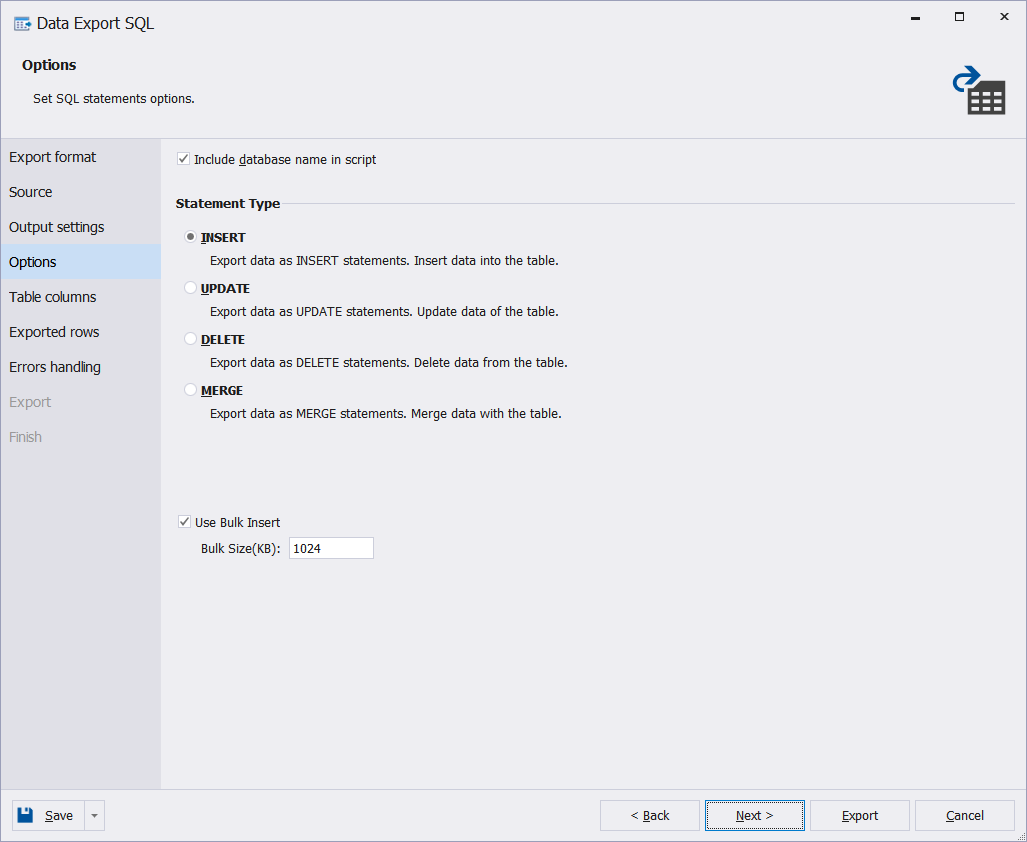
Select the SQL statements to use when exporting the MySQL sample data. The INSERT statement is selected by default. Finally, click Export.
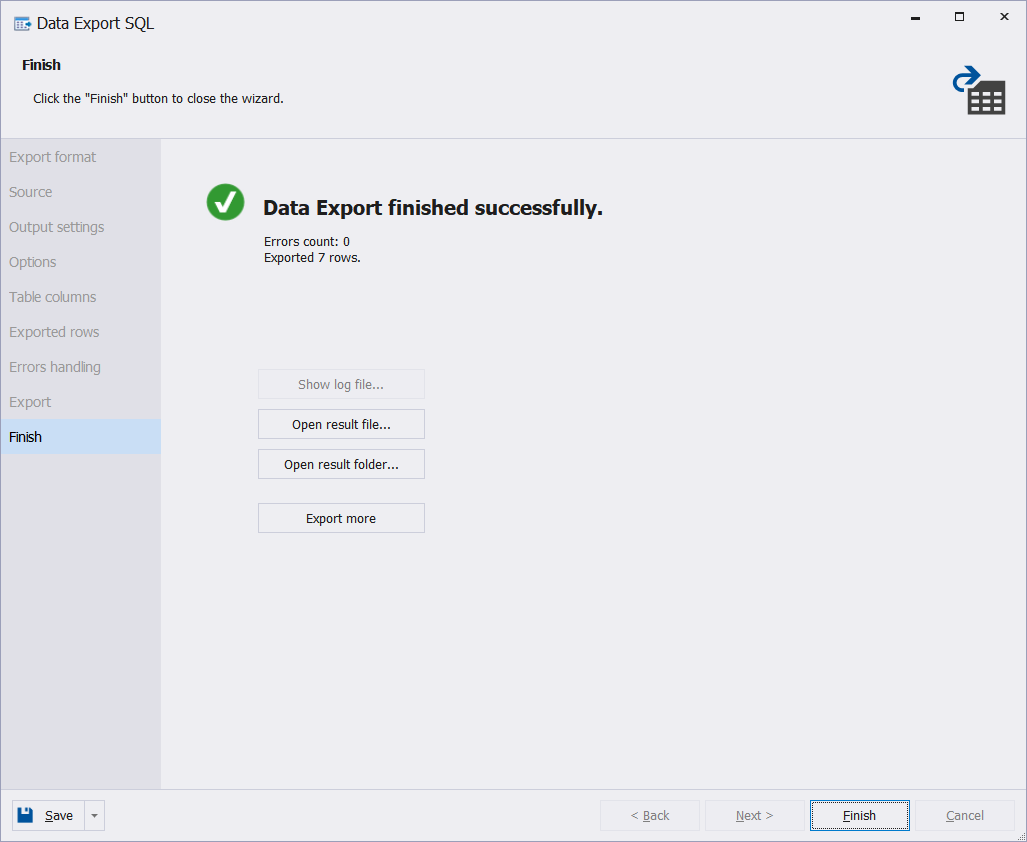
Once your data is successfully exported, you will see the confirmation screen.
Conclusion
In this article, we did our best to tell you about MySQL sample databases, what they are, and how to obtain them (as well as why you might need one). It can be a big issue for teams seeking a fully-functional test database for testing purposes. Now you know where and how to get such a database — a complete, sound, and 100% reliable.
So, grab dbForge MySQL IDE and feel free to develop any MySQL sample database query without any concerns about affecting your production data. Get your FREE 30-day fully-featured trial right now!