How to install MySQL 5.7 or 8 on Ubuntu 18.04, 20.04, 22.04
Step-by-step guide for installing MySQL Server 5.7 and 8 on Ubuntu 18.04 or later, as well as configuring, managing, and securing it using the command-line terminal or an IDE.
Choosing the right OS for your database development tasks is highly important; however, with the virtualization of operating systems
becoming more and more common, companies get more flexibility in selecting an operating system to run their database servers on. Since Linux (and Ubuntu as
part of the Linux family) play a significant role in today's business and software ecosystem, lots of enterprises are migrating their workloads there.
This guide is intended to help you install MySQL Server on Ubuntu.
About MySQL
Anyone involved in database development, analysis, or administration knows that MySQL is a key player in the market of RDBMSs. It is an open-source, multithreaded, and multi-user relational database management system developed by Oracle and based on Structured Query Language (SQL).
MySQL ranks number two in the list of most popular relational database systems, letting Oracle take the lead. However, it is an unchallenged leader among open-source RDBMS solutions. MySQL is also the most popular database used in the Linux environment.
What are the benefits of MySQL?
High performance
User-friendliness
Security and reliability
High availability and scalability
Open-source license
Quality support
About Ubuntu
Ubuntu is a free open-source Linux-based OS that belongs to the Debian family of Linux; in fact, it is the most popular Linux distro. Ubuntu is favored by developers across the world since it offers Cloud DevOps and optimized ML/AI; hence this OS is usually chosen by professionals. When it comes to database development, Ubuntu supports two popular database servers: MySQL and PostgreSQL.
Long Term Releases of Ubuntu are published biennially. Still available releases are the following: Ubuntu 14.04, 16.04, 18.04, 20.04, 22.04.
Prerequisites for installing MySQL on Ubuntu
To install MySQL on Ubuntu, you will need the following:
The Ubuntu operating system
A user account with sudo privileges
A stable network connection
Access to the terminal
How to Install MySQL 5.7 on Ubuntu 18.04, 20.04, or later
Let’s look at how to install MySQL 5.7 on Ubuntu 20.04 LTS using the command line. The installation guide for MySQL 8.0 will be provided below.
1 - Download and install MySQL server and client
Since Ubuntu 20.04 used in this guide only has MySQL 8.0 in the APT repository, we need to add MySQL 5.7 repository first before installing it.
Step 1: Add the MySQL 5.7 APT Repository
1.1 Download the MySQL repository by executing the following command:
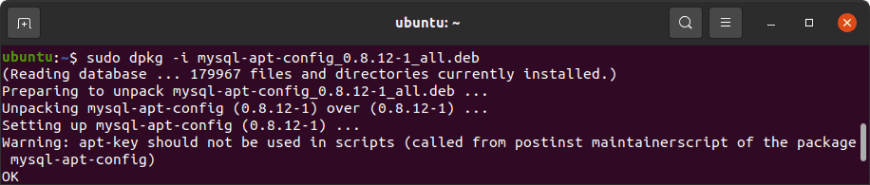
1.2 After the MySQL package has been successfully downloaded, install it:
sudo dpkg -i mysql-apt-config_0.8.12-1_all.deb
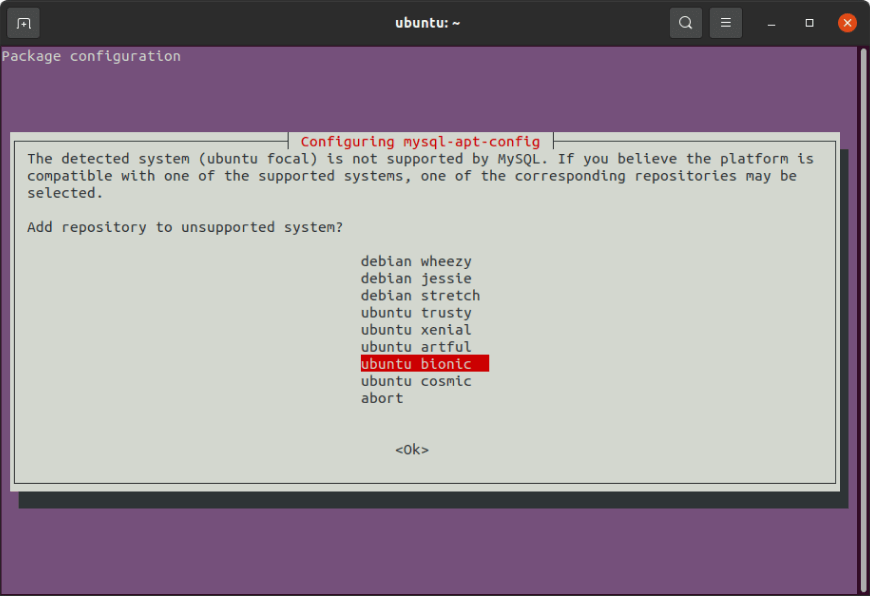
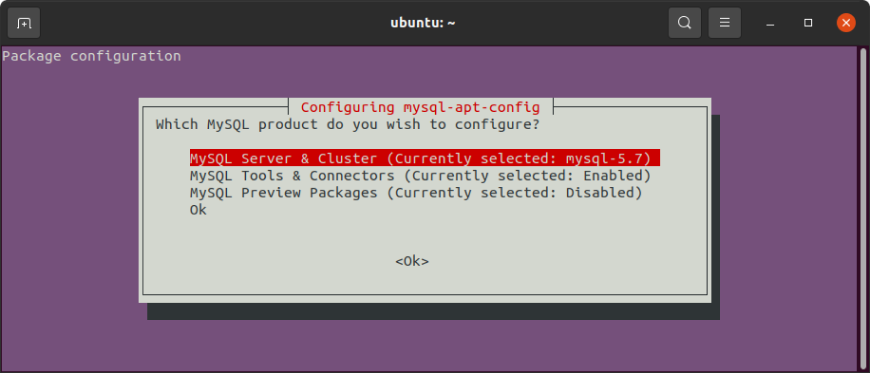
1.3 Next, select Ubuntu Bionic.
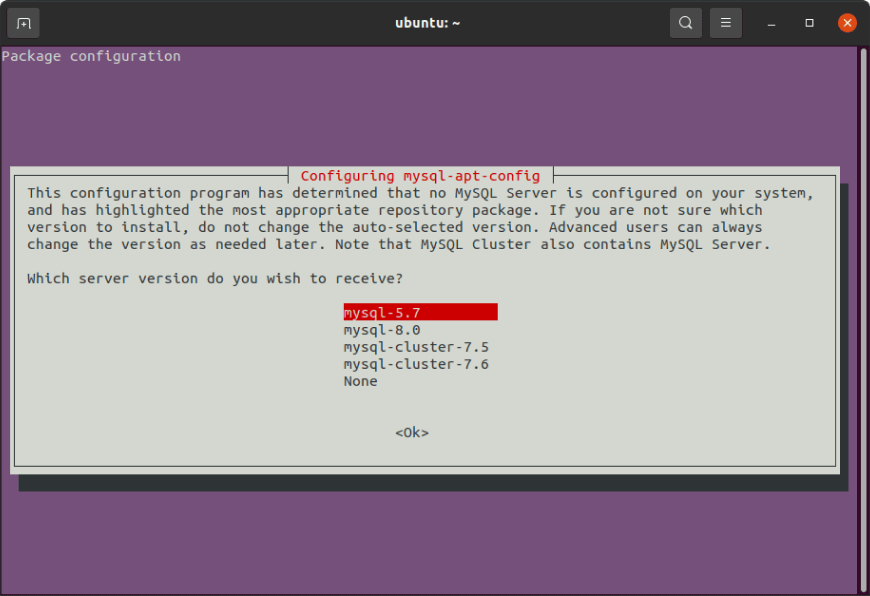
After that, select the MySQL Server & Cluster option. Then, select mysql-5.7 and finally select Ok.
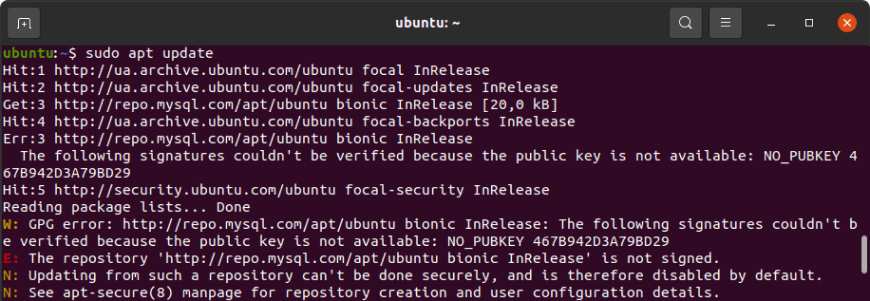
1.4 Next, update the APT repository:
sudo apt update
Note
If you encounter the "signature couldn't be verified" error like this one: NO_PUBKEY 467B942D3A79BD29, you will need to import the missing gpg key by running the following command:
2.2 Press Y to begin the installation and set the root password when asked.
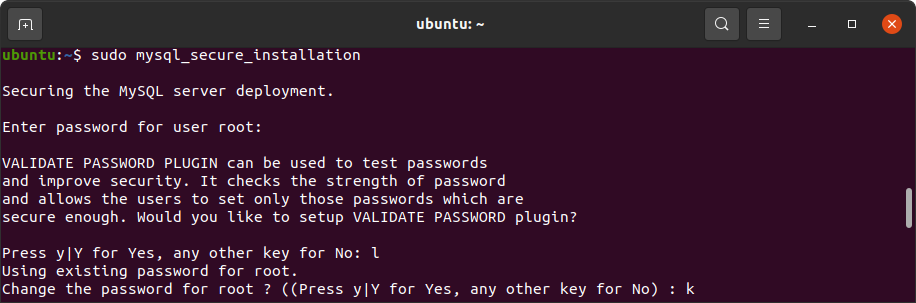
2 - Secure your MySQL root user account
Before starting to use MySQL 5.7, you need to secure it first. For this, use the command:
sudo mysql_secure_installation
Provide a password when asked, and then answer the security questions.
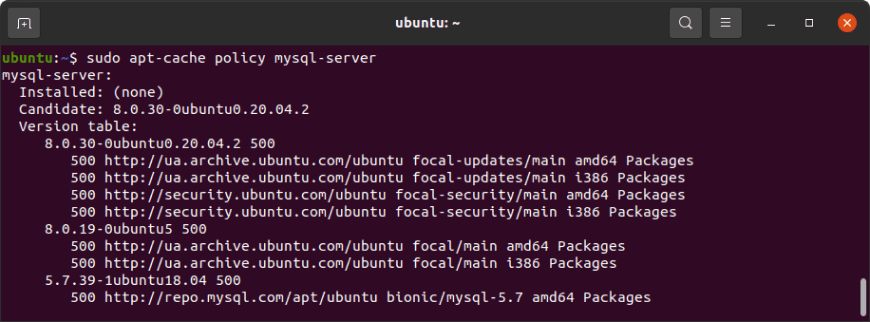
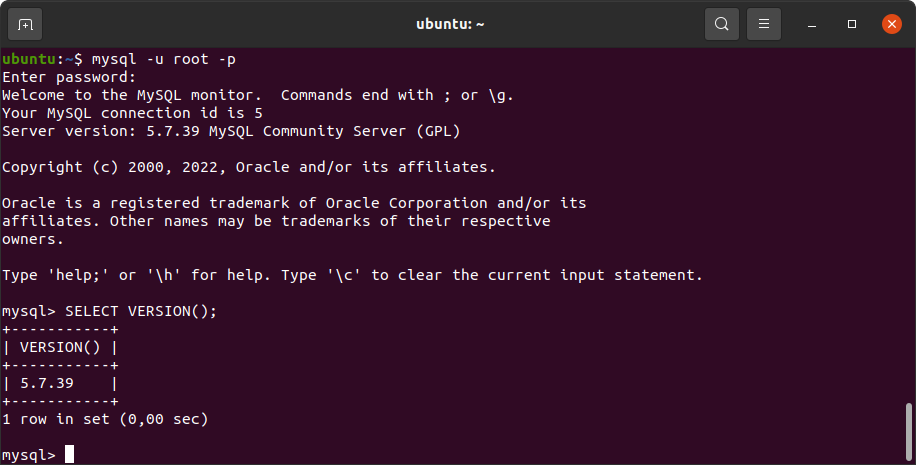
3 – Check the MySQL version
Want to make sure that you have installed everything correctly? You can do that by checking your current MySQL version. First, you need to log in to MySQL using the root password you have set earlier.
mysql -u root -p
After that, execute the following command:
SELECT VERSION();
You should see your installed MySQL version.
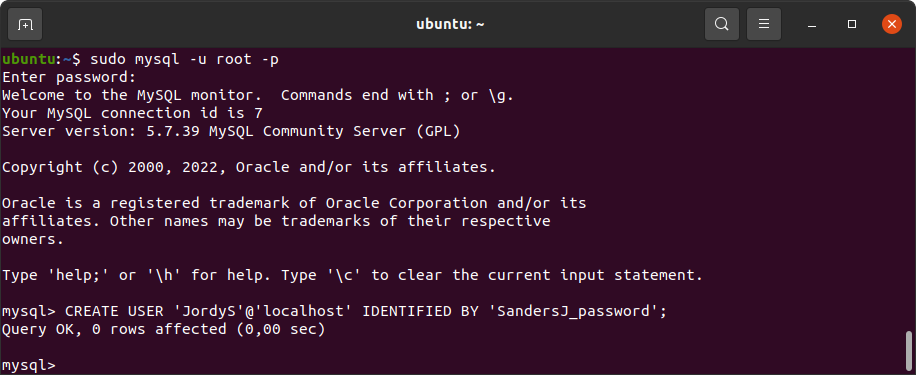
4 - Add MySQL user and set privileges
To create a new MySQL user account on Ubuntu, use the following command:
CREATE USER 'username'@'localhost' IDENTIFIED BY 'user_password';
Note
To allow a user remote access to MySQL on Ubuntu, we recommend creating a user with access from a specific IP address ('username'@'192.168.1.100') or from any host ('username'@'%').
Now that we have created a new account, we can grant privileges to it. Suppose, we want to give the user the privilege to create and select database objects. For this, we run:
GRANT CREATE, SELECT ON *.* TO 'username'@'localhost';
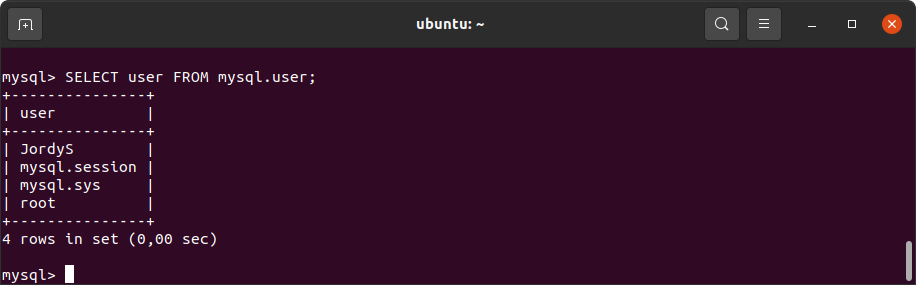
If you want to get the list of all the users in MySQL, execute the following command:
SELECT user FROM mysql.user;
As you can see, we have been successful in the endeavor of creating a new user.
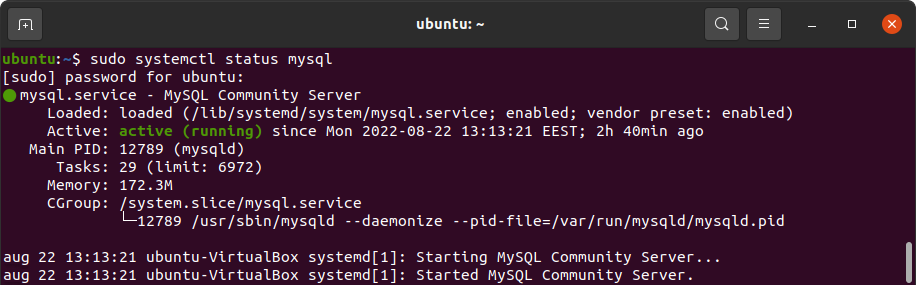
5 - Test MySQL 5.7
After installation, MySQL server starts running automatically. However, if you need to verify that, execute the command:
sudo systemctl status mysql
The output should show that the service is active.
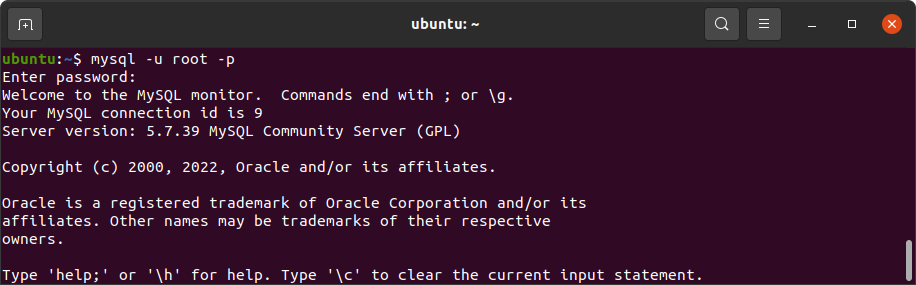
6 – Log in to your MySQL server
And in the end, you need to log in to MySQL. For this, simply execute:
mysql -u root –p
Now you are ready to work with MySQL 5.7 on Ubuntu. You can create databases, fill in them with data, execute queries, and much, much more. Good luck!
How to Install MySQL 8 on Ubuntu 20.04, 22.04, or later
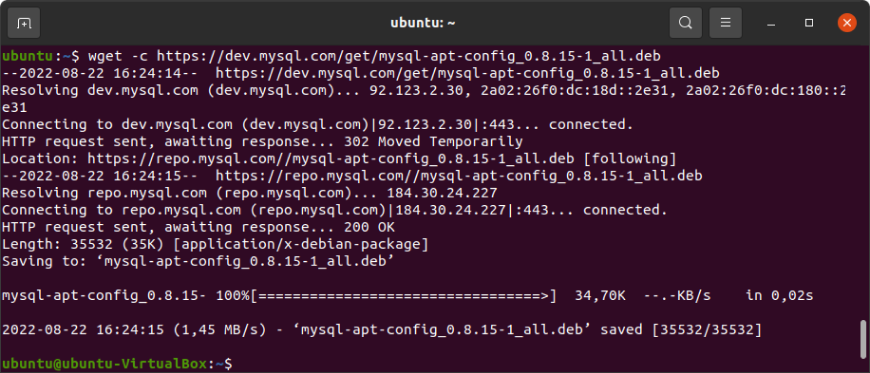
1 - Download and install MySQL 8.0 APT Repository
First of all, you need to download the latest release package using the wget command:
Next, you need to install the MySQL package. For this, execute the command below:
sudo dpkg -i mysql-apt-config_0.8.15-1_all.deb
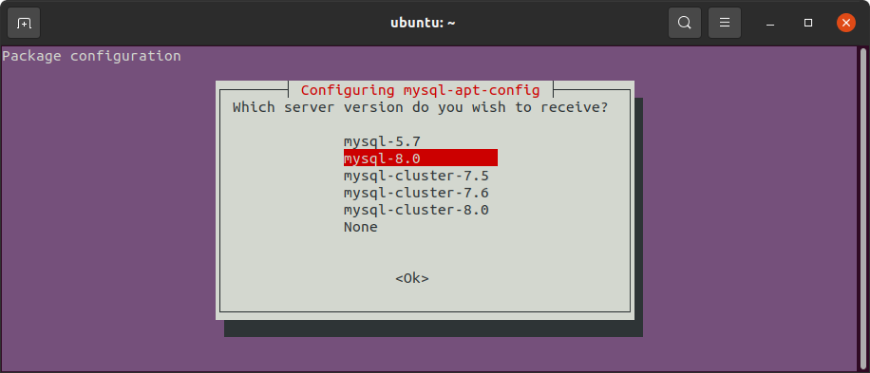
In the Package configuration window that appears, select the first option and then select OK.
In the next window, select mysql - 8.0 and hit Enter to continue.
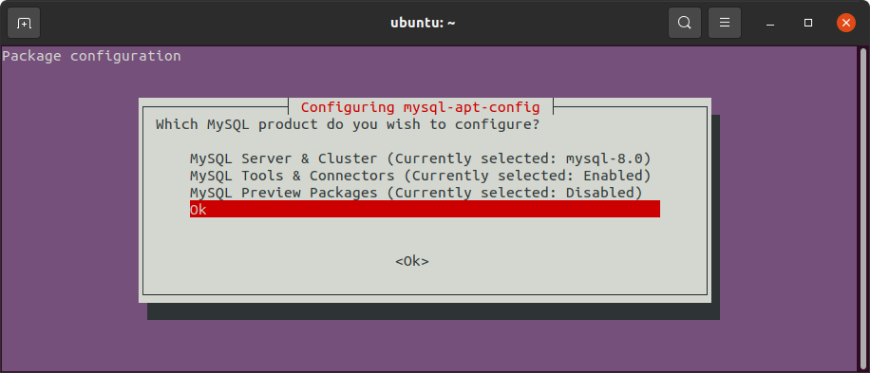
And finally, select the last option and press Enter to proceed:
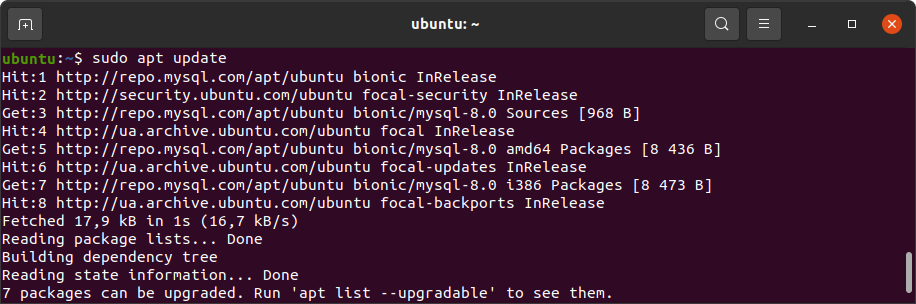
Next, update the APT repository:
sudo apt update
2 - Install MySQL 8.0
Now, you need to run the below command to install MySQL server and client. Press Y to begin the installation, then insert a password for the root user when asked.
In the next windows, provide a password for the root user, read the information about the authentication system based on SHA256-based password methods, and choose the authentication plugin. The installation will proceed, and MySQL 8.0 will be installed in your system.
3 - Check MySQL version
To make sure, that the installation has been successful, run the following command:
mysql –V
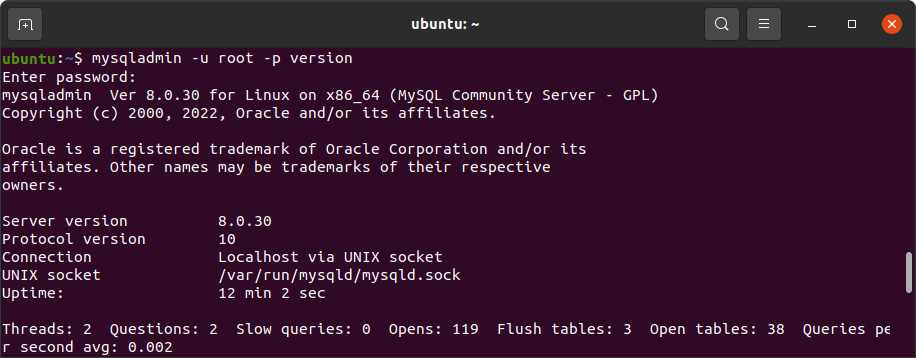
If you need more information about your MySQL server, run:
mysqladmin -u root -p version
4 - Create a MySQL user
To create a new MySQL user account on Ubuntu, execute the following command:
CREATE USER 'username'@'localhost' IDENTIFIED BY 'user_password';
Note
To allow a user remote access to MySQL on Ubuntu, we recommend creating a user with access from any host ('username'@'%') or from a specific IP address ('username'@'192.168.1.100').
How to update MySQL on Ubuntu
To update MySQL on Ubuntu, run the following command:
sudo apt update
After the update is completed, run the upgrade command to install the updates for each outdated package and dependency on your system.
sudo apt upgrade
Now you are ready to work with MySQL 8.0 on Ubuntu. You can design databases, fill in them with data, run queries, and much, much more. There are several ways to manage databases that reside on MySQL server run on Ubuntu: from the command line, via a specialized IDE (for example, dbForge Studio for MySQL installed via CrossOver, or remotely from the IDE on Windows (like the abovementioned Studio). Good luck!
Manage MySQL using a client or an IDE
To manage your MySQL server and databases that reside on it, you can, by all means, use the built-in MySQL command-line client. It has always been a hot
topic discussion whether it is better to handle databases in specialized IDEs or by using the command line. Every developer has their preferences.
However, it is an undeniable fact – the bigger your workloads are, the more difficult it becomes to manage them from the command line.
One of the best IDEs for managing, developing, and administering MySQL and MariaDB databases today is dbForge Studio for MySQL. The solution is designed
to cover every possible routine database-related task.
With dbForge Studio for MySQL Studio, you can:
dbForge Studio for MySQL is a classic Windows application. However, you can always connect to a MySQL server run on any OS, including Ubuntu. When connecting to a remote MySQL server, make sure that the user under which you’re logging in, has the rights to access the server remotely. You can also install and run dbForge Studio for MySQL on Ubuntu via CrossOver, a commercial compatibility solution that allows running Windows applications on macOS and Linux. To learn how to install dbForge Studio on Linux via CrossOver, refer to our product documentation.
Need a reliable solution to manage your MySQL databases?
Get the most advanced IDE on the market - dbForge Studio for MySQL
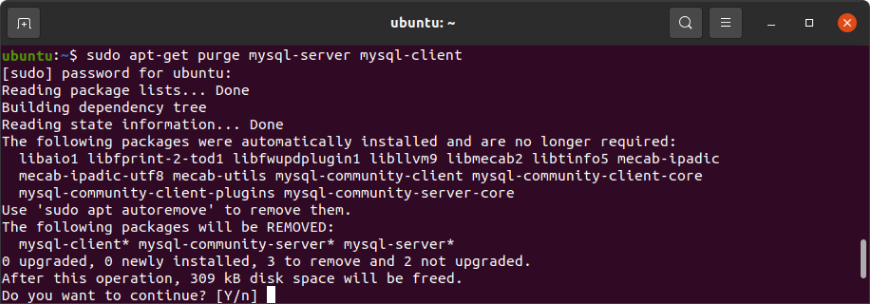
To remove MySQL from Ubuntu 20.04, first, you need to stop your MySQL server. For this, run the following command and provide a password for Ubuntu when asked:
sudo service mysql stop
Then, run the below command to uninstall your MySQL server and agree to remove MySQL packages:
sudo apt-get purge mysql-server mysql-client
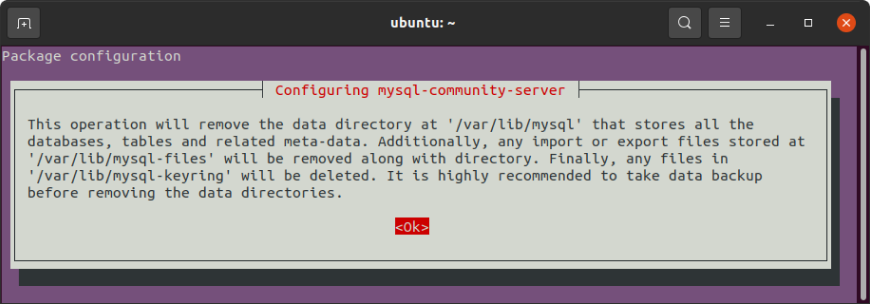
In the window that appears, hit Enter:
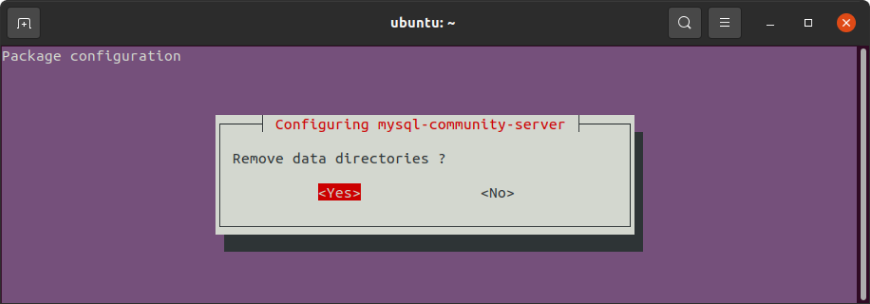
In the next window, select Yes and again press Enter:
Finally, execute the following commands:
sudo apt-get autoremove
sudo apt-get autoclean
We use cookies to provide you with a better experience on the Devart website. You can read more about our use of cookies in our Cookies Policy.
Click OK to continue browsing the Devart site. Be aware you can disable cookies at any time.